To grow plant species X successfully, you first need to confirm exactly which plant you're dealing with, then match its care to your real environment: the right light, the right growing medium, and a watering and feeding routine you can actually stick to. This guide walks you through every step, from ID to ongoing maintenance, whether you're growing in a pot on a windowsill, a hydroponic setup, or a terrarium.
How to Grow Plant Species X: Step-by-Step Care Guide

Marcus Holloway
30 Apr 2026
Start here: identify your plant species X correctly
Before you can give a plant what it needs, you need to know exactly what it is. "Species X" is a placeholder, and getting the care wrong because you misidentified the plant is one of the most common reasons things go sideways early. With a confirmed species in hand, you can use the right approach to grow plant species y successfully in your home or garden. A quick phone photo and a Google search often isn't enough, especially if your plant looks like several other species.
The two most reliable free tools right now are iNaturalist and Pl@ntNet. Both are photo-driven, but they work best when you give them good material to work with. A single blurry shot of the whole plant will get you a rough guess at best. To get a species-level identification you can trust, take multiple photos covering different diagnostic features.
For iNaturalist, the computer vision model is trained on the typical iNaturalist photo style for each species, so poor lighting, blur, or missing plant parts genuinely reduces the accuracy of suggestions. For Pl@ntNet, the AI extracts visual features like leaf shape, flower color, and stem texture, then cross-references a large taxonomic database. Both tools improve significantly when you give them more to work with.
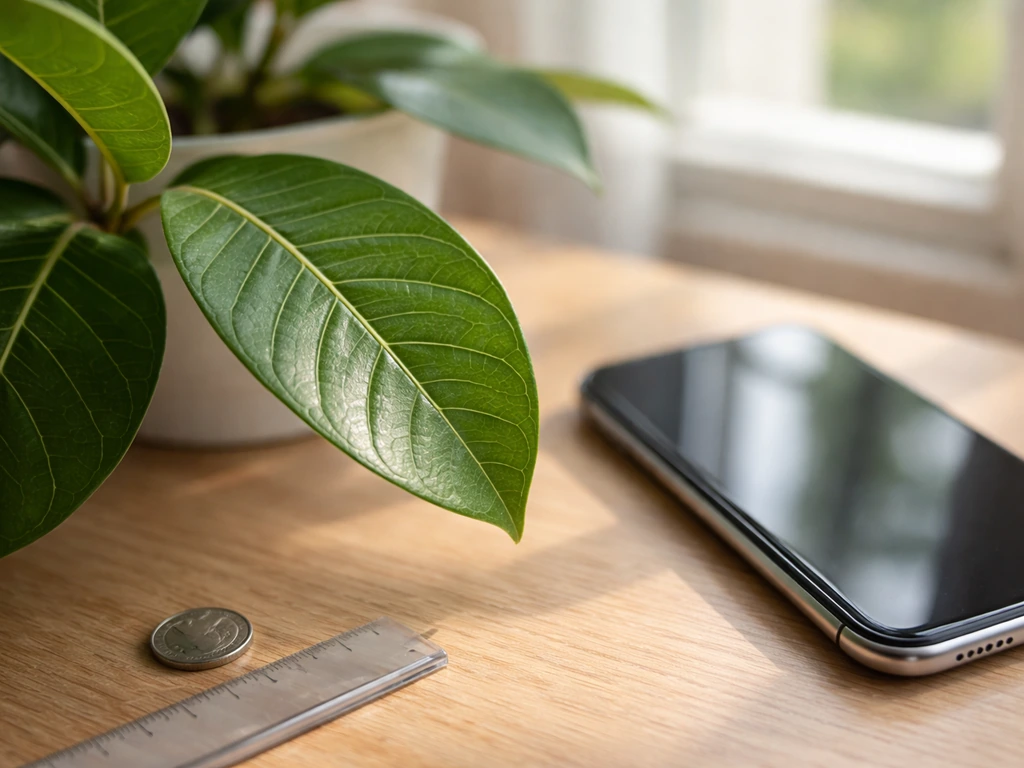
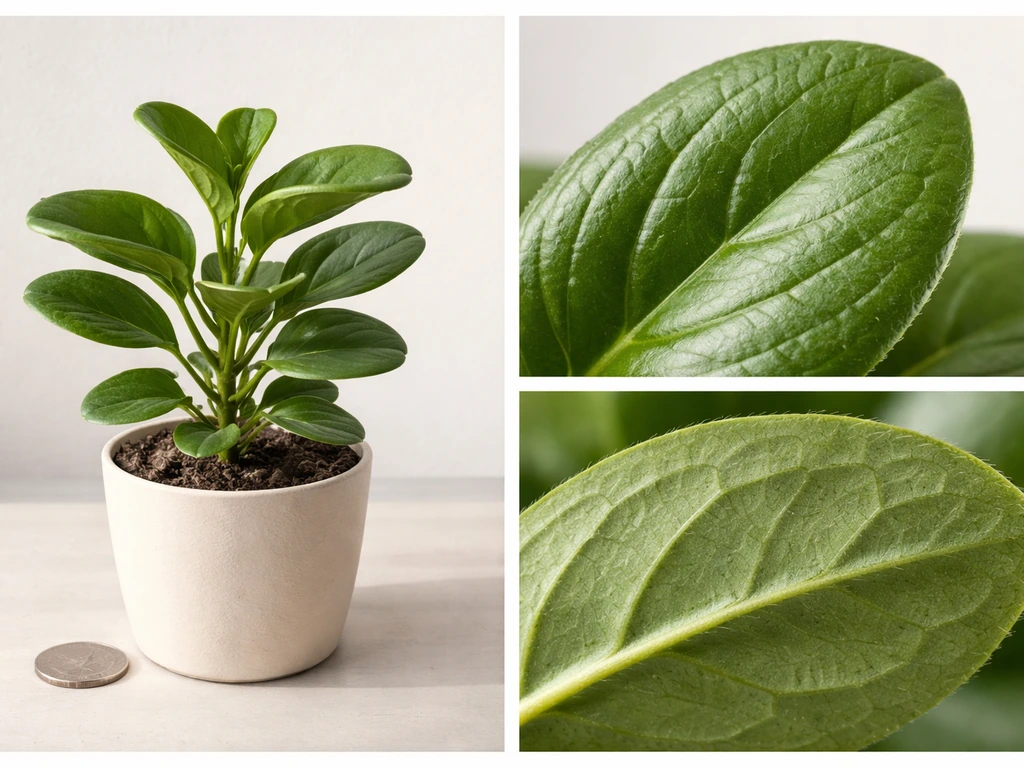
Photos that actually get you a good ID
- Whole plant shot with something nearby for scale (a coin, a ruler, your hand)
- Close-up of the upper leaf surface, showing shape and edge detail
- Close-up of the lower leaf surface, which often has diagnostic textures or colors
- Where the leaf attaches to the stem (this reveals leaf arrangement, which is a key ID feature)
- Flowers if present, including a close-up of the center showing pistil and stamen
- Stem texture and color
Once you upload to Pl@ntNet, use the species sheets to compare characteristics and refine the match rather than just accepting the first suggestion. On iNaturalist, community members can confirm or correct your ID, and observations move toward "Research Grade" status as the community reaches consensus. If you have a cultivar rather than a straight species, note that iNaturalist handles cultivar naming through comments rather than as a formal taxonomic entry, so you may need to do a bit of extra research to pin down the exact variety.
Translate the ID into care requirements
Once you have a confirmed species name, look up its native habitat. A plant from a humid tropical forest floor wants something very different from one native to a Mediterranean hillside. The native habitat is your shortcut to understanding light, water, humidity, and temperature needs without having to memorize a long list of rules. Think of it as the plant telling you where it feels at home.
Check the plant's hardiness rating while you're at it. The USDA Plant Hardiness Zone Map divides North America into zones based on the average annual extreme minimum winter temperature, using 10°F zones (Zone 1 through Zone 13) with 5°F half-zone subdivisions. If you're in the UK or Europe, the RHS uses a nine-category system (H1a through H7) with defined temperature ranges for each band. Matching your plant's rated hardiness to your local zone tells you immediately whether it can live outdoors year-round or needs to come inside for winter.
Light, temperature, and humidity: getting the environment right

Light is the single biggest variable most indoor growers get wrong, and it's usually not enough rather than too much. A plant sitting three feet back from a window is getting a fraction of the light you'd guess. As a rough rule: bright indirect light sits within one to two feet of an east or west-facing window, or slightly back from a south-facing one. Low light means more than six feet from a window or in a north-facing room. Direct sun through glass can scorch some species but is exactly what others need.
Temperature swings matter more than most people realize. Most common houseplants and container plants are comfortable between 60°F and 80°F (15°C to 27°C), but night temperatures dropping below 50°F (10°C) stress tropical species significantly. Keep plants away from cold drafts near windows in winter and away from heating vents that blast dry hot air. Both create stress that shows up as yellowing, dropped leaves, or stunted growth.
Humidity is the care factor that's easiest to overlook because you can't see it. Tropical species often want 50% to 70% relative humidity indoors, while the average home runs 30% to 50%, and heated winter air can drop even lower. Simple fixes include grouping plants together (they create a small humidity microclimate), placing pots on a tray of wet pebbles, or using a small humidifier nearby. Misting works short-term but dries out quickly and can promote fungal issues if leaves stay wet overnight.
Using grow lights when natural light falls short
If your space doesn't get enough natural light, a full-spectrum LED grow light is worth the investment. Position it 12 to 24 inches above the plant canopy and run it for 12 to 16 hours per day on a timer. Modern LEDs are energy-efficient and don't generate the heat that older fluorescent or HID setups did, so they're a realistic option even in a small apartment. Watch for signs the light is too close (pale, bleached patches on leaves) or too far (stretched, leggy stems reaching toward the source).
Which growing medium actually suits your plant (and your setup)
The medium you choose affects everything downstream: how often you water, how you fertilize, and how fast the plant grows. There's no single best option; the right choice depends on the plant's natural habitat, your watering habits, and your goals.
| Medium | Best for | Key advantage | Main watch-out |
|---|---|---|---|
| Standard potting soil | Most houseplants, vegetables, herbs | Forgiving, widely available, holds moisture and nutrients | Can compact over time, risk of overwatering |
| Soilless mix (peat/coco coir + perlite) | Plants needing sharp drainage, seedlings, cuttings | Better aeration, reduced disease risk, lightweight | Dries faster, requires more consistent feeding |
| Water/semi-hydro (passive hydroponics) | Aroids, pothos, some herbs | Eliminates overwatering risk, easy to manage | Needs transition period from soil, fewer species options |
| Active hydroponics (DWC, NFT, etc.) | Fast-growing vegetables, herbs, advanced growers | Fastest growth, precise nutrient control | Higher setup cost, requires monitoring pH and EC |
| Terrarium substrate | Moisture-loving tropicals, ferns, mosses | Maintains stable humidity, great for small species | Limited to small plants, closed terrariums need balance |
For most beginners, a quality soilless potting mix with added perlite (roughly a 3:1 ratio of mix to perlite) gives good drainage while still holding enough moisture to be forgiving. If your plant species naturally grows in wet conditions or you know you tend to underwater, a heavier moisture-retaining mix makes more sense. If you tend to overwater (most people do), lean toward more perlite or consider a semi-hydro setup.
Switching mediums mid-growth is possible but requires a transition period. Moving a soil-grown plant to water or hydroponics means gently washing all soil from the roots and giving the plant a week or two to adapt before expecting strong new growth. Going the other direction (water to soil) is similar: pot up into a moist but not soggy mix and keep humidity high while the roots adjust.
Planting, sowing, and early growth care step by step
Whether you're starting from seed, a cutting, or a transplant, the first few weeks are when most plants are most vulnerable and most beginners make mistakes. Once you know what you have, you can follow a simple plan for how to plant, throw, and grow so the early weeks go smoothly how to plant throw and grow. Get these foundations right and the rest of the grow tends to take care of itself.
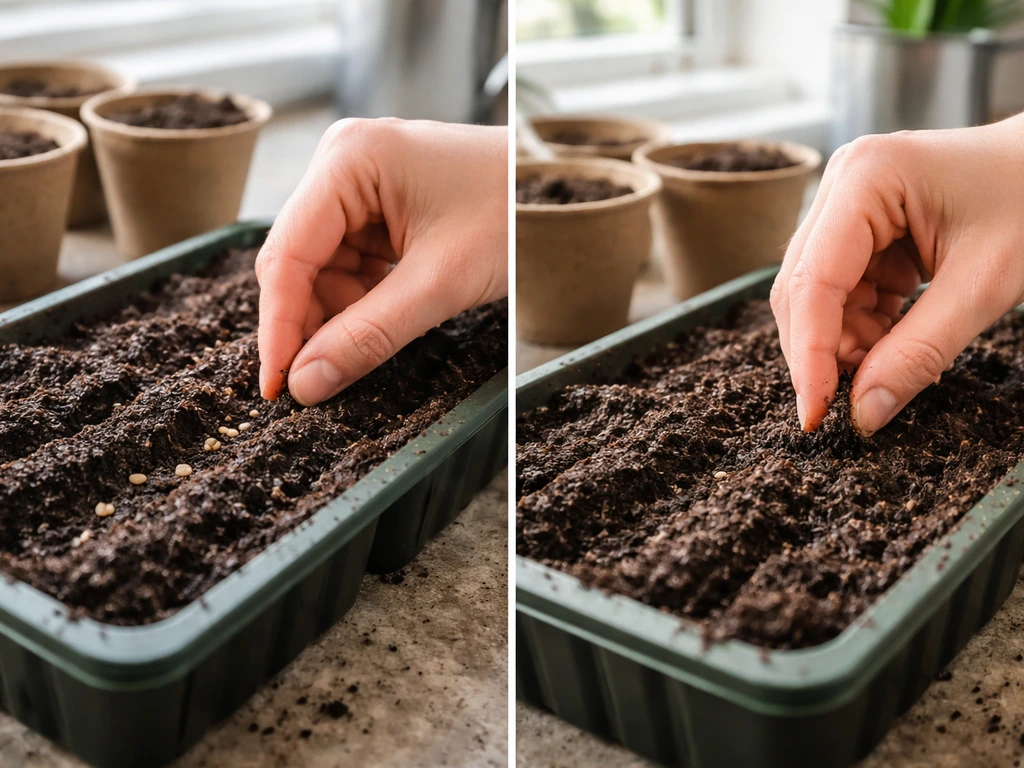
Starting from seed
- Fill a small seed tray or pots with a fine, moist seed-starting mix. Do not use standard potting soil for germination; it's too dense and can harbor pathogens.
- Sow at the depth recommended for the species (a common rule is to bury seeds to a depth of about twice their diameter; very fine seeds often just need light pressing onto the surface).
- Cover the tray with a humidity dome or clear plastic wrap to keep moisture consistent. Most seeds germinate best between 65°F and 75°F (18°C to 24°C).
- Keep the medium moist but not waterlogged. Bottom-watering (setting the tray in a shallow dish of water and letting the mix absorb from below) prevents disturbing seeds and reduces damping-off risk.
- Once seedlings emerge and show their first true leaves, remove the humidity dome gradually over two to three days to harden them off.
- When seedlings have two to four true leaves, transplant into individual pots with your chosen growing medium.
Starting from a transplant or division
- Choose a pot that's only slightly larger than the root ball, roughly one to two inches wider in diameter. Oversized pots hold excess moisture that the roots can't use, which leads to root rot.
- Fill the bottom third of the pot with your chosen medium, set the plant in so the root crown sits at the same level it was in its previous container, then fill in around the roots and firm gently.
- Water thoroughly until water drains freely from the bottom, then let the medium dry down to the appropriate level before watering again.
- Keep the plant in bright indirect light for the first one to two weeks after transplanting, even if it normally tolerates lower light. This reduces transplant stress.
- Hold off on fertilizing for the first four to six weeks. New roots are sensitive, and fresh potting mix usually has enough nutrients to get started.
Container and spacing considerations
Pot material matters more than most people think. Terracotta pots are porous and allow the medium to dry out faster, which suits drought-tolerant species but can stress moisture-loving ones. Plastic and glazed ceramic hold moisture longer, better for tropicals and ferns. Drainage holes are non-negotiable; no drainage hole means you're gambling on not overwatering, and those odds are not good. If you love a decorative pot without drainage, use it as a cachepot and keep the plant in a functional inner pot.
Watering and fertilizing: a schedule you can actually follow
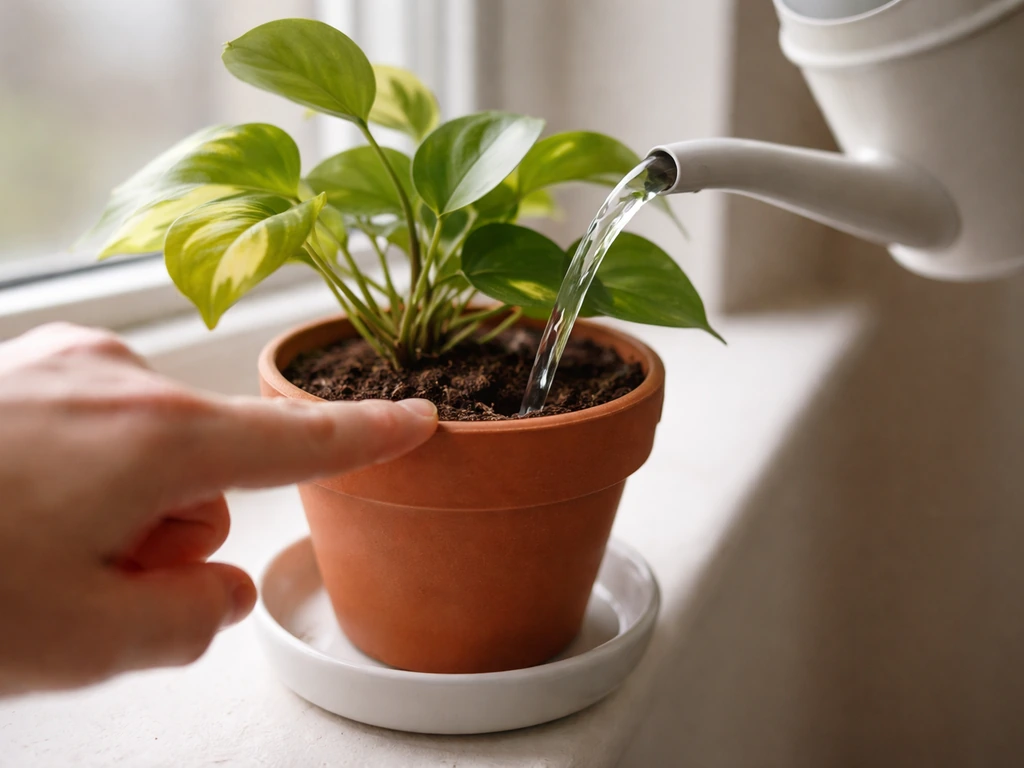
Overwatering is the number one plant killer, and it doesn't mean watering too often in isolation; it means watering before the medium has dried down enough. The fix is to water based on the medium's moisture level, not a fixed calendar schedule. Stick your finger two inches into the soil: if it's still moist, wait. If it's dry, water thoroughly. That simple test beats any generic schedule.
That said, a rough schedule helps you build a habit. Most medium-moisture houseplants in standard potting mix need watering every five to ten days in summer and every ten to fourteen days in winter when growth slows and evaporation drops. Adjust based on your specific conditions: terracotta pots in a warm, bright room dry out faster than plastic pots in a cool, dim one.
Fertilizing basics and timing
Plants in containers need supplemental feeding because they exhaust the nutrients in their medium over time. A balanced liquid fertilizer (look for roughly equal N-P-K numbers, like 10-10-10 or 5-5-5) applied at half the label-recommended strength every two to four weeks during the active growing season (spring through summer) covers most species. In fall and winter, reduce feeding to once a month or stop entirely for plants that go dormant.
For plants in hydroponics, you'll replace the liquid nutrient solution rather than feeding into a medium. Check and adjust pH (target 5.5 to 6.5 for most species) and electrical conductivity (EC, which measures nutrient concentration) weekly. A basic pH meter and EC pen are inexpensive and take the guesswork out of hydro feeding entirely.
Signs you're overfeeding: brown leaf tips and edges, white crusty deposits on the soil surface or pot edges, and wilting despite moist medium (fertilizer salt buildup draws water out of roots). Fix it by flushing the medium with plain water two or three times its volume, then waiting a month before feeding again. Signs you're underfeeding: pale yellowing that starts on older (lower) leaves, slow growth, and small new leaves.
Pruning, training, and making more plants
Pruning isn't just cosmetic. Cutting back leggy stems, removing dead or yellowing leaves, and pinching off spent flowers all redirect the plant's energy toward healthy new growth. For most species, prune just above a leaf node (the point where a leaf meets the stem) using clean, sharp scissors or pruning shears. Cutting at an angle reduces water sitting on the cut surface.
Training for shape and space
If your plant is a climber or vining species, training it up a moss pole, trellis, or wire frame encourages larger leaves and more compact upward growth rather than long trailing stems. Soft plant ties or garden tape work well; avoid wire or string that can cut into stems. For bushy species, pinching out the growing tip regularly (removing the top inch or two of new growth) encourages the plant to branch laterally and fill out rather than grow tall and sparse.
Propagation: making new plants from what you have
Stem cuttings are the most accessible propagation method for most species. Take a cutting with at least two to three nodes, remove the lower leaves, and place it in water or directly into a moist propagating mix. In water, you'll see roots form in one to four weeks for most species; pot up once roots are one to two inches long. In propagating mix, keep humidity high with a plastic bag or humidity dome until new growth appears, which signals rooting.
Leaf cuttings, division, and seed starting are other options depending on the species. Division works well for clumping plants: unpot the plant, gently tease apart root clumps, and pot each division separately. Seed starting (covered in the planting section above) is slower but lets you grow multiple plants at low cost and is the only option for species that don't root from cuttings easily. If you want a quick, hands-on way to start seeds or young plants, follow a step-by-step method for how to plant Click and Grow planting section above.
Diagnosing and fixing common problems

Most plant problems come down to a handful of root causes. Before reaching for any product or making a big change, take a minute to run through the basics: Is the watering right? Is the light adequate? Has anything changed recently (season, location, repotting)? Most mystery problems have an obvious cause once you ask these questions.
Yellowing leaves
Yellow leaves are the most common complaint and have the most possible causes. Yellow on lower (older) leaves with healthy new growth is often just natural leaf senescence or mild nitrogen deficiency; feed lightly and monitor. Yellow spreading across the whole plant, especially with soggy soil, points to overwatering and potential root rot. Yellow with dry, crispy edges and dry soil means underwatering or low humidity. Yellow with green veins (chlorosis) on new growth suggests an iron or magnesium deficiency, often triggered by high soil pH locking out nutrients.
Leggy, stretched growth
Long, stretched stems with wide gaps between leaves (etiolation) is always a light problem. The plant is reaching for more light than it's getting. Move it closer to a window or add a grow light. You can cut back the leggy stems to just above a healthy node to encourage bushier regrowth once the light situation is improved.
Root rot
Root rot is the consequence of overwatering. Signs include mushy, brown, or black roots (check by unpotting), wilting despite moist soil, and a sour or musty smell from the medium. To recover, unpot the plant, trim all rotten roots back to healthy tissue with sterile scissors, dust cuts with a small amount of cinnamon (a natural antifungal) or powdered sulphur, and repot into fresh, well-draining medium. Reduce watering frequency going forward. Catch it early and most plants recover; let it go too long and recovery is difficult.
Common pests and how to handle them
| Pest | What you'll see | Fix |
|---|---|---|
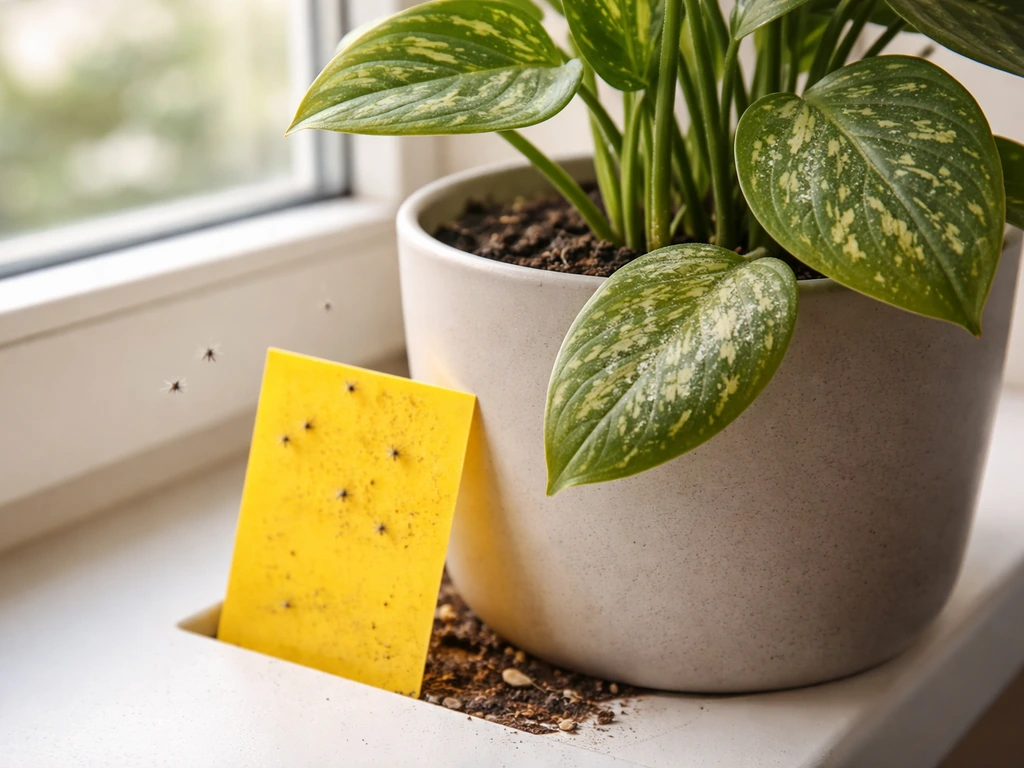
| Fungus gnats | Tiny flies around soil, larvae in top inch of medium | Let soil dry out more between waterings; use sticky yellow traps; apply BTi (Bacillus thuringiensis israelensis) as a soil drench |
| Spider mites | Fine webbing under leaves, stippled pale dots on leaf surface | Rinse leaves with water; apply neem oil or insecticidal soap spray every five to seven days for three weeks |
| Mealybugs | White cottony clusters at leaf joints and stem bases | Dab individual bugs with rubbing alcohol on a cotton swab; spray whole plant with diluted neem oil or insecticidal soap |
| Scale insects | Brown bumps on stems and leaf undersides that don't wipe off easily | Scrape off manually, then treat with neem oil spray weekly for a month |
| Aphids | Clusters of small green, black, or white insects on new growth | Knock off with a strong water spray; treat with insecticidal soap if they persist |
Fungal and bacterial diseases
Powdery mildew (white powdery coating on leaves) and botrytis grey mold (fuzzy grey patches, usually on dead or dying tissue) are the most common fungal issues. Both thrive in still, humid air with poor circulation. Improve airflow, reduce humidity if it's very high, remove affected tissue immediately, and apply a diluted baking soda solution (one teaspoon per quart of water) or a copper-based fungicide for persistent cases. Bacterial leaf spot shows as water-soaked patches that turn brown with yellow halos; cut off affected leaves and avoid wetting foliage when watering.
Keeping your plant thriving long-term
Once you're past the early setup phase, plant care becomes about reading your plant and adjusting as conditions change. Seasons shift the light angle, intensity, and duration coming through windows. Winter heating drops humidity and reduces growth rates. Summer heat can accelerate drying. The care routine that worked in July probably needs adjusting in January.
Seasonal adjustments
- Spring and summer (active growth): increase watering frequency, feed every two to four weeks, watch for pests as temperatures rise
- Fall: start tapering fertilizer, watch for pests moving indoors as you bring outdoor plants in
- Winter: reduce watering, stop or cut back feeding, keep plants away from cold drafts and heating vents, consider grow lights if days are very short
Repotting and long-term container health
Most container plants benefit from repotting every one to two years, ideally in early spring before the growing season kicks in. Signs it's time: roots circling the bottom of the pot or growing out of drainage holes, water running straight through without absorbing, or a plant that's noticeably slow despite good care. Go up only one pot size at a time and refresh the medium completely to give roots access to fresh nutrients and better structure.
Adapting to limited space and low-light homes
If you're working with a small apartment or a north-facing room, you're not stuck. Compact species, trained climbers on vertical structures, and wall-mounted planters all make use of vertical space rather than floor area. Grow lights mounted under shelves or in a small grow tent let you create a controlled environment regardless of window situation. If you're traveling frequently, self-watering pots with reservoirs or a simple wick-watering system can stretch the gap between waterings to a week or more without stressing most species.
If you're interested in exploring growing methods beyond standard containers, semi-hydroponic and terrarium setups are worth looking into for the right species, since both dramatically reduce the daily care burden once established. And if you want to push further into low-maintenance growing, systems that minimize or eliminate supplemental irrigation are a natural next step once you have the basics down. Many drought-tolerant or naturally dry-climate plant species can be grown with minimal irrigation if you match soil mix, light, and seasonal timing to their native conditions minimize or eliminate supplemental irrigation.
The most important thing is to start with a confirmed identification, match the care to what that plant actually needs, and then observe and adjust. Plants give constant feedback if you know what to look for. Most problems are recoverable, most mistakes are learning moments, and every plant you manage to grow successfully makes the next one easier.
FAQ
Can I use the same care routine for “plant species x” even if my plant is a cultivar or named variety?
Yes, but only after you confirm whether you have a species or a specific cultivar. A cultivar can require slightly different light and feeding than the parent species, and iNaturalist may not list it as a formal taxon, so you might need to verify the cultivar name using the nursery label or consistent photo traits (leaf pattern, bloom traits, growth habit) before changing care.
What should I do if my plant keeps showing symptoms that don’t match the identified care guide?
Recheck the ID if you see persistent mismatch signs. For example, if a plant you identified as a low-light species keeps stretching, it suggests the light need is higher or the ID is wrong. The fastest correction is to compare multiple photo angles to a species sheet, then adjust one variable at a time (light first) for 1 to 2 weeks before changing soil or feeding.
How accurate is the finger test for figuring out when to water a plant in potting mix?
Treat the “two-inch finger test” as a quick check, not a guarantee. In dense mixes or terracotta pots it can mislead, so use weight too: learn how heavy “wet” and “dry” pots feel (lift the pot) and use that as your consistent indicator. If the pot feels light but the surface is still moist, water deeper, not more frequently.
Can I move my plant to brighter light without stressing it?
Yes, but do it slowly to avoid shock. Move it to more light in steps, increasing exposure every 3 to 5 days, and rotate the pot so new growth develops evenly. Watch for pale or bleached patches (too much sun too fast) and leaf scorch (direct glass sun), then back off to the last comfortable spot.
Is it possible to switch from soil to hydroponics mid-grow, and what mistakes should I avoid?
Most growers can, but only if you match the root environment. If switching from soil to semi-hydro or hydro, you should rinse off soil thoroughly and start with lower fertilizer strength, then increase after stable new root growth. Expect slower early growth (often 2 to 4 weeks) while roots adapt to the new moisture and oxygen conditions.
When is the wrong time to prune (for example, if my plant is flowering)?
Before pruning, confirm whether the plant is about to flower or naturally sheds leaves. Avoid heavy pruning during low-growth seasons for many species, instead do light cleanup (dead leaves, spent blooms) and remove leggy parts gradually. Cutting just above a healthy node helps, but removing too many nodes at once can delay regrowth.
If my plant is hardy to my zone, will it automatically do fine outdoors year-round?
In general, hardiness ratings tell you outdoor survivability, but indoor setups still depend on winter temperature stability and light availability. A plant rated hardy to your zone may still drop leaves indoors if it gets a cold draft near a window or too little winter light, so adjust placement and consider a grow light during darker months.
Why do my leaves wilt even when the soil still seems moist, and how can I tell overwatering from overfeeding?
It is common, and the cause is often fertilizer salts or low oxygen around roots. If you see crust on pot edges or wilting with consistently moist soil, flush the medium with plain water (using enough volume to rinse salts through) and pause feeding for several weeks. Also confirm drainage hole performance, since clogged holes can mimic overwatering.
What’s the best first response to powdery mildew or botrytis if the problem keeps coming back?
Yes. For sensitive plants, trim only visibly affected tissue and immediately improve airflow, spacing, and watering so foliage dries quickly. Baking soda solutions can help mild cases, but persistent mildew or botrytis often requires consistent environmental changes first, otherwise spores return even after treatment.
Can yellow leaves be caused by both underwatering and overwatering, and how do I distinguish them quickly?
Sometimes, but avoid “watering more” as a default. Dry, crispy yellowing usually means insufficient water or humidity, while yellowing that progresses with soft stems and soggy medium suggests rot stress. Use a two-step check: inspect the medium condition (dry versus wet) and check the roots if decline continues after your next adjustment.