Before you can grow plant species Y successfully, you need to figure out exactly what it is, because 'species Y' is a placeholder, and the moment you pin down the real name, everything else clicks into place. The light level, watering schedule, soil mix, temperature range, and even whether it'll survive your windowsill or needs a grow light, all of that flows directly from a correct identification. Get the ID right first, and the rest of this guide will walk you through setup, planting, feeding, and keeping it alive long-term.
How to Grow Plant Species Y: Step-by-Step Guide

Marcus Holloway
28 Apr 2026

Step 1: Figure out exactly what plant species Y actually is
If someone handed you a plant, gave you a cutting, or you spotted something at a nursery with a vague label, you need a confirmed species name before anything else. Guessing based on one feature, like just the leaf shape, leads to misidentification more often than you'd think. A classic example is confusing a pothos with a heartleaf philodendron because the leaves look similar. Care requirements overlap, but they're not identical, and those small gaps matter at scale.
The most reliable approach is to observe multiple characteristics at once: leaf shape, the pattern of veins, the margin (smooth, toothed, lobed), the texture (waxy, fuzzy, papery), the leaf tip and base shape, stem structure, and ideally flowers, seeds, or fruit if any are present. No single feature is enough on its own. Think of it like identifying a person using just their eye color vs. using their full face, height, and voice together. More data points mean a much more confident answer.
Tools that actually help with plant ID
Photo-based apps have gotten genuinely good and are a practical starting point. Pl@ntNet, LeafSnap, and PlantIn all let you submit a photo (ideally of the leaf plus one other feature like the stem or a flower) and return candidate species. Some apps advertise identification databases covering 20,000 or more species with claimed accuracy rates around 97%, but independent research shows that accuracy varies depending on the species and how common it is in the app's training data. Use these tools as a shortlist, not a final verdict. If the app returns three candidates, look up all three and compare.
For trickier plants, a dichotomous key or field guide adds a second layer of confirmation. These walk you through a series of yes/no questions based on observable traits, and they're especially useful if the app results don't match what you're seeing in real life. Local plant societies, university extension programs, and Reddit communities like r/whatsthisplant are also surprisingly accurate when you post clear, multi-angle photos.
Translate the species name into growing requirements

Once you have a confirmed species name, look up these five things specifically: light level (low, medium, bright indirect, or full sun), temperature range (minimum and maximum tolerances), humidity preference (dry, moderate, or high), growth habit (trailing, upright, rosette, vining), and whether it's an annual, perennial, or houseplant. Also check for any special needs like a dormancy period, specific photoperiod requirements, or sensitivity to drafts or tap water minerals. These details are what you'll use to match the plant to your actual space.
Set up the right environment before you plant anything
Environment is the single biggest factor in whether your plant thrives or slowly declines. Most people jump to watering questions when their plant struggles, but the root cause is usually light, temperature, or airflow. Get these right from day one and you avoid most beginner problems.
Light: the number one thing to get right
Natural light from a window is great when it matches the plant's needs, but understanding what 'bright indirect light' or 'full sun' actually means in measurable terms helps you stop guessing. Plant scientists measure light in PPFD (photosynthetic photon flux density), expressed in µmol m⁻² s⁻¹, because it captures exactly the wavelengths plants use for photosynthesis. Lux meters measure light the way human eyes see it, which is not the same thing. A common indoor grow study found that 16-hour light cycles with an average PPFD around 250 µmol m⁻² s⁻¹ worked well for leafy plants like lettuce. You can't reliably convert lux to PPFD without knowing your light fixture's specific spectrum, so if you're using a grow light, check whether the manufacturer lists PPFD output rather than just lux.
As a practical guide: low-light plants generally want 50 to 150 µmol m⁻² s⁻¹, medium-light plants want 150 to 400, and high-light or sun-loving plants often need 400 to 800 or more. A north-facing window typically delivers low to medium light at best. South-facing windows in the northern hemisphere deliver the most. If your space genuinely can't hit the light level your plant needs, a full-spectrum LED grow light is the fix, not a different watering schedule.
Temperature, humidity, and airflow
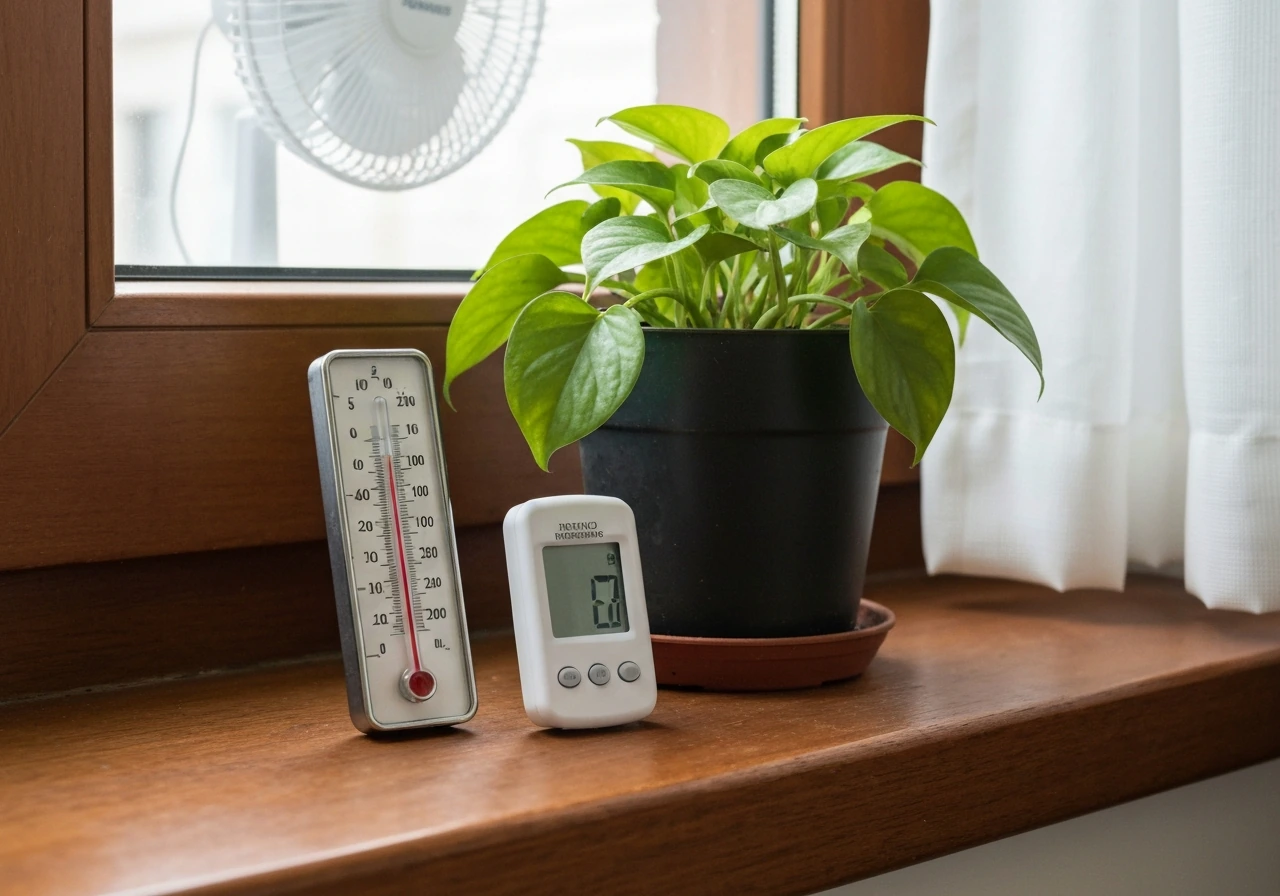
Most houseplants are comfortable in the 60 to 80°F (15 to 27°C) range, but always check the specific species. Cold drafts from windows in winter or AC vents in summer can stress plants even if the room average is fine. Keep plants away from direct heating and cooling vents. For humidity, tropical plants often want 50 to 70% relative humidity, which most homes don't naturally hit. A small humidifier, a pebble tray with water under the pot, or grouping plants together raises local humidity without affecting the whole room. Airflow matters more than most people realize: stagnant air promotes fungal disease. A small fan on low keeps air moving and also strengthens stems over time.
Choose the growing method that matches your setup
You have real options here, and the right one depends on the species you're growing, the space you have, and honestly how much you enjoy tinkering. Here's a practical comparison of the main methods.
| Method | Best for | Key advantage | Main watch-out |
|---|---|---|---|
| Soil (container or ground) | Most species, especially beginners | Forgiving, buffers moisture and nutrients naturally | Overwatering is easy; soil quality varies a lot |
| Water propagation / hydroponics | Fast-rooting species, leafy greens, herbs | Faster growth, no soil-borne pests | Requires pH and nutrient monitoring; algae risk |
| Terrarium (enclosed or open) | High-humidity tropical plants, ferns, mosses | Self-regulating humidity, low maintenance | Not suited for drought-tolerant or large plants |
| Self-watering or wicking systems | Travelers, busy schedules, drought-tolerant plants | Consistent moisture, less frequent attention | Can overwater moisture-sensitive species |
Soil is the default for a reason: it's forgiving, widely available, and works for the vast majority of species. If you're growing something that roots easily in water, like pothos, tradescantia, or many herbs, water propagation or a simple hydroponic setup can actually be faster and cleaner. Terrariums shine for high-humidity lovers that struggle in dry indoor air. If you're switching a plant from one medium to another, for example moving a water-rooted cutting into soil, do it gradually. Water roots and soil roots have different structures, and an abrupt switch can cause wilting and stress for a week or two while the plant adjusts.
Propagation basics: seeds, cuttings, and transplants
How you start the plant shapes everything about the first few weeks. Seeds give you full control over the lifecycle but take patience. Stem cuttings are the fastest route to a mature plant when you already have access to the parent. Transplants (nursery starts) are the easiest entry point and the one I'd recommend to anyone growing a new species for the first time, because you skip the germination guesswork.
Starting from seed
Check the seed packet or species database for germination temperature, expected days to germination, and whether the seeds need any pre-treatment like cold stratification or soaking. Sow at the depth specified (usually 2 to 3 times the seed diameter) in a moist seed-starting mix, not regular potting soil. Keep the medium consistently moist but not waterlogged, and cover with a humidity dome or plastic wrap until sprouts appear. Once seedlings have their first true leaves (not just the initial seed leaves), begin feeding with a diluted, balanced liquid fertilizer.
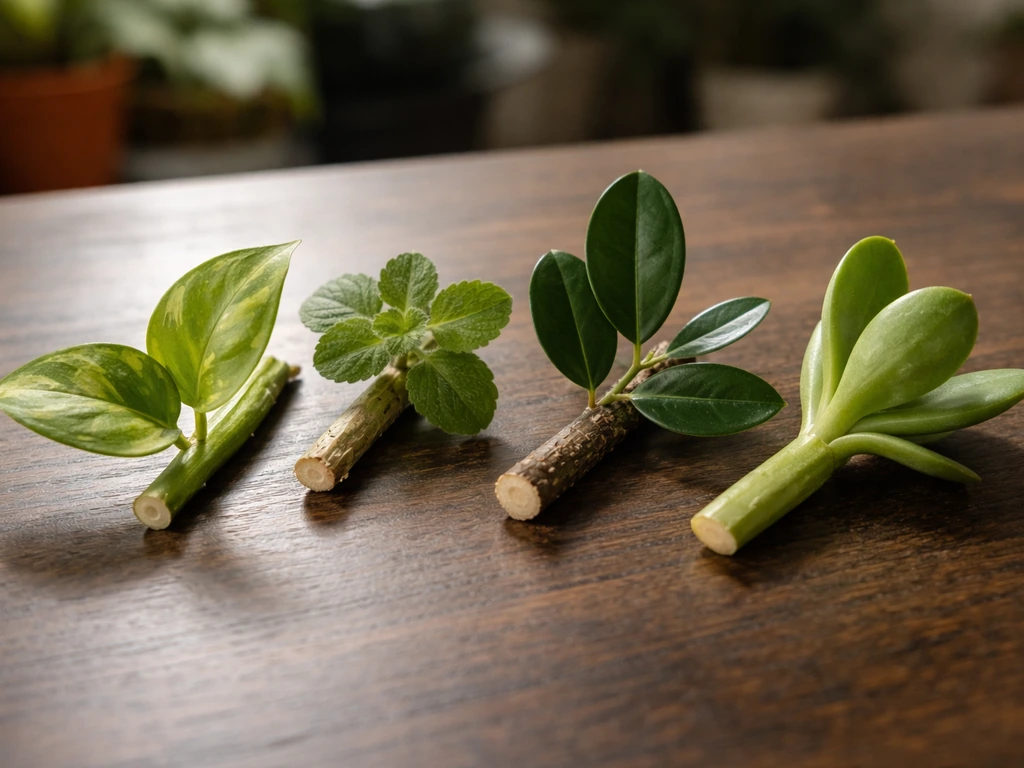
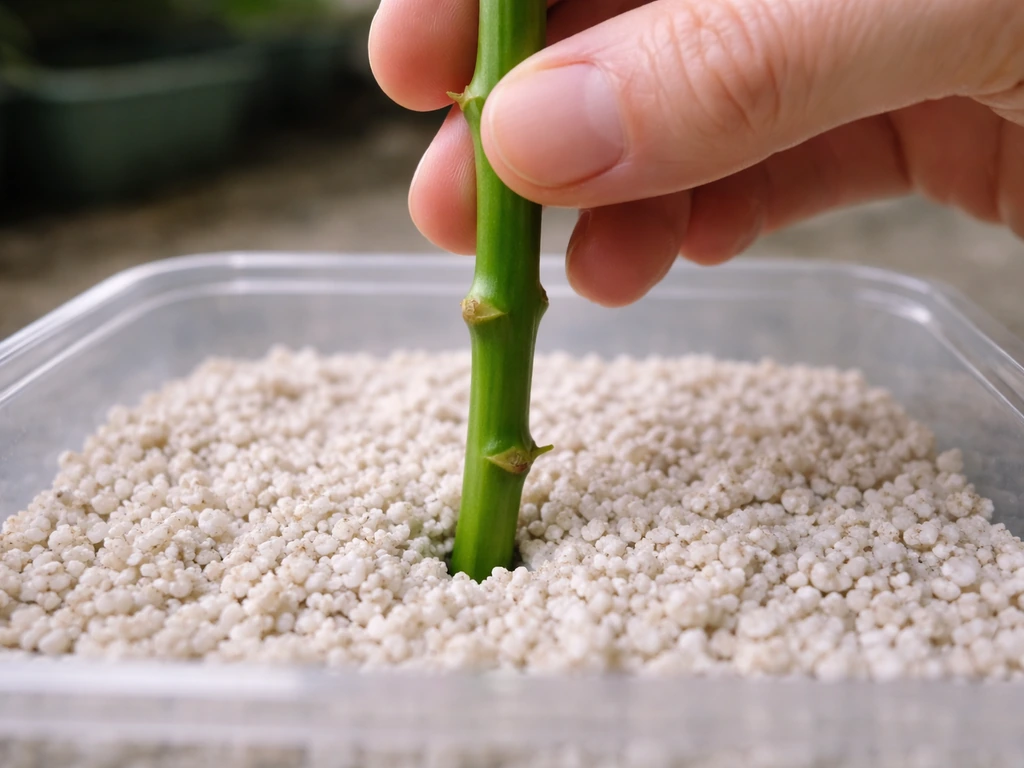
Taking and rooting cuttings
Take stem cuttings just below a node (the point where a leaf meets the stem) using clean, sharp scissors or pruning shears. Remove lower leaves so at least one or two nodes are submerged in water or buried in moist propagation mix. In water, change the water every 3 to 5 days to prevent bacterial buildup. In propagation mix, mist the medium to keep it moist but don't overwater. Most species show visible roots within 1 to 4 weeks. Wait until roots are at least 1 to 2 inches long before transplanting into a permanent pot.
Transplanting nursery starts
When you bring a plant home from a nursery, resist the urge to immediately repot it into something larger. Give it 1 to 2 weeks to acclimate to your home's light and humidity before disturbing the roots. When you do repot, choose a container only 1 to 2 inches larger in diameter than the current one. Too-large pots hold excess moisture and invite root rot. Water thoroughly after transplanting, then hold off on fertilizing for 4 to 6 weeks to let roots settle without being pushed by nutrients.
Watering, soil nutrition, and pH: the specifics
There's no universal watering schedule that works for every plant, every pot size, and every home environment. The honest answer is that you water based on the soil or medium, not the calendar. The easiest reliable method: stick your finger 1 to 2 inches into the soil. If it's dry at that depth, water thoroughly until it drains from the bottom. If it's still moist, wait. For most houseplants, this means watering every 5 to 10 days in summer and every 10 to 14 days in winter. Succulents and cacti can go longer; moisture-loving tropicals may need more frequent checks.
Fertilizing in soil
During the active growing season (roughly spring through early fall), feed with a balanced liquid fertilizer, something like a 10-10-10 or 20-20-20 NPK ratio, diluted to half strength, every 2 to 4 weeks. Reduce to monthly or stop entirely in winter when growth slows. Signs of overfeeding include salt crust on the soil surface, brown leaf tips, and sudden wilting despite moist soil. If you see those, flush the soil thoroughly with plain water to clear the buildup.
pH, nutrients, and hydroponics
If you're growing in water or a hydroponic system, pH is something you actually need to measure and manage. As a rule of thumb, MU Extension recommends an optimum hydroponic crop pH of approximately 5.5 to 6.5 (with exceptions) Hydroponic Nutrient Solutions. Most plants absorb nutrients most efficiently in a pH range of 5.5 to 6.5. Outside that window, nutrients are present in the solution but locked in forms the plant can't absorb, which looks exactly like a deficiency. Get an inexpensive digital pH meter and check your solution every few days. Use pH Up (potassium hydroxide) or pH Down (phosphoric acid) to correct. Use a complete hydroponic nutrient solution rather than a soil fertilizer, because soil fertilizers assume the growing medium will supply certain micronutrients, and in water, those simply won't be present.
Reading nutrient deficiency vs. toxicity
- Yellowing older leaves (bottom of plant first): likely nitrogen deficiency, or overwatering causing root damage
- Yellowing between leaf veins while veins stay green: likely iron or magnesium deficiency, often a pH problem in hydro
- Brown, crispy leaf edges: often salt buildup from overfertilizing, low humidity, or fluoride/chlorine sensitivity
- Dark green leaves with stunted growth: possibly phosphorus excess or root-bound condition
- Pale, washed-out new growth: likely too much light or a calcium/iron issue
Building a maintenance routine that actually sticks
The plants that thrive long-term are the ones that get consistent, light attention rather than occasional emergency care. A simple weekly check takes about five minutes per plant and catches problems before they escalate. Here's what to look at each week.
- Check soil moisture or hydroponic reservoir level and top up as needed
- Inspect both sides of leaves for pests (especially the undersides, where they hide)
- Look for yellowing, spotting, or wilting and note any changes from the week before
- Wipe dust off large leaves with a damp cloth to keep light absorption efficient
- Check for leggy growth stretching toward the light source (a sign the plant needs more intensity or closer placement)
Pruning and shaping
Prune dead or yellowing leaves as soon as you notice them. Beyond that, trim back stems to encourage bushier growth on most plants. Cut just above a node (the bump where a leaf or branch attaches) using clean scissors. For flowering plants, removing spent flowers (deadheading) extends the bloom period. Avoid removing more than one-third of the plant at once, which can shock it into stalling.
Repotting schedule
Most plants benefit from repotting every 1 to 2 years, or when you notice roots circling the bottom of the pot, pushing out the drainage hole, or the plant drying out unusually fast despite consistent watering. Spring is the ideal time to repot because the plant is entering its active growth phase and can recover quickly. Use fresh potting mix appropriate for the species: a well-draining mix for most tropical houseplants, a sandy or gritty mix for cacti and succulents, and an orchid bark or chunky mix for epiphytes.
Pest prevention before you have a problem
Quarantine any new plant for two weeks before putting it near your existing collection. Inspect it at arrival. Most pest infestations come from new plants, not open windows. Keeping leaves clean, airflow adequate, and the growing area tidy eliminates most of the conditions pests need to establish. If you grow multiple plants, a monthly preventive spray with diluted neem oil solution on the foliage and soil surface can keep common pests like fungus gnats, spider mites, and mealybugs from ever gaining a foothold.
When things go wrong: fast troubleshooting
Even experienced growers deal with problems. The goal isn't to avoid all issues, it's to catch them early and respond correctly. Here's how to diagnose and fix the most common ones.
| Problem | Most likely cause | Immediate action | Prevention |
|---|---|---|---|
| Yellowing leaves (lower/older first) | Overwatering or nitrogen deficiency | Check soil moisture; let dry out if soggy; feed if dry and pale | Water only when soil is dry at 1–2 inch depth |
| Wilting despite moist soil | Root rot from overwatering or compacted roots | Unpot and inspect roots; trim black/mushy roots; repot in fresh dry mix | Use well-draining soil; pot with drainage holes only |
| Leggy, stretched growth | Insufficient light | Move closer to light source or add a grow light | Match light intensity to species PPFD requirements |
| Brown, crispy leaf tips | Low humidity, overfertilizing, or fluoride sensitivity | Raise humidity; flush soil; switch to filtered or rainwater | Use diluted fertilizer; keep humidity at recommended level |
| Leaf spots (brown or black) | Fungal or bacterial infection, often from wet leaves | Remove affected leaves; improve airflow; avoid overhead watering | Water at soil level; maintain airflow; don't mist excessively |
| White fuzz or sticky residue on leaves | Mealybugs or scale insects | Dab with isopropyl alcohol on a cotton swab; spray with neem oil solution | Quarantine new plants; inspect monthly |
| Tiny flying insects around soil | Fungus gnats (larvae in soil) | Let soil dry out more between waterings; apply hydrogen peroxide solution to soil | Avoid overwatering; use well-draining soil top-dressed with sand |
| Roots visibly circling or escaping drainage holes | Root-bound condition | Repot into a container 1–2 inches larger with fresh mix | Check roots annually; repot every 1–2 years as needed |
One thing worth saying out loud: plants don't die overnight, and most problems give you warning signs for days or even weeks before they become fatal. If you've killed plants before, that's part of the learning process, not a sign you have a black thumb. The most useful thing you can do is keep a simple note (even just a phone photo with a date) when you first notice something off. Tracking the timeline helps you connect the symptom to the cause much faster the second time around.
If you're also exploring related growing situations, like growing plants without any irrigation setup, in smart systems like Click and Grow pods, or in throw-and-grow scatter methods, the identification and environment-matching steps here apply across all of them. If you are using Click and Grow pods, the same identification and environment-matching steps still guide how to plant and care for your chosen species. Throw-and-grow scatter methods still start with identification and matching the light, temperature, and moisture needs of the species you choose how to plant throw and grow. This guide can also help you understand how to grow plant species X without irrigation by matching the right species to your natural conditions growing plants without any irrigation setup. If you want to grow plant species Z, use the same identification and environment-matching steps to translate its needs into your conditions how to grow plant species X. The species always dictates the requirements; the method just changes how you deliver them.
Your next steps, in order
- Identify your plant using multiple traits and at least two tools (an app plus a field guide or community confirmation)
- Look up the confirmed species name and note its light, temperature, humidity, and any special care requirements
- Assess your space against those requirements and adjust (add a grow light, humidifier, or fan where needed)
- Choose your growing method based on species needs and your lifestyle, then set up the medium before planting
- Start with a transplant if you're new to the species, or take a cutting if you have access to a healthy parent plant
- Set a weekly plant check reminder so you catch problems early instead of in crisis mode
- Keep your first season simple: nail watering and light before adding complexity like fertilizing or propagating
FAQ
My plant’s leaves are yellowing, how do I tell if it’s watering, light, or something else?
For many “species Y” problems, the plant is being overwatered, but the real trigger is low light (water uptake slows) or soil that stays wet too long. Before changing watering frequency, confirm light level (window direction, distance from glass, or grow light PPFD), check drainage holes, and verify the potting mix drains within a few minutes after watering. Then re-test soil moisture at the same depth after 2 to 3 days to see how quickly it dries.
What should I change first if my plant stays wet for days after watering?
If the soil is consistently moist or the pot dries in an unusually long time, the medium is likely too dense for that species. Fixes include switching to a species-appropriate mix (more aeration for tropicals, gritty mix for succulents and cacti), using a pot with drainage, and watering only after the target depth has dried. Also avoid fertilizing yellowing plants until you stabilize light and moisture, because nutrient issues can look similar.
Should I fertilize right away when my plant looks weak or stressed?
Don’t start fertilizing when symptoms are just beginning. Wait until you have stable conditions (light, temperature, and correct watering depth check), then resume at half strength. If you suspect salt buildup or root issues, flush the medium thoroughly and allow excess water to drain, then hold fertilizer for about 4 to 6 weeks while growth normalizes.
What do I do if I see salt crust on the soil surface?
Salt crust can come from hard tap water, fertilizer residue, or letting water evaporate on the soil surface. To address it, flush the pot until water drains freely from the bottom, then restart with diluted fertilizer and consistent watering based on depth. If your area has very hard water, consider filtering or using non-stale water, and monitor for new growth that is greener and firmer.
How should I move my plant to a brighter location without causing shock?
Use a staging approach: increase light gradually over 7 to 14 days, moving the plant closer to the window or raising grow light intensity in steps. Avoid big jumps because stressed plants often respond with leaf drop or browning. Keep watering consistent during the transition, since faster drying from higher light can otherwise make you overcorrect.
Why does my plant struggle near windows or air-conditioning even when the room temperature seems fine?
Even with the right general temperature, drafts can cause localized stress (especially near windows and vents). Move the plant several feet away from heating and cooling airflow, rotate the pot slowly to prevent one-sided growth, and keep foliage from touching cold glass in winter. If you see leaf tips or edges browning despite correct watering, airflow plus low humidity is often the combination.
Is misting enough to raise humidity for tropical plants?
Most species do not benefit from “frequent misting” as the primary humidity fix, because humidity at the leaf surface drops quickly when air moves. Instead, use a humidifier, a pebble tray under the pot (not water touching the pot base), or group plants to raise local humidity. If you mist, do it lightly and earlier in the day to reduce the time leaves stay wet.
If I’m using tap water, do I need to worry about pH or minerals?
Yes, but treat it as a correction, not a recurring routine. If your water is high in minerals, salts can accumulate and mimic deficiencies or cause edge burn. Pair the pH management in hydroponics with periodic solution changes and monitor pH after refilling. In soil, focus on flushing occasionally and using an appropriate mix that doesn’t stay oversaturated.
My hydroponic plant looks nutrient-deficient, what’s the first thing to measure besides pH?
In hydroponics, “locked nutrients” usually shows up as the plant looking deficient even though your solution contains nutrients. Confirm you have the right nutrient product for hydroponics, then measure pH at least a few times per week. If the plant’s symptoms do not change after pH correction, check electrical conductivity or solution strength (too dilute or too concentrated) and ensure enough light for uptake.
Why do my water-propagated cuttings wilt after I move them into soil?
A key difference is root age and fragility. Water propagation often creates delicate roots that can collapse in soil if they are exposed too long. Transfer only when roots are long enough (your article’s 1 to 2 inches target helps), keep the transplant medium lightly moist, and avoid fertilizing immediately so new roots do not get stressed by nutrient salts.
My plant seems to dry out faster than it used to, what could cause that?
If a plant dries too fast, the problem is usually pot size, root crowding, or an overly airy mix, not only “needs more water.” Move it to an appropriately sized container, ensure the mix holds moisture for that species, and confirm you’re watering thoroughly until drainage happens. Then re-check drying time at the same depth to recalibrate your schedule.
How do I avoid root rot after repotting?
In most cases, overpotting delays drying, which can lead to rot, even if you water “less.” Choose a container only slightly larger (about 1 to 2 inches in diameter), use fresh species-appropriate mix, and keep fertilizer paused for the root settling period. If the plant is in a pot with no drainage or the mix is too dense, changing potting medium can fix it more reliably than changing watering frequency.
Where should I look during my weekly plant check to catch pests early?
Early pest detection depends on consistent inspection. Check the underside of leaves and new growth weekly, especially after you bring in new plants or change humidity conditions. Quarantine new arrivals longer if they came from a sale, show any spots, or have sticky residue, webbing, or tiny moving specks.
When pests show up, should I switch from prevention to a stronger neem routine?
If a plant is infected or has a visible pest outbreak, don’t rely only on a preventive neem spray. Remove heavily affected leaves, isolate the plant, and follow up with targeted treatment based on the pest type (fungus gnats, mites, mealybugs behave differently). Also keep airflow and sanitation consistent, because repeated conditions can bring pests back after sprays stop.
How long should a new plant take to adjust to my home before I intervene?
Start by separating “normal adjustment” from “harm.” In the first 1 to 2 weeks after bringing a plant home, you should expect minor leaf drop if the environment differs, but you should not see rapid decline. If symptoms worsen daily, re-check light (too dark is common), drafts, and watering depth. Fertilizer can mask issues, so pause feeding until conditions stabilize.