You can grow Plant Species X with little to no irrigation, but the honest starting point is this: 'without irrigation' almost never means zero water forever. It means setting up the right system, building the right soil, and getting through a critical establishment window so the plant can eventually survive on rainfall alone. Once you understand that, the whole process clicks into place.
How to Grow Plant Species X Without Irrigation

Marcus Holloway
28 Apr 2026
What 'without irrigation' actually means for Plant Species X
Before you commit to a rain-fed approach, get honest about two things: your climate's rainfall pattern and what Plant Species X genuinely needs. 'Drought tolerant' is not the same as 'drought proof from day one.' University of Arizona Cooperative Extension is blunt about this: some supplemental irrigation is necessary for successful plant establishment, even for plants that will eventually need none. The irrigation system at establishment is typically designed to deliver water only near the original root ball, a small and targeted area, not a full soaking of the bed. So 'without irrigation' in practice usually means one of these two things depending on your situation.
- Fully rain-fed: You live somewhere with reliable seasonal rainfall, Plant Species X is well-matched to that climate, and once established it survives entirely on natural precipitation with zero supplemental water.
- Minimal intervention: You water during the establishment phase (typically the first one to two seasons), then wean the plant off supplemental water as its root system deepens, until rainfall alone maintains it.
The California Native Plant Society puts it well: the initial deep soaking during establishment is probably the only time you genuinely cannot overwater most drought-tolerant plants. That phase is different from long-term drought-free care. So calibrate your expectations: you are building toward irrigation-free, not starting there. Knowing this upfront saves a lot of plant funerals.
Also check your USDA hardiness zone and microclimate. Drought tolerance is always tied to a regional context. A plant that thrives rain-fed in coastal California may struggle without irrigation in a hot, windy Oklahoma summer. OSU Extension makes exactly this point: microclimate and hardiness zone matter as much as the plant label. Pick a dry season that matches what your rainfall calendar actually delivers, not what the seed packet assumes.
Pick the right growing system before you do anything else
The system you choose sets the ceiling for how drought-resilient your setup can be. There are four realistic options for growing Plant Species X without regular irrigation, each with different tradeoffs.
Rain-fed in-ground dryland planting
This is the most common approach and the most hands-off once established. You plant directly in the ground in a site that gets natural rainfall and design the whole setup around soil health, plant spacing, and moisture retention. WSU Extension frames drought resistance as a system-level outcome, not a plant-level one: it is soil plus plants plus design working together. This is the method to use if you have outdoor space, decent seasonal rainfall, and the patience to let the root system develop over at least a full growing season.
Water-wise containers
Containers give you control over the substrate and microclimate, which is useful if your native soil is poor or you have a balcony or patio setup. The tradeoff is that containers dry out faster than in-ground beds, so you will need a more moisture-retentive substrate mix and possibly self-watering or wicking planters to reduce how often you intervene. This is a good fit if you are also exploring related growing methods like those used in Click and Grow or Throw and Grow approaches where the growing medium is engineered for efficiency.
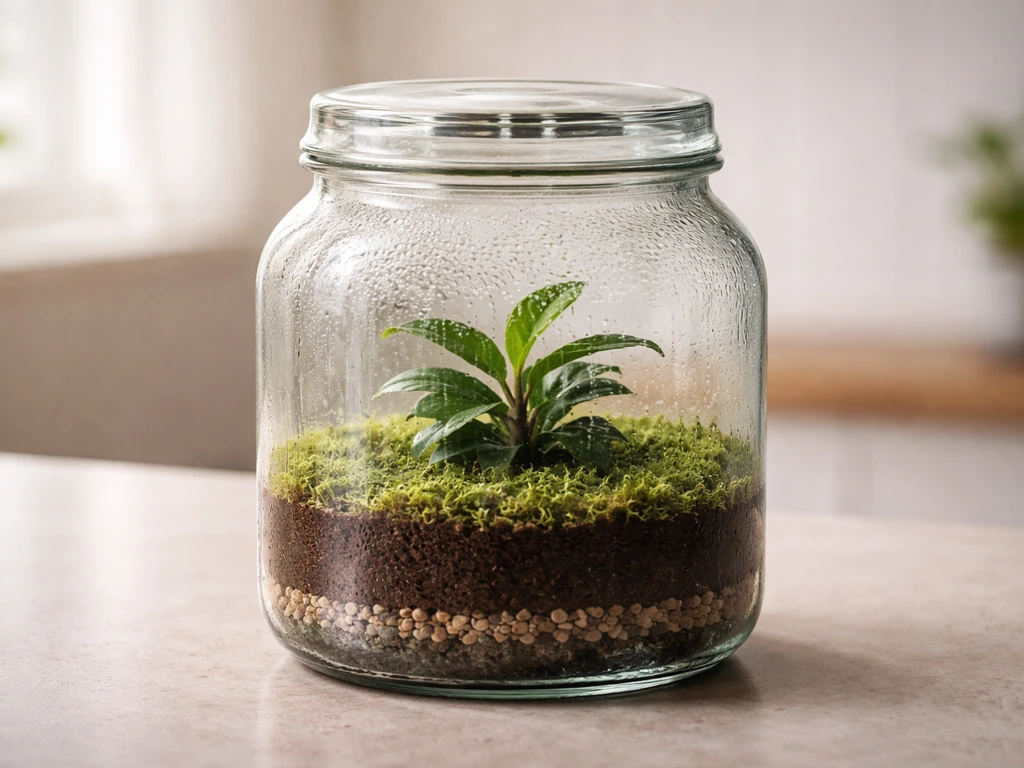
Terrarium-style humidity capture
If Plant Species X tolerates or prefers high humidity and lower light, a closed or semi-closed terrarium is a surprisingly effective irrigation-free setup. University of Arizona Cooperative Extension describes terrariums as high-humidity micro-environments that allow growing moisture-loving plants without using a lot of water, because the moisture cycles inside the enclosure. Oklahoma State University Extension cautions that plants in terrariums should be naturally dwarf, slow-growing, and tolerant of high humidity and moderate light. If Plant Species X fits that profile, a terrarium might be your lowest-maintenance option. Just keep in mind that a terrarium with a large opening and no cover will require more frequent misting to maintain that internal humidity, as Missouri Extension notes.
Which system fits your situation
| System | Best for | Irrigation need | Main challenge |
|---|---|---|---|
| Rain-fed in-ground | Outdoor growers with seasonal rainfall | None post-establishment | Establishment phase survival |
| Water-wise containers | Patios, balconies, poor native soil | Minimal, infrequent | Substrate drying out faster |
| Terrarium humidity capture | High-humidity, low-water indoor plants | Near zero if sealed | Plant selection limits, overwatering risk |
| Dryland raised beds | Poor drainage sites or compacted ground | Very low post-establishment | Building bed depth and soil quality |
Site conditions and soil setup that make drought resilience possible
Your soil is doing the work of an irrigation system when there is no irrigation system. Get this part right and everything downstream gets easier. Get it wrong and even a drought-tolerant plant will struggle.
Start by checking drainage. OSU Extension is clear: where water stands after rain is a problem for almost all landscape plants. If your site has pooling water, fix it before you plant anything, whether that means adding drain tile, raising the bed, or relocating. Standing water and drought tolerance are incompatible because waterlogged roots cannot access oxygen, which paradoxically produces the same wilting symptoms as drought.
Next, improve the soil's water-holding structure without making it waterlogged. WSU Extension recommends incorporating compost to a depth of 8 inches to improve soil health and water infiltration over the long term. Compost improves both drainage in clay soils and water retention in sandy soils, which is why it works across almost every soil type. Work in a 2 to 3 inch layer of compost and dig it in thoroughly rather than just laying it on top.
For container or raised-bed setups, build your substrate with a mix that balances aeration and water retention: a base of quality potting mix with added perlite for drainage and coir or compost for moisture retention. Avoid dense, peat-heavy mixes that compact over time and repel water when they dry out completely, a common and frustrating problem with neglected containers.
If you are going the terrarium route, the substrate still matters. Oklahoma State University Extension advises that the potting medium should be moist but not wet, and Missouri Extension gives a useful tactile test: the soil should be just moist enough to cling in a ball when squeezed, but not dripping. Layer the terrarium base with gravel or horticultural charcoal for drainage, then add your substrate on top.
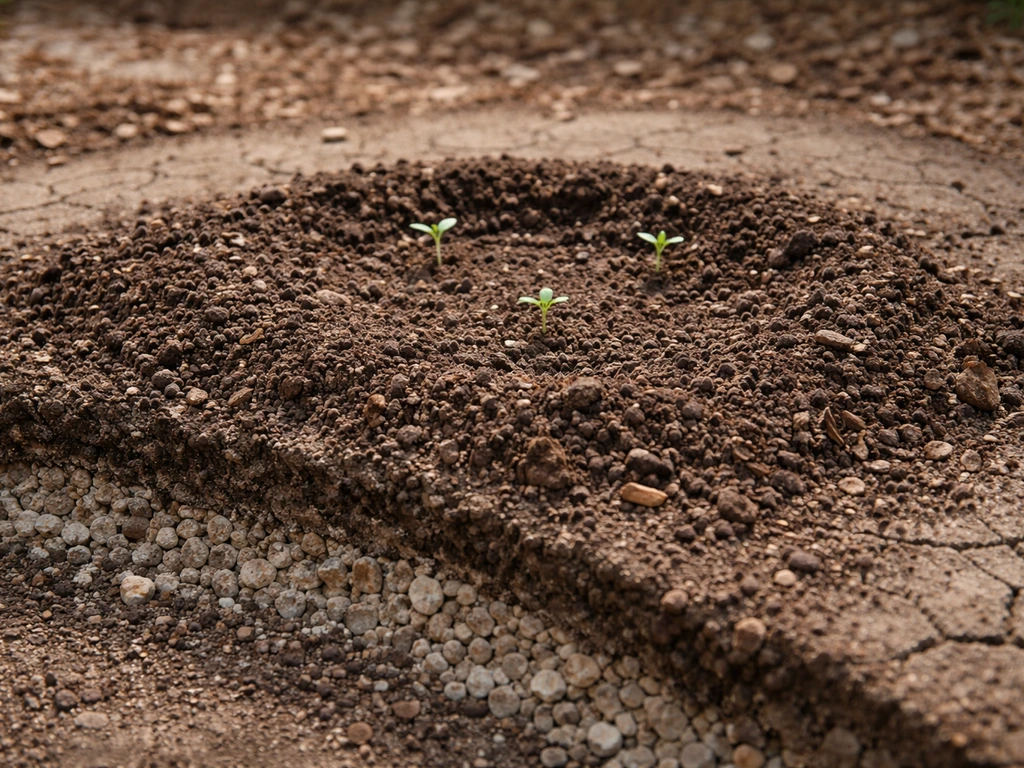
Planting, spacing, and the establishment phase (this is where most people go wrong)
The establishment phase is the most critical and most misunderstood part of growing anything without irrigation. This is the window where the plant is transitioning from a nursery-grown root ball to a self-sustaining root system anchored in your soil. Until that transition is complete, the plant is vulnerable regardless of how drought-tolerant the species is.
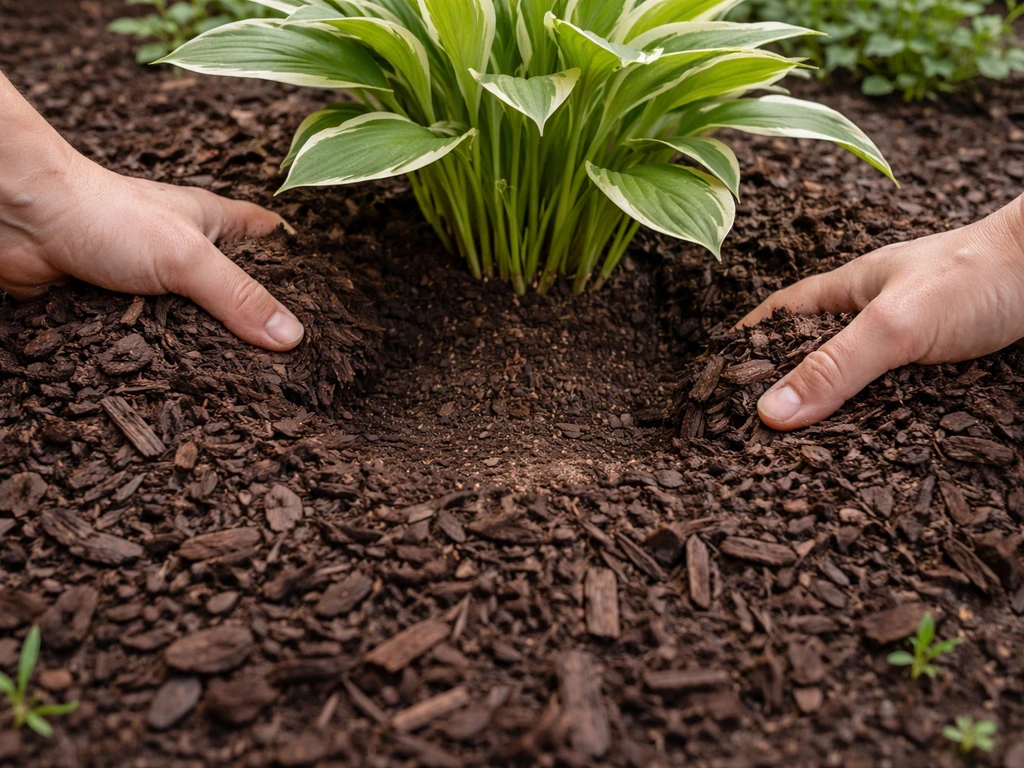
When you plant, inspect the root ball first. UNH Extension recommends slicing or correcting any circling roots before planting: these are roots that have wrapped around inside the container and will eventually girdle the plant if not addressed. Gently tease them outward or make shallow vertical cuts on the sides of the root ball to encourage outward growth.
Plant at the right depth. The crown (where stem meets root) should sit at or just above the surrounding soil level, never buried. Planting too deep is one of the most common beginner mistakes and it sets up moisture and disease problems from the start.
Give the plant a deep initial soak at planting. This is not a contradiction of the irrigation-free goal. CNPS frames this well: the initial soaking is the one time you genuinely cannot overwater drought-tolerant plants. You are collapsing air pockets around the root ball and giving the plant hydration to recover from transplant stress. After that, follow a tapering schedule as the root system establishes.
CNPS provides a practical establishment schedule for the first few months: water once a week during the first month after planting, every other week during the second and third months, and then taper further depending on your soil and plant size. UC Davis Arboretum's guidance reinforces this: the goal during the first season is to grow as large a root system as possible, so that in the second year, when you start reducing irrigation, the plant has the reach to find its own moisture. Watering deeply but infrequently during this phase, as WSU Extension recommends, trains roots to grow downward toward consistent soil moisture rather than staying shallow.
Spacing matters too. Crowded plants compete for the same soil moisture, which means each individual plant has less access to what rainfall does arrive. Follow spacing guidelines specific to Plant Species X, and err on the side of wider spacing if you are committed to rain-fed growing. You can always fill gaps with ground cover later.
For trees and shrubs specifically, establishment time correlates with trunk size. UNH Extension describes a useful rule of thumb: roughly one year of establishment time per inch of trunk diameter measured six inches above the ground. A two-inch diameter trunk needs about two seasons of careful management before you can genuinely step back. Keep that timeline in mind before declaring something 'established.'
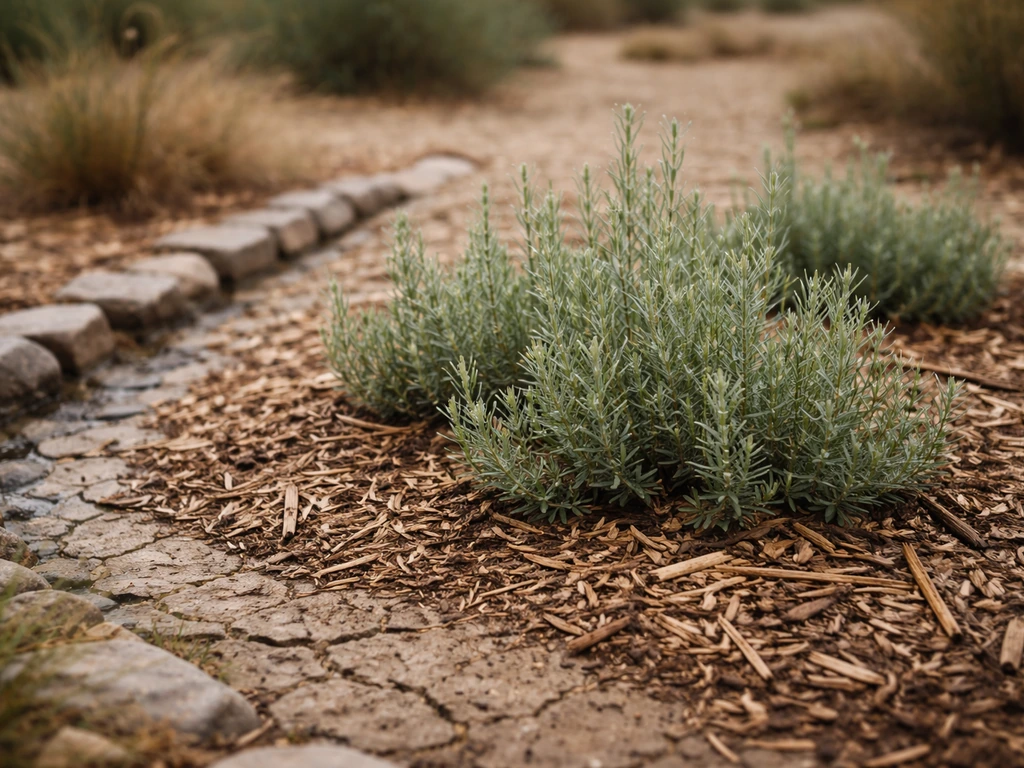
Mulch, ground cover, and keeping moisture in the soil
Mulch is your single most effective tool for reducing irrigation need. It insulates the soil from heat, slows evaporation, suppresses competing weeds, and moderates soil temperature swings. The research is consistent on depth: apply organic mulch like wood chips at 3 to 4 inches deep. USU Extension, Illinois DNR, and Missouri Extension all land in this range. Do not go thicker than 3 to 4 inches, though. University of Florida IFAS warns that excessive mulch can actually divert rainfall away from the root zone rather than delivering it, and too much mulch can trap moisture against the stem and promote rot.
Keep mulch pulled back an inch or two from the plant stem or trunk. Cornell’s turf and weeds guidance also notes you should avoid the mulch “volcano” form and keep a mulch-free area around the base of woody plants, such as young plants with a gap of about 3, 5 inches mulch pulled back an inch or two from the plant stem or trunk. This is the classic 'mulch volcano' mistake: piling mulch up against the base of the plant creates a moist environment right where you do not want it, against the crown and lower stem, which invites fungal problems and root rot.
For inorganic mulch (gravel, decomposed granite, river rock), USU Extension recommends 2 to 3 inches. Inorganic mulch is lower maintenance and does not break down, but it does not add organic matter to the soil over time the way wood chips do. Both work. Choose based on the aesthetic and the plant: succulents and Mediterranean-climate plants often do better with gravel mulch because it improves drainage at the soil surface, while woodland understory plants tend to prefer organic mulch that mimics their natural leaf-litter environment.
Ground cover plants are a living extension of this strategy. Low-growing, spreading plants like thyme, creeping sedum, or native ground covers shade the soil, reduce evaporation, and outcompete weeds, all without requiring their own irrigation once established. Pair them with Plant Species X if your spacing allows.
Microclimate management is the underrated piece of moisture retention. Wind strips moisture from both leaves and soil surface faster than heat does. If your site is exposed, use a windbreak (a fence, hedge, or temporary burlap screen) during the establishment phase. Even a few feet of wind reduction can meaningfully cut evaporative stress. In hotter climates, partial afternoon shade from a structure or taller plant can also extend how long soil moisture lasts between rain events.
Ongoing care without turning on a hose
Once Plant Species X is established, your main jobs are weed control, occasional monitoring, and knowing when to intervene. None of these require irrigation.
Weed control
Weeds are competition for soil moisture. In a rain-fed setup where every inch of moisture matters, weeds are not just an aesthetic problem: they are actively reducing what is available to Plant Species X. Your mulch layer handles most of this passively, but check monthly and pull anything that has broken through, especially in the first season when the canopy is not dense enough to shade out competition. Hand pulling while weeds are small is far easier than dealing with established root systems later.
Pest and disease monitoring
Plants under drought stress are more vulnerable to pest damage and some fungal diseases. A stressed plant has less energy to mount a defense, and certain pests like spider mites actively prefer dry, stressed plants. Do a quick scan of the leaves, stems, and soil surface every week or two, especially during dry stretches. Look for stippling on leaves (mites), sticky residue (scale or aphids), or sudden wilting that does not match the weather. Catch things early and you can usually handle them with a targeted spray or physical removal without the plant suffering long-term.
Also watch for the paradox: CNPS warns against summer drip irrigation directly on the root ball of established drought-tolerant plants because it can foster soil pathogens that kill plants that were thriving without it. If you do decide to step in with water during an extreme drought, water away from the crown and root ball, not directly on it.
When to intervene with emergency water
Even an established drought-tolerant plant has a limit. UC Davis Arboretum's guidance is practical: if drought continues and you see wilting, water just enough to keep the plant from dying. This is emergency triage, not a watering routine. A xeric benchmark from Botanic Gardens Conservation International puts this in perspective: truly xeric plants target around 1 inch of water per month total, including rainfall. If your rainfall drops well below that for weeks on end, a single deep soak is not a failure of the irrigation-free approach. It is keeping your investment alive.
Troubleshooting: when things go wrong and how to tell why
The two most common failure modes in drought-tolerant growing are dehydration stress and root rot, and they can look almost identical from above the soil line. Both cause wilting, yellowing, and slow growth. Diagnosing correctly matters because the fixes are opposite.
Check the soil first, not just the leaves. Environmental Literacy Council provides a clear diagnostic: if the soil is dry and hard when you press it, the plant is underwatered. If the soil is soggy or waterlogged and smells musty or rotten, you are dealing with root rot, almost certainly from overwatering or poor drainage. Almanac.
com adds that root rot often produces a noticeable odor, which is a useful sensory check. UMD Extension notes the most confusing case: root rot can cause wilting even when the soil feels wet, because damaged roots physically cannot take up water regardless of how much is available. If you see wilting in wet soil, pull the plant and check the roots. Healthy roots are firm and white.
Rotten roots are brown, mushy, and fall apart when touched.
| Symptom | Likely cause | What to check | Fix |
|---|---|---|---|
| Wilting, dry hard soil | Underwatering or extreme drought | Soil moisture at root depth | Deep soak, add mulch, check windbreak |
| Wilting, wet or soggy soil | Root rot or waterlogging | Root color and firmness, soil smell | Improve drainage, reduce water, repot if container |
| Yellowing lower leaves | Nutrient stress or overwatering | Soil drainage, pH if accessible | Improve drainage, add compost next season |
| Stunted growth, established plant | Weed competition or compacted soil | Soil surface, weed density | Weed thoroughly, apply fresh mulch |
| Leaf scorch, crispy edges | Heat stress or wind exposure | Sun exposure and wind patterns | Add afternoon shade or windbreak |
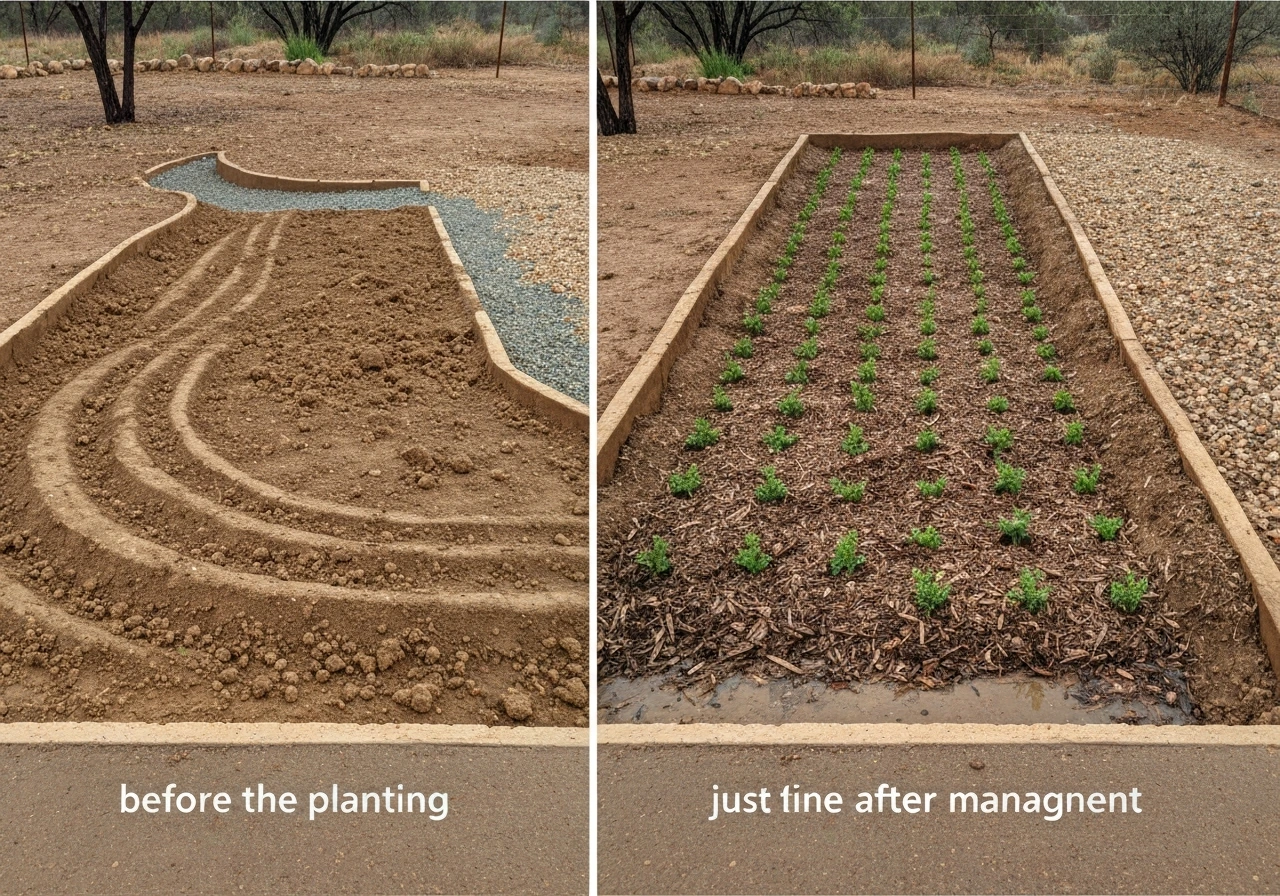
From a trial patch to a full bed
If you are new to growing Plant Species X without irrigation, start with a small test area of three to five plants before committing to a full bed. If you want a related approach, our guide on how to plant click and grow walks through the setup step by step. For more detailed guidance on how to grow Plant Species X without irrigation, follow the establishment schedule and adjust watering based on your soil and microclimate.
This is not timidity, it is smart risk management. A small trial lets you observe how your specific soil, microclimate, and rainfall interact with this species over one full growing season without a large investment. If plants establish well and show vigorous growth by the end of season one, you have evidence that your system works and can scale up with confidence.
If you lose plants or see consistent stress, you have a small, fixable problem rather than a failed bed of 50 plants.
When you do scale up, do it in phases. Expand by doubling the planting area each season rather than going all-in at once. This lets you apply what you learned in the trial, adjust spacing, improve soil prep, and refine your mulching approach before committing to a large area. Document what worked, even informally: a quick photo with a date label does the job. After two seasons of successful establishment, you will have a genuinely low-maintenance, irrigation-free planting that rewards the patience you put in upfront.
If you are working across different plant species in the same setup, the same system-level principles apply whether you are growing Plant Species X, Plant Species Y, or Plant Species Z alongside it. If you want species-specific details, use our guide on how to grow Plant Species Z without irrigation. The soil prep, mulching depth, and establishment watering schedule transfer directly. The main variable is always the species-specific moisture tolerance and the time it needs to anchor its root system, so check those specifics for each plant you add to the bed.
Your action plan starting today
- Assess your rainfall pattern and match it honestly to Plant Species X's actual drought tolerance, not the optimistic seed packet version.
- Choose your system: rain-fed in-ground, water-wise containers, terrarium humidity capture, or dryland raised bed, based on your site and the plant's humidity and light needs.
- Fix drainage problems before you plant anything. Standing water kills drought-tolerant plants just as reliably as drought does.
- Amend your soil with compost worked in to 8 inches, or build a substrate mix that balances aeration and moisture retention for containers.
- Plant at the correct depth, correct any circling roots, give a deep initial soak, and follow a tapering watering schedule for the first two to three months.
- Apply 3 to 4 inches of organic mulch (or 2 to 3 inches of inorganic mulch) around the plant, keeping it away from the crown.
- Add a windbreak if the site is exposed and consider partial shade for afternoon sun in hot climates.
- Monitor weekly for weeds, pests, and stress symptoms. Diagnose by checking the soil, not just the leaves.
- Start with a small trial of three to five plants this season, observe the full establishment cycle, then scale up next season with what you learned.
FAQ
Does “without irrigation” mean I should never water at all?
Not exactly. “Rain-fed” still requires an establishment window where you supply supplemental water in a targeted way (near the root ball) and then taper. If your local rainfall has long dry gaps, plan a reduced but nonzero schedule for at least the first growing season, otherwise many drought-tolerant species will never build the deep roots that later make true rain-fed care possible.
How can I tell if my rainfall is enough for Plant Species X to survive without irrigation?
Test your plan by translating your rainfall into target plant needs. If the driest months deliver far less moisture than the plant’s expected total (rain plus any brief supplemental water), you will need either a different site, a different plant, or a compromise (for example, a wick planter for containers). A quick check of your local monthly rainfall and the plant’s typical moisture category prevents the common mistake of relying on annual rainfall totals.
What’s the difference between watering a little versus watering deeply for rain-fed establishment?
A “wet top” can still be under-watered if the water never penetrates. Before watering any establishment soak, check how far moisture reaches by probing 4 to 8 inches down with a finger or small trowel. During establishment, the goal is deep wetting around the root zone, then letting it dry back (within reason) so roots chase moisture downward instead of staying near the surface.
What should I do if my site pools water after rain, can I fix it after planting?
It is usually safer to fix drainage or relocation before planting. Raised beds, drain tile, and changing the grade are best done before the plant is in. If you discover pooling after planting, you can sometimes correct it with additional soil removal and regrading, but major drainage changes can disturb roots and set back establishment, especially for trees and shrubs.
Can I grow Plant Species X without irrigation in containers? What’s different?
Containers are the most common place people overestimate rain-fed success because evaporation is faster and rainfall can miss the media entirely on windy days. Use a moisture-retentive but breathable mix (potting mix plus perlite, coir or compost), ensure the container has drainage, and consider wicking/self-watering systems if you need to reduce how often you intervene. Plan for more frequent checks even when you “don’t irrigate.”
When does a terrarium actually count as “no irrigation” for drought-tolerant plants?
Yes, but choose the setup based on the plant’s fit for humidity and light. A terrarium can work only if Plant Species X tolerates high humidity and reduced airflow. Also watch ventilation: a closed terrarium can prevent drying but can create fungal issues if airflow is poor. If you see persistent condensation, slow growth, or leaf spotting, switch to semi-closed, increase indirect light, or open slightly more often rather than adding water.
If I have an extreme drought, how do I intervene without breaking the irrigation-free goal?
Yes, and it can be lethal in the wrong way. If you water during an extreme drought, keep water away from the crown and do not create a constant wet ring. Apply a slow deep soak to the surrounding area that encourages roots outward, then stop once the plant is stabilized. Frequent small waterings are often worse than one well-timed intervention because they keep roots shallow.
How do I tell dehydration stress from root rot if both cause wilting? (What should I check first?)
The quickest diagnosis is soil first, then roots if needed. If the soil is dry and hard, treat as dehydration and check whether mulch, spacing, or wind exposure is worsening stress. If soil is soggy or smells rotten, treat as root rot risk and stop all supplemental watering, then improve drainage or replant if roots are failing. If plants wilt while soil is wet, suspect damaged roots (the plant cannot take up water) and you may need to inspect and correct the root system.
How long does “established” really take for trees and shrubs?
Timing matters, especially for trees and shrubs. Use the establishment rule of thumb as a commitment timeline, not a hope. For example, if you plant a shrub with a larger trunk diameter, treat it as a multi-season project, and keep mulch and weed control consistent through that period. Declaring “established” too early is one of the most common reasons rain-fed plants fail later.
How does spacing affect how successfully Plant Species X survives without irrigation?
Err on the side of wider spacing if you are going for rain-fed success, because plants that are too close compete for every rainfall pulse. If spacing is tight, plan for more aggressive weed control and a slightly longer establishment taper so one plant does not starve another. After a year or two, you can sometimes add ground cover between plants rather than tightening spacing with additional watering.
What are the most common mulch mistakes that cause failures in “no irrigation” plantings?
Mulch choice and depth can change outcomes. Wood chips at about 3 to 4 inches help moderate temperature and evaporation, but keep it pulled back 1 to 2 inches from the stem or trunk to prevent crown rot. If your site stays wet or your soil drains poorly, consider slightly less mulch depth or inorganic surface mulches to reduce prolonged saturation at the root collar.
What monitoring should I do after planting, and how often?
Watch for early warning signs on a simple schedule. During the first season, do quick checks every 1 to 2 weeks for leaf color changes, unusual wilting patterns, and pests like mites or scale during dry spells. If the plant is wilting in the middle of the day but recovers by evening, it is more likely stress management than imminent failure. If wilting persists into cooler hours, act sooner with diagnosis (soil check) rather than adding water blindly.
How should I set up a small test plot so I learn something useful instead of just losing a few plants?
Do it in a way that lets you compare conditions. Start with a small test area that includes the best and worst microclimates you expect (more sun versus more shade, sheltered versus windy, sloped versus flatter areas). If the worst spots fail, you learn where you need drainage improvements, wind protection, or different plant placement before scaling up.