Yes, you can grow a whole new plant from an existing root system or a root cutting, but it only works reliably when a few biological conditions are met: the root piece must have a dormant bud or the hormonal signals to form one, the rooting environment needs the right balance of moisture and oxygen, and the temperature and timing have to nudge the root into growth mode rather than rot mode. Get those things right and you can multiply almost any fibrous-rooted perennial, divide crowded clumping plants, or coax root cuttings into brand-new shoots. Get them wrong and you end up with mush. This guide walks you through exactly how to make it work.
How Do New Plants Grow From Roots: A Practical Guide

Marcus Holloway
11 May 2026
What roots actually do (and why that matters for propagation)
Roots do three main jobs: they absorb water and minerals, conduct those materials up through the plant via xylem tissue, and store carbohydrates that fuel regrowth. The absorption happens mostly through root hairs, which are tiny extensions that massively increase surface area. A peer-reviewed review on root hairs and water uptake notes that the evidence for their importance can vary by species and soil conditions, including root-hair length, turnover, and shrinkage blank" rel="noopener noreferrer">root hairs play a major role in water uptake. Those root hairs are also the main sites for mineral uptake like phosphate, so anything that damages them, rough handling, drying out, soaking in stagnant water, directly reduces the root's ability to feed a developing shoot.
The storage function is the key to propagation. A healthy root section holds a reserve of carbohydrates that a new shoot can live off while it's still too small to photosynthesize much on its own. Roots also synthesize cytokinins, the hormones that trigger shoot formation. This is why a plump, firm root cutting from a well-fed plant will almost always outperform a skinny, depleted one. The root tip contains the meristem, the zone of actively dividing cells, protected by a root cap. New growth originates from meristematic tissue, whether that's in a root tip or in a dormant bud along the root.
What actually has to happen before a new shoot forms
A root doesn't just spontaneously sprout a leaf. Before you see any green above the surface, a sequence of events has to happen underground. First, the root tissue has to have a bud, either a pre-existing dormant bud at the crown or the capacity to form an adventitious bud (a bud that develops from non-bud tissue in response to wounding or hormonal change). Not every root piece can do this, which is why method and plant selection matter so much. In other words, if you want roots to start growing, you need the right balance of moisture, oxygen, temperature, and a bud to kick things off what do roots need to grow.
The hormonal balance inside the root is what flips the switch. A low ratio of auxin to cytokinin favors shoot regeneration; a high ratio favors root development; and an intermediate balance can produce a blob of undifferentiated callus tissue that just sits there doing nothing useful. When you divide a plant or take a root cutting, you're essentially wounding the tissue and creating a new hormonal environment. The root responds by forming callus at the wound site first, and then, if conditions are right, that callus develops into organized shoot tissue. This process takes time, anywhere from a couple of weeks to a couple of months depending on the species and conditions. Patience is genuinely part of the method.
Picking the right plant and the right method
This is the step most people skip, and it's the single biggest reason root propagation fails. Not every plant can be grown from a root cutting, and not every plant divides well. Knowing your root system type before you start saves a lot of frustration.
Root system types and what works for each
| Root System Type | Example Plants | Best Method | Notes |
|---|---|---|---|
| Fibrous / clumping crown | Hostas, daylilies, ornamental grasses, most ferns | Division | Easiest; each division needs both roots and a crown bud |
| Spreading rhizome or runner | Mint, bee balm, black-eyed Susan, irises | Division or sucker separation | Runners and offsets already have their own buds — separate and replant |
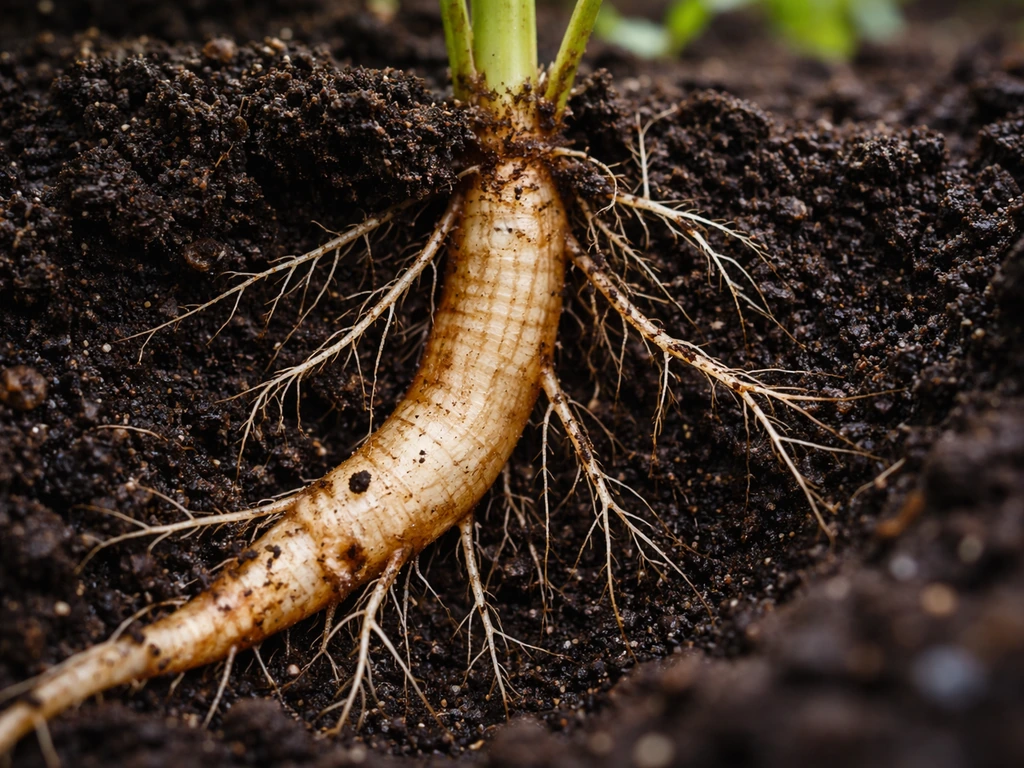
| Fleshy taproot | Oriental poppy, sea holly, Japanese anemone, comfrey | Root cuttings | Cannot divide well; take 3–4 inch root sections instead |
| Woody taproot / shrub-like base | Lavender, rosemary, most woody shrubs | Stem cuttings, not root cuttings | Division and root cuttings rarely work; use stem cutting methods instead |
| Offset-forming | Many succulents, agave, spider plants | Offset/pup separation | Pups already have their own root systems; separate when they're at least a third the size of the parent |
The takeaway: if the plant has a single woody taproot or a shrub-like base, skip root propagation entirely and work with stem cuttings. If it forms clumps, spreads by runners, or has thick fleshy roots, you're in good shape. When in doubt, look at the base of the plant. Multiple crowns with their own root clusters? Divide. One central woody stem? Don't.
When to do it
Timing is one of the most underrated parts of root propagation. For divisions, early spring, just as new growth is emerging but before it's gotten big, is the most forgiving window. The soil is warming up, the plant is coming out of dormancy, and the hormone balance is already tilted toward new growth.
Fall is a second solid option if you're in a climate where soil stays warm enough for a few weeks after you plant: roots can establish before the freeze without the top growth demanding much energy. Mid-summer divisions are possible but harder, the plant is under heat stress, losing water fast, and the divisions tend to sulk or collapse.
Root cuttings for fleshy-taprooted plants are best taken in late fall or winter when the roots are loaded with stored carbohydrates and the plant is dormant.
Step by step: growing new plants from roots in soil
What you need
- Sharp, clean knife or garden spade (wipe the blade with a diluted bleach solution or rubbing alcohol between cuts to avoid spreading disease)
- Sterile potting mix — a perlite-heavy or well-draining mix works better than dense garden soil for new root growth
- Pots with drainage holes — 4- to 6-inch pots are fine for most divisions; you can always pot up later
- Optional: rooting hormone powder or gel for root cuttings of slower-rooting species
- A spray bottle or watering can with a gentle rose head
For divisions
- Water the parent plant thoroughly the day before. Hydrated roots handle the stress of division better than dry ones.
- Dig up the entire clump (or lift the pot and ease the root ball out). Shake off excess soil so you can see what you're working with.
- Look for natural separation points — sections with their own cluster of roots and at least one visible crown bud or growing point. Each division needs both roots and a bud. Roots without a bud won't regenerate a shoot.
- Cut cleanly with a sharp knife or spade. Avoid sawing back and forth; a clean cut minimizes the damaged tissue that can become an entry point for rot.
- Discard the woody or dead center sections if the clump is older — the vigorous new growth is always on the outside. Small, weak, or damaged pieces are better composted than potted up; they rarely establish well and can introduce disease.
- Plant each division so the crown bud is at or just slightly above the soil surface. Burying the bud too deep is one of the most common reasons divisions fail to shoot. Depth matters.
- Firm the soil gently around the roots to remove large air pockets, then water in. You want the medium moist but not waterlogged.
- Keep divisions shaded and moist for the first one to two weeks while they're re-establishing. Once you see new leaf growth, they're rooted and stable.
For root cuttings
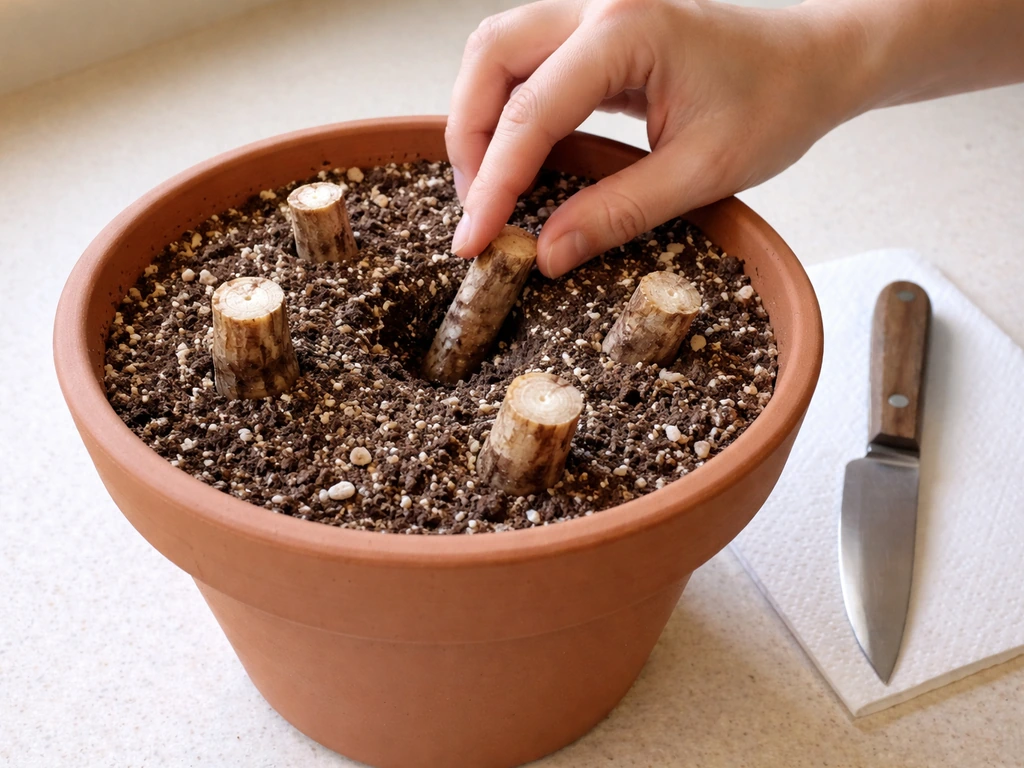
- Dig down to expose pencil-thick or thicker roots. Thin root cuttings from fine-rooted plants rarely store enough energy to generate a shoot.
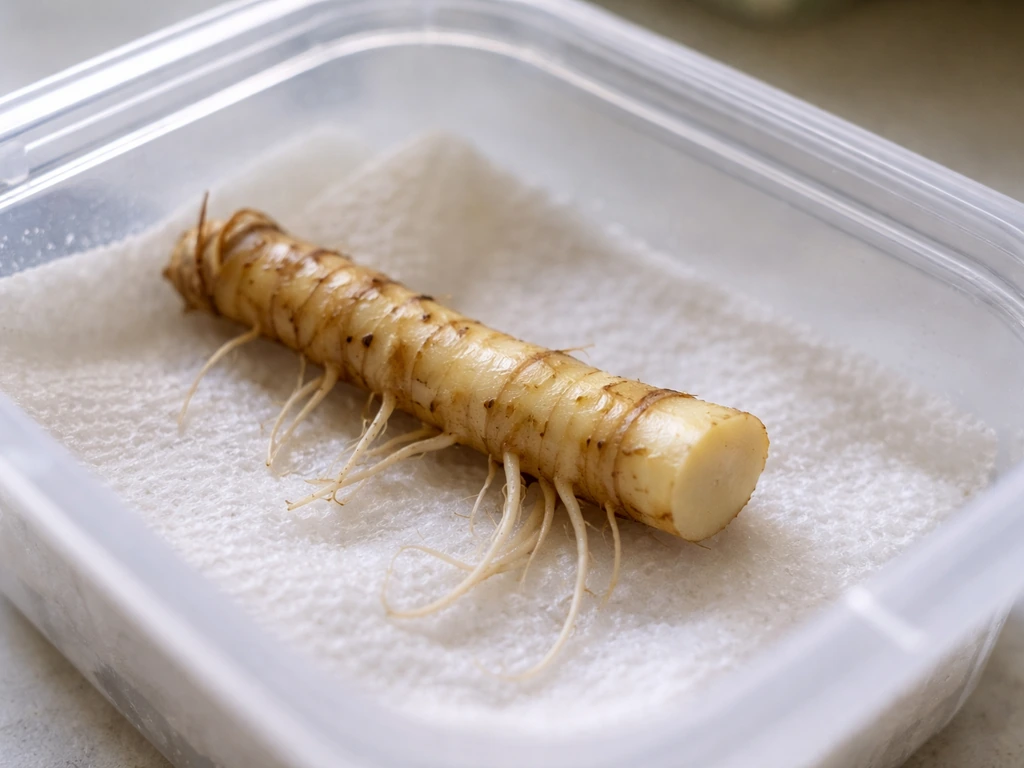
- Cut sections 3 to 4 inches long with a clean knife. Make a straight cut at the top (the end that was closest to the crown) and an angled cut at the bottom. This way you can always tell which end goes up — planting a root cutting upside down is a surprisingly common mistake and it usually means no shoot.
- Dust the top cut end with rooting hormone if you have it; it's optional but can speed things up on slower species.
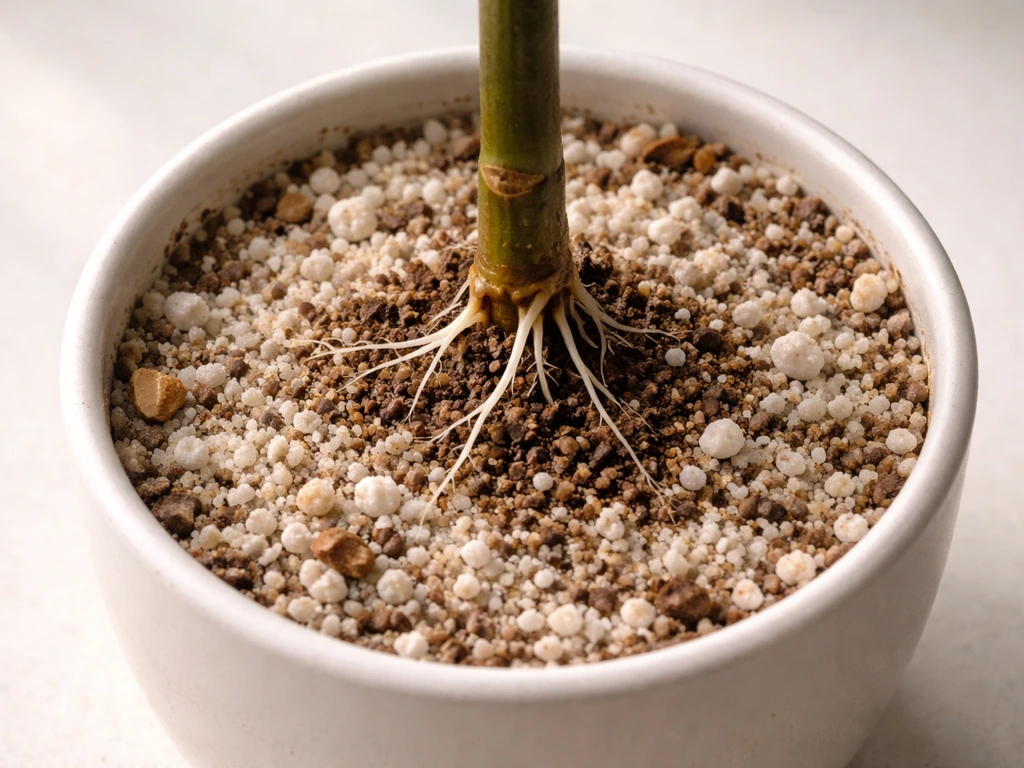
- Insert the cuttings vertically into a moist, well-draining mix — perlite, coarse sand, or a 50/50 perlite and potting mix blend all work. The top cut end should be just at or slightly below the surface (about half an inch down).
- Cover loosely with clear plastic or a humidity dome to keep moisture in, but prop it up slightly to allow some airflow. Trapped, stagnant air is the setup for mold.
- Place the pot somewhere with indirect light and a soil temperature of about 60 to 70°F (15 to 21°C). Bottom heat — a seedling heat mat under the pot — significantly speeds callus formation and root initiation if your space runs cool.
- Check moisture every few days. The medium should feel damp like a wrung-out sponge, never soaking wet. Let the surface just start to dry slightly between light waterings.
- Expect to wait 4 to 8 weeks before you see any shoot growth. Don't dig up cuttings to check — you'll disturb the callus. Instead, gently tug after 4 weeks; resistance means roots are forming.
Step by step: rooting in water or soilless setups
Water propagation and soilless methods (perlite, vermiculite, or basic hydroponic-style setups) work well for stems and some soft-tissue plants. They're less commonly used for root cuttings, which tend to prefer the support and gas exchange of a solid medium. That said, if you're rooting a division or a plantlet that already has some root development, water or perlite can be a clean and satisfying way to watch progress.
Water rooting
- Use a clean glass or opaque container — opaque is actually better because it prevents algae growth, which competes for oxygen in the water. If you use a clear jar, keep it out of direct sun.
- Fill with room-temperature water. Avoid straight tap water with high chlorine; let it sit out for an hour or use filtered water.
- Submerge only the root section or the base of a division with existing root stubs. Keep any leaves or crown tissue above the waterline — submerged foliage will rot quickly.
- Change the water every 3 to 5 days. This is not optional: dissolved oxygen in standing water gets depleted fast by the plant and by microbes, and low-oxygen water is the fast lane to rot. Fresh water means fresh oxygen.
- Keep the container at room temperature (65 to 75°F is ideal) and in bright indirect light. Don't place covered containers in direct sun — plastic covers in sun can heat the water to damaging temperatures very quickly.
- Once roots are 1 to 2 inches long and you can see new shoot growth beginning, transition to soil. Water-grown roots are fragile and not adapted to soil conditions, so pot up gently and keep the soil consistently moist for the first week or two to ease the transition.
Perlite and soilless setups
Straight perlite or a perlite/vermiculite blend is one of the best rooting media for divisions and cuttings because it drains instantly (preventing waterlogging), retains enough moisture to keep the root humid, and allows good oxygen flow around the root tissue. It's also essentially sterile, which reduces fungal risk. Set up the same way as the soil method above, keep it moist, use bottom heat if available, and pot up into a nutrient-containing mix once new shoots are visible. For a more hydroponic-adjacent setup, you can sit the cuttings in net pots over a shallow reservoir, but make sure the roots aren't fully submerged continuously, they need air pockets to avoid oxygen deprivation.
Caring for new growth after rooting
Light
New divisions and root-grown plants need bright indirect light, not direct sun. Their root systems are still small and can't pull up water fast enough to compensate for heavy evaporation from leaves. Harsh direct sun on a plant with an underdeveloped root system causes wilting and stress. Once the plant has been actively growing for two to four weeks and looks sturdy, you can gradually introduce more light. For indoor growers, a north or east-facing window, or a spot a few feet back from a south-facing window, works well for the recovery period.
Temperature and humidity
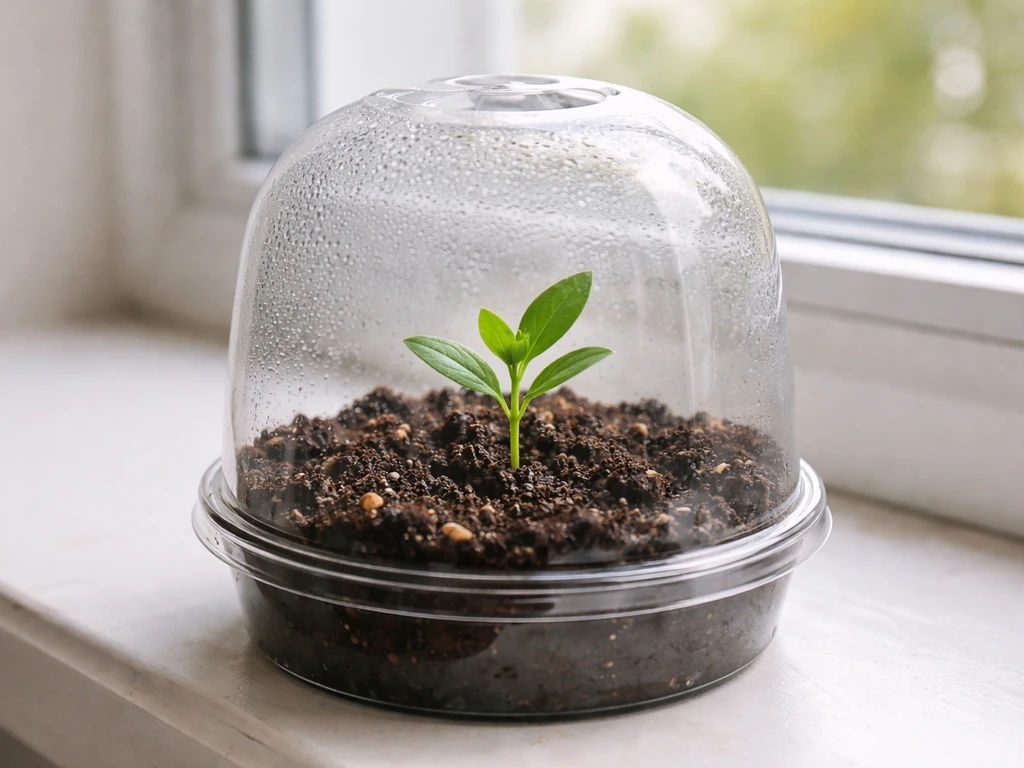
The sweet spot for most divisions and root cuttings during establishment is 65 to 75°F (18 to 24°C). If your space runs cooler, a basement, an unheated garage, or a cool apartment in winter, a seedling heat mat under the pot can make a real difference. It warms the root zone specifically, which is where you need the heat most. Humidity helps too: covering a pot with a clear plastic bag or a humidity dome keeps moisture near the emerging shoot while roots are still developing. Just open the cover for 15 minutes a day to prevent fungal buildup, and remove it entirely once the plant has several new leaves.
Watering and feeding
Water consistently but not heavily. The goal is a medium that stays evenly moist, not soaked, not bone dry. Before shoots appear, the root is surviving on stored carbohydrates and minimal uptake; overwatering is a much bigger risk than underwatering at this stage. Once you see active shoot growth, that's your signal that the vascular system is up and running, and you can start a light feeding schedule. Use a diluted balanced fertilizer, half the recommended dose, for the first month. The root system is still establishing and a heavy fertilizer dose can burn new roots that don't yet have the absorptive capacity to handle it.
When roots won't sprout: what's going wrong and how to fix it
Rot (soft, brown, mushy tissue)
Rot is almost always a combination of too much moisture and too little oxygen, often made worse by non-sterile medium or dirty tools. If you pull up a root cutting after a few weeks and it's soft and brown rather than firm and white, the culprit is usually one of three things: the medium was kept too wet, the container didn't have adequate drainage, or the tools or soil introduced fungal pathogens.
To recover: cut away all rotted tissue back to healthy white or cream-colored root, dust the cut end with a tiny pinch of cinnamon (a mild natural antifungal) or activated charcoal, let the cut air-dry for 30 to 60 minutes, then replant in fresh sterile mix. Once you have healthy growth, follow a simple trimming routine and learn how to trim a plant and grow roots for the next propagation cycle healthy white or cream-colored root.
Going forward, water less and make sure the pot drains freely.
No shoot forming (but no rot either)
If the root looks healthy but nothing is happening above ground after 6 to 8 weeks, the most common causes are: the cutting was planted upside down (always make that angled vs straight cut), the crown bud was buried too deep, the plant species doesn't actually propagate well from root cuttings (check the table above), or the temperature is too low to trigger bud break. Try gently brushing back the surface of the medium to check for any small pale buds forming just at or below the surface, they're often there before you can see them. If it's a temperature issue, move the pot to a warmer spot or add bottom heat.
Mold on the surface
White fluffy mold on the soil surface usually means too much moisture and not enough airflow, especially common when using a humidity dome with no ventilation. Remove the dome or prop it up to allow air circulation, let the surface of the medium dry out slightly, and consider lightly dusting the surface with cinnamon or fine horticultural sand to discourage further growth. Surface mold rarely kills the root cutting directly, but it's a warning sign that conditions are too favorable for pathogens.
Slow growth that just won't speed up
Some plants are genuinely slow, and smaller divisions take longer to establish than larger ones, sometimes one to two growing seasons before they flower again. If you divided a large clump into very small sections to maximize the number of new plants, expect a longer wait. The root system has to reach a size where it can support vigorous top growth before the plant puts energy into flowering. This isn't failure; it's just math. Make sure the parent material was healthy to begin with: plants with dead centers, reduced flowering, and floppy growth are already in decline before you divide them, and their divisions will start from a weaker position.
The parent plant looked unhealthy before you started
A declining parent plant is one of the sneakiest causes of propagation failure. If the clump had a dead or hollow center, sparse blooming, or generally weak stems, those are signs the plant was already telling you it needed dividing urgently, or that it was stressed or diseased. Divisions from the outer, vigorous sections of such a clump can still work, but discard the tired center material. Starting with healthy, well-fed parent stock gives every division and root cutting a much better foundation.
FAQ
How do I know which end of a root cutting should face up?
Use the angled cut orientation rule: the top of the root piece (where the bud or crown connection would be) should be planted at the correct depth and the cut end should never be flipped. If you took a root “slice” with no clear top, mark one side immediately at harvest and plant that side consistently, because many failures are just incorrect orientation.
What watering level is best before any shoots appear, too wet or too dry?
Most root cuttings should be kept evenly moist, not constantly wet. A practical test is to aim for a medium that clumps lightly in your hand and then crumbles, if you squeeze it once, if water runs out, it is too wet. Once you see active shoot growth, you can slightly increase watering frequency, but still avoid standing water.
My root cutting hasn’t sprouted, what should I troubleshoot first after a couple of months?
If nothing sprouts after 6 to 8 weeks, do not keep adding fertilizer or increase heat drastically. First, inspect for tiny buds just under the surface, confirm depth, and check the root zone temperature stays in the 65 to 75°F (18 to 24°C) range. Then pull one sample cutting after you can tolerate loss, to check color and firmness, white or cream is healthy, brown and soft usually means rot.
Can I grow any plant from root cuttings, even if it has a taproot?
Yes, but only certain types. Fibrous-rooted perennials and plants that form crowns or clumps are the best candidates, while deep woody taproots often do poorly because they lack workable buds along the cut section. If you are unsure, do a “one-off trial” with a single cutting, and use stem cuttings for taproot and woody single-stem plants.
When I divide a clumping plant, how much root and crown tissue does each piece need?
If you divide a plant that has multiple crowns, each division should carry at least one living growing point and its own section of roots. If you split so small that you lose buds or most of the attached root mass, the division may live but will take much longer to restart and may not flower for a long time.
What do I do if I get mold on top of the medium under a humidity dome?
If you see mold on the surface, increase airflow before you change anything else. Remove or prop up the humidity cover so air can circulate, let the top layer dry slightly, and consider a light dusting with cinnamon or fine inert sand. If mold returns quickly or the roots feel soft when you test, move to a fresher sterile medium and improve drainage.
Is water propagation safe for root cuttings, or should I use perlite instead?
Avoid fully submerging root pieces in water for long periods. Roots need oxygen, so if you use a water-adjacent method, keep the roots mostly in contact with moist conditions while leaving air pockets. Many growers instead use perlite or perlite-vermiculite because it delivers both moisture and oxygen.
When should I start feeding, and how strong can the fertilizer be for root-grown plants?
Start fertilizing only after you see reliable new shoot growth. Use a diluted balanced fertilizer at about half strength for the first month, and keep the feeding light, because new roots are still ramping up uptake capacity. If leaves look scorched or growth stalls while the medium stays wet, reduce fertilizer and adjust moisture toward slightly drier.
I see rot, can I just remove the bad part and keep the same soil?
If roots are rotting, cut back to firm healthy tissue, then replant into fresh sterile mix. Skipping the replant is a common mistake, because pathogens and excess moisture conditions remain. Also sanitize tools between cuts, since dirty tools are a frequent contributor to repeat failures.
How much light should a newly rooted plant get, and when can it move outdoors?
Yes, during establishment you usually want bright indirect light, but you should not leave the plant in dim conditions for weeks. A practical approach is to begin with indirect light, then increase exposure gradually after two to four weeks of steady growth. Sudden direct sun can cause wilting even if roots are alive.