Yes, you can absolutely grow new plants from eyes, and it works reliably for potatoes, sweet potatoes, dahlias, ginger, turmeric, irises, and several other plants that store energy in tubers, rhizomes, or corms. An "eye" is simply a dormant bud waiting for the right conditions to wake up and grow. Give it warmth, some moisture, and a bit of patience, and most of the time it delivers. The catch is knowing which plants this actually works for, how to prepare the cutting correctly, and what conditions to set up so the bud sprouts instead of rotting.
Can You Grow New Plants From Eyes? Step-by-Step Guide

Marcus Holloway
17 May 2026
What "eyes" actually means on plants
The word "eye" gets used loosely in gardening, but it always refers to the same basic thing: a dormant growing point on a storage organ. That storage organ might be a tuber, a rhizome, a corm, or even the fleshy crown of a clumping plant. Understanding which type you're dealing with changes how you prepare and plant it.
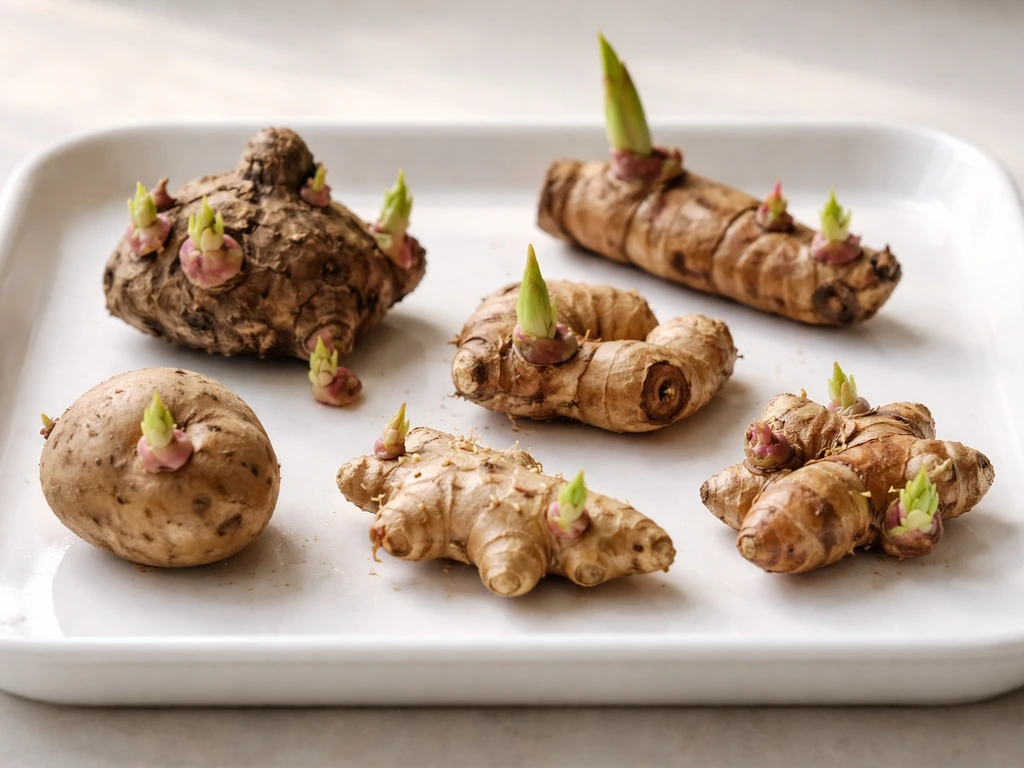
Tubers (potatoes, sweet potatoes, dahlias)
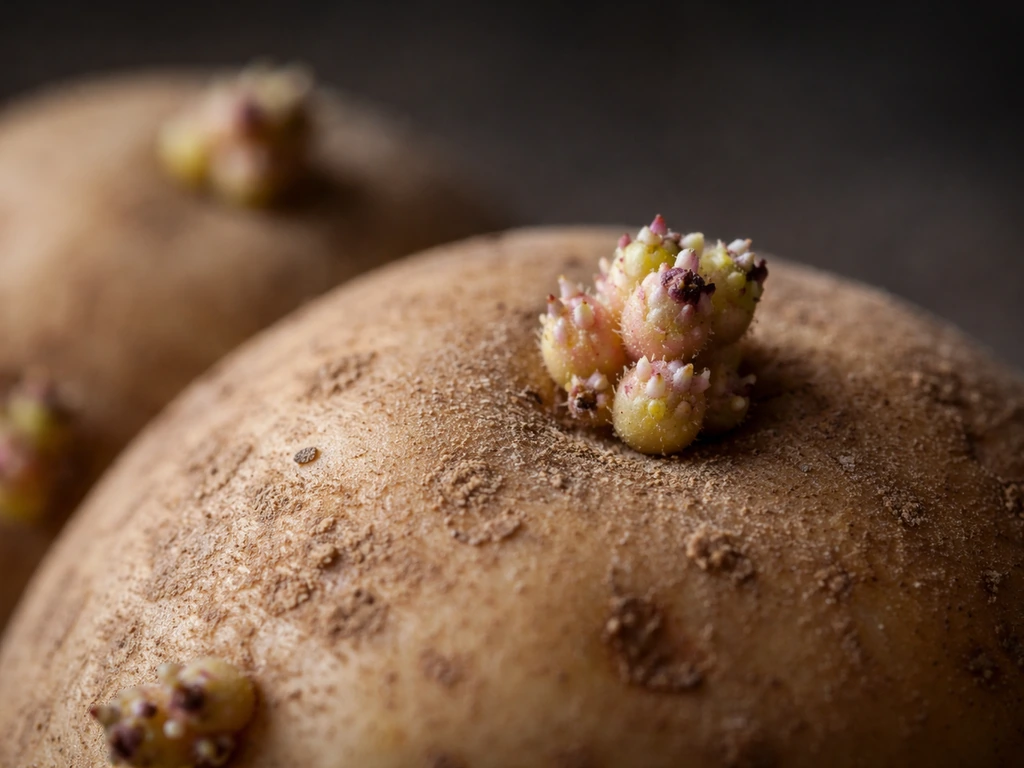
On a potato, the eyes are those little indented dimples scattered across the surface, each one a cluster of dormant buds. The ones clustered at the "rose" end (the blunter end opposite the stem end) are often the most vigorous because the apical eye there tends to dominate and sprout first. On dahlia tubers, the eyes sit at the crown, the narrow neck where the tuber connects to the main stem. You won't find eyes on the fat, sausage-shaped part of a dahlia tuber at all, which is one of the most common reasons dahlia propagation fails. Sweet potato eyes are shallower and less obvious, and they're best coaxed into "slips" (little rooted shoots) rather than planted as cut pieces.
Rhizomes (ginger, turmeric, iris)
On ginger and turmeric, the eyes look like small rounded bumps or knobby protrusions on the surface of the rhizome. Each one is a potential shoot. On iris rhizomes, the growing point is at the leading tip of each division, and you replant the younger sections (the ones closer to the outer edge of a clump) rather than the old, woody center. The principle is the same: you're planting a storage organ that has a dormant bud capable of producing a new plant.
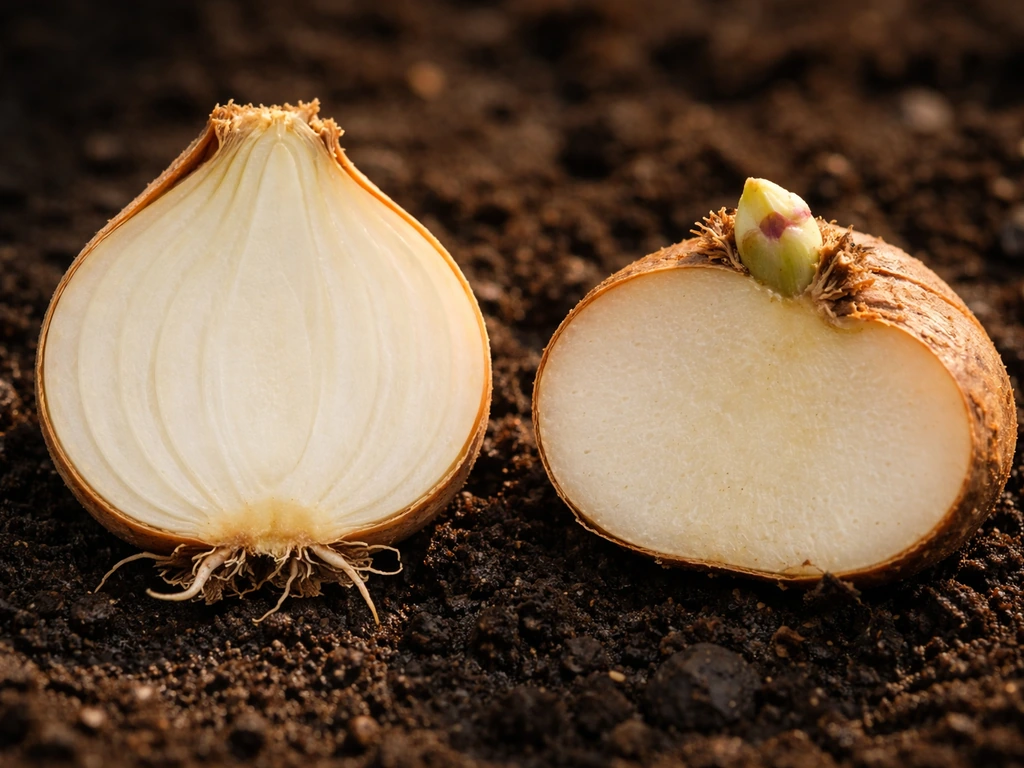
Bulbs and corms
True bulbs like tulips and daffodils propagate mainly through offsets (bulblets that form around the basal plate, the compressed underground stem at the bottom of the bulb). Corms like gladiolus and crocus do carry multiple buds that are sometimes called eyes, with the main growing point at the top and the basal plate at the bottom where roots emerge. So while the "eye" terminology is less common with bulbs, the biology is similar: you're working with a dormant growing point attached to a storage structure.
Grocery store produce
This is where a lot of people start, and it's worth being realistic. Potatoes and sweet potatoes from the grocery store are often treated with sprout inhibitors like chlorpropham (CIPC) to extend shelf life on the shelf. Some will still sprout eventually, but it takes longer and germination rates are lower. Organic grocery store potatoes are a better bet since they're less likely to be treated. For ginger and turmeric from Asian grocery stores, results are usually decent since those rhizomes are often fresher and less processed. Still, for the most reliable results, certified seed potatoes from a garden center or seed company are worth the small investment.
When eye propagation works and when it won't
Eye propagation is reliable when the storage organ is healthy, the eye itself is intact and viable, and you give it the right conditions. It won't work reliably in a few specific situations worth knowing upfront.
| Plant | Eye type | Works from eyes? | Notes |
|---|---|---|---|
| Potato | Dormant bud clusters on tuber | Yes, very reliably | Use certified seed potatoes when possible; each piece needs at least one eye |
| Sweet potato | Shallow buds on root tuber | Yes, via slips | Don't plant cut pieces like potatoes; grow slips from whole roots in water |
| Dahlia | Buds on crown/neck only | Yes, if crown is intact | No eyes = no growth; fat tuber alone won't sprout |
| Ginger | Rounded buds on rhizome | Yes, very reliably | Each piece needs at least one plump bud |
| Turmeric | Buds on rhizome | Yes, reliably | Same approach as ginger; needs warmth |
| Iris | Growing tip of rhizome | Yes, via division | Replant young outer sections, not woody centers |
| Onion/garlic | Scales around basal plate | Via sets/offsets, not eyes | Different propagation method altogether |
| Carrots/beets | Tap roots, no true eyes | No | These don't have dormant buds suitable for propagation |
| Avocado pit | Embryo inside seed | Seed propagation, not eyes | Grows from the seed, not from a bud called an "eye" |
The clearest rule: eye propagation works when the storage organ has a clearly visible dormant bud (the eye) that is attached to an energy source (the tuber, rhizome, or corm tissue around it). If you can see the bud and the storage tissue is firm and healthy, you're in good shape. If the storage organ is soft, shriveled, or moldy, or if there are no visible buds, it won't work.
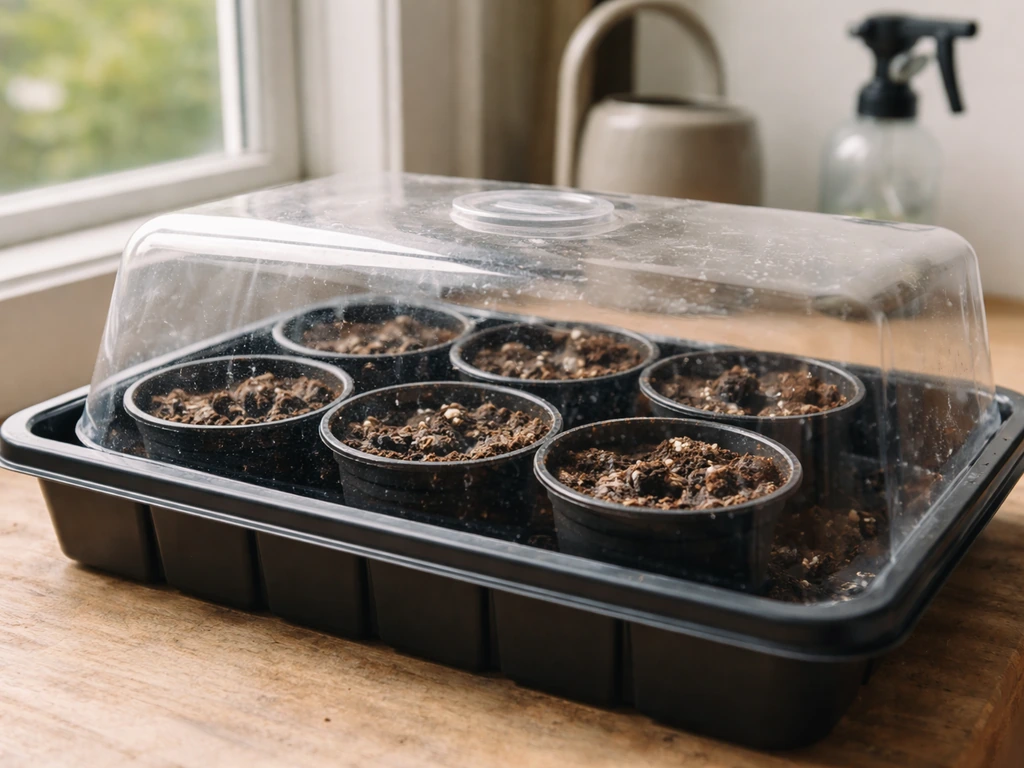
How to propagate from eyes: tools, timing, and the step-by-step process
What you'll need
- A sharp, clean knife (clean it with rubbing alcohol between cuts to avoid spreading disease)
- Potting mix, a tray or small pots, and a spray bottle
- Optional: powdered sulfur or a fungicide dust for treating cut surfaces on potatoes
- A warm spot in your home (60 to 70°F is ideal for callusing)
- Good indirect light or a grow light for the sprouting phase
Timing
For outdoor planting, work backward from your last frost date. Potatoes go in the ground when soil reaches 50°F. Dahlias need soil at about 60°F. Ginger and turmeric are tropical and want warm soil above 65°F. For indoor growing, you can start almost any time, though late winter to early spring is ideal if you're planning to eventually move plants outdoors.
Step-by-step for potatoes
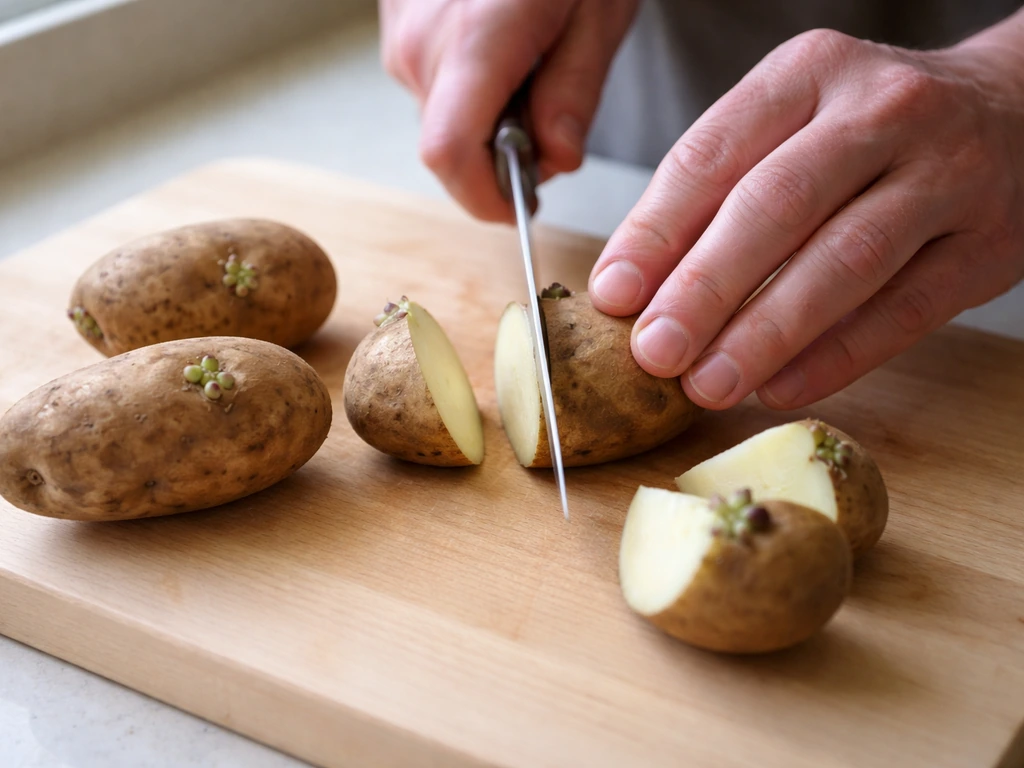
- Choose firm, healthy seed potatoes with visible eyes. If sprouting has already started, sprouts should ideally be about 1 inch long before planting.
- For large tubers, cut into blocky pieces weighing about 1.5 to 2 ounces each. Each piece must have at least one eye, and more is better.
- Let cut pieces callus. Place them on a tray at room temperature (60 to 70°F) in a humid spot for 1 to 2 days. The cut surface will dry and toughen, forming a protective layer that dramatically reduces rot.
- If conditions are cooler (below 60°F), extend the callusing period to 2 to 4 days at 50 to 55°F with good air circulation.
- Plant cut-side down, about 3 to 5 inches deep. The eyes face up.
- Water in gently. Soil should be moist but not waterlogged.
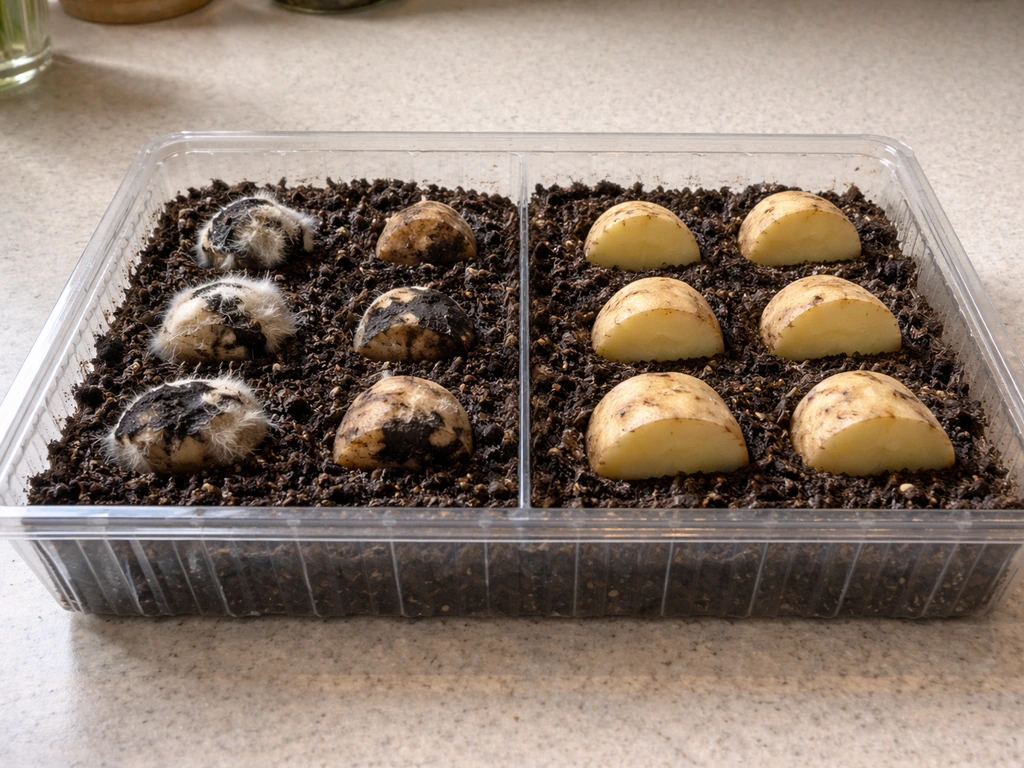
Step-by-step for ginger and turmeric
- Choose plump, fresh rhizomes with clearly visible rounded buds (eyes). Avoid anything shriveled or soft.
- Cut into pieces 1 to 1.5 inches long (some sources recommend up to 2 to 3 inches, which is fine and actually more forgiving), making sure each piece has at least one good bud.
- Set cut pieces aside for a few days in a warm spot to let the cut surfaces heal before planting.
- Plant shallowly, about 1 to 2 inches deep, in well-draining potting mix with the eyes facing up.
- Keep the growing medium lightly moist and the environment warm (70°F or above). Ginger is patient but cold-sensitive.
Step-by-step for dahlias
- Look carefully at the crown of the tuber (the narrow neck area) for small pinkish or greenish bumps. Those are the eyes.
- If dividing a clump, make sure every divided tuber has a section of crown with at least one visible eye attached.
- Dust cut surfaces with sulfur powder or allow to air dry briefly before planting.
- Plant with the eye facing up, about 4 to 6 inches deep.
- Keep warm (above 70°F for indoor starting; soil should be 60°F before outdoor planting).
Sweet potatoes: the slip method
Sweet potatoes are handled differently from regular potatoes. You don't cut the tuber into pieces and plant them directly. Instead, you place the whole root half-submerged in water (or lay it in moist soil) and wait for it to produce slips, which are leafy shoots with developing roots. Once slips are 6 to 8 inches long, you twist or cut them off and root them separately before planting. One sweet potato can produce multiple slips over time, which makes it a really satisfying propagation project.
Setting up the right growing conditions
The sprouting phase is where most failures happen, and almost all of them come down to getting one of these four things wrong: temperature, moisture, light, or planting depth.
Temperature
Warmth is the single most important trigger for dormant eyes. For potatoes, soil at 50 to 60°F is the target range for outdoor planting and wound healing. For indoor sprouting, room temperature of 60 to 70°F is your sweet spot. Dahlias and tropical rhizomes like ginger and turmeric want it warmer, ideally above 65 to 70°F. If your space is cold, a seedling heat mat under the tray makes a real difference.
Moisture and soil
Use a well-draining potting mix. The medium should feel like a wrung-out sponge: moist but not soggy. Overwatering before sprouts emerge is the number one cause of rot. Since the tuber or rhizome hasn't rooted yet, it can't drink the water you're giving it, and excess moisture just creates a breeding ground for fungal and bacterial pathogens. Water sparingly until you see the first sprouts pushing through.
Light
Before sprouts emerge, light isn't critical. Tubers are actually traditionally pre-sprouted in a dark or dim location. Once green shoots appear, they need light immediately or they'll stretch and weaken fast. Aim for at least 8 hours of light per day once you see growth: a bright windowsill works, but a basic grow light is more reliable, especially in spring when indoor light can be dim.
Humidity
During the callusing phase (right after cutting), you want moderate humidity around the cut surfaces, not bone dry air. If your home is very dry, covering the tray loosely with plastic wrap or placing it in a slightly enclosed space helps. Once planted and sprouting, normal household humidity is usually fine.
Troubleshooting common problems
No sprouts after 3 or 4 weeks
First, check temperature. If the soil or ambient temperature is below 50°F, many tubers simply won't move. Warm things up and give it another 2 weeks before giving up. Second, consider dormancy: freshly harvested tubers (especially potatoes right after fall harvest) may still be in a deep dormancy state and need more time or a specific temperature shift to break out of it. Grocery store produce can also be deeply dormant, especially if treated with sprout inhibitors. If you've had a piece sitting in warm, moist soil for 6 weeks with nothing happening and it's still firm, dormancy or inhibitors are likely the culprit. Switch to certified seed material.
Rot and mold
Rot is almost always caused by one of three things: the cut surface wasn't allowed to callus before planting, the soil is too wet, or the temperature is too cold. Fungal dry rot and bacterial blackleg are the two main pathogens on potatoes, and both thrive in cool, wet conditions. If you pull up a piece and it's mushy, let future pieces callus longer (3 to 4 days instead of 1 to 2), let the soil dry out a bit between waterings, and make sure your growing space is warm enough. Dusting cut surfaces with powdered sulfur before planting is a simple, inexpensive way to reduce rot risk.
Weak, leggy, or pale sprouts
Leggy sprouts mean not enough light. Move the tray to a brighter spot or set up a grow light 4 to 6 inches above the plants. Pale or yellowish sprouts can also indicate the growing medium is too wet or too nutrient-poor. If you're using plain soil from the garden, it may be compacting and limiting oxygen to the roots; switch to a lighter potting mix. Very thin, fragile stems are also a sign that temperature has been inconsistent, so try to stabilize the growing environment.
Eye damage or missing eyes
This one is heartbreaking but simple: if you can't find an eye, the piece won't grow. On potatoes, pressure bruising during storage can damage eye tissue. On dahlias, sometimes the crown gets cut away accidentally when dividing. Always check each piece before planting. If a piece has no viable eye, compost it rather than plant it and wonder why nothing is happening.
Sprouts emerge then collapse
This usually means the sprout ran out of energy from the storage tissue (often because the piece was too small or the storage tissue was shriveled to begin with) or got hit by a sudden cold spell. Make sure seed pieces are at least 1. Iowa State University Extension recommends cutting seed pieces to contain one or two eyes and to weigh about 1.5, 2.0 ounces before placing them in a callusing environment seed pieces weigh about 1.5–2.0 ounces and contain one or two eyes. 5 ounces and that storage tissue is firm and plump at cutting time.
Planting outdoors vs. keeping indoors
If you started your eyes indoors and you're planning to move the plants outside, timing and hardening off are what stand between a successful transplant and a shocked, stunted plant.
When to move outdoors
For potatoes, wait until soil temperature hits 50°F and the risk of hard frost has passed. For dahlias, soil should be around 60°F. For ginger and turmeric, you want consistently warm soil above 65°F and nighttime temperatures reliably above 50°F. As a general rule, tender plants started indoors shouldn't go outside when temperatures will drop below 45°F, and you can safely leave them out overnight once temperatures stay above 50°F.
Hardening off
Don't just carry your potted sprouts outside and set them in full sun. They've been growing in a sheltered, stable environment and the combination of direct wind, stronger sunlight, and temperature swings will stress them significantly. Start by setting them in a sheltered, partly shaded outdoor spot for an hour or two on the first day. Increase outdoor exposure gradually over 7 to 10 days, working up to full sun and longer periods before finally transplanting. This process, called hardening off, dramatically reduces transplant shock and the check in growth that often follows moving plants from indoors to out.
Transplanting
For rhizomes and tubers being moved from pots to beds, disturb the roots as little as possible. Water the pot thoroughly an hour before transplanting so the root ball holds together. Plant at the same depth the plant was growing indoors, and water in well after transplanting. Avoid fertilizing heavily right at transplant time since that can burn stressed roots. Give it a week to settle before resuming a normal care routine.
Keeping plants indoors
Ginger and turmeric are perfectly happy as long-term indoor plants in containers if you have a warm, bright spot. Potatoes can be grown in containers indoors or on a balcony, though they need substantial volume (at least 5 gallons per plant) to produce a decent harvest. Dahlias need more light than most indoor environments can provide, so they're usually better suited to a patio or garden bed.
Realism, safety, and when to try something else
Eye propagation is genuinely one of the most beginner-friendly plant propagation methods out there. But it's worth being honest about a few limitations before you commit time and space to it.
Grocery store produce viability
Supermarket potatoes are often sprout-inhibited and may carry diseases not present in certified seed stock. They can work, especially organic varieties, but expect lower success rates and potentially longer wait times. Ginger and turmeric from Asian markets tend to work better since they're traded more as fresh produce than treated commodities. For the most reliable results with potatoes in particular, certified seed potatoes are worth the few extra dollars because they're disease-tested and guaranteed to be dormancy-free and sprout-ready.
Pest and disease awareness
Always start with clean tools. Diseases like Fusarium (dry rot) and Erwinia (blackleg) on potatoes spread easily on dirty knives and through infected planting stock. Keep your cutting tools wiped down with rubbing alcohol between cuts. Don't plant into soil that previously grew the same type of plant for at least 2 to 3 years if you've had disease problems before.
When to switch methods
Eye propagation won't work for every plant you want to grow more of, and that's completely fine. If you're trying to multiply houseplants or shrubs, stem cuttings are usually faster and easier. If you want broader options beyond eyes, you can also look at how to grow new plants from old plants using other propagation methods. If you're growing plants from scratch and don't have an existing tuber or rhizome, seeds are your starting point.
UMN Extension notes that onions can be grown from small bulbs called sets or from transplants, rather than from the “eye” method described here onions can be grown from sets or from transplants. For plants that produce offsets or pups (like many bromeliads, succulents, and agapanthus), division is cleaner and more reliable than trying to identify and isolate eye-like structures.
And sometimes, especially for disease-free fruit trees or grafted varieties, just buying a known, healthy start from a reputable nursery is the smartest move. The goal is always to get a healthy plant growing, not to prove a technique.
If you're interested in expanding your plant collection beyond tubers and bulbs, a lot of the same principles covered here connect to broader techniques for growing more plants from one plant, or for multiplying a collection without spending much money. The core ideas (dormant buds, energy storage, right conditions) show up again and again across different propagation methods, which makes what you learn here genuinely transferable.
FAQ
Can you grow new plants from eyes taken from a dried or shriveled tuber
Not always. Eyes grow best when they are true dormant buds attached to firm, energy-rich storage tissue. If the “eye” you see is just a scar or dried skin, or if the tuber rhizome feels soft or hollow, the bud is usually dead and it will rot instead of sprout.
If my eyes do not sprout, how long should I wait before trying again
Yes, but only to a point. Cold delays sprouting, but it rarely kills viable eyes if the storage piece stays firm. If nothing happens after you move to the correct warmth, think dormancy, inhibitors, or dead eyes rather than continuing to wait indefinitely.
What is the most common mistake that causes eye cuttings to rot
Warmth and moisture management. After you cut, let surfaces callus (so they seal) and then keep the medium moist not wet. A good rule is to water lightly only after the mix starts to dry on the surface, because undrained soggy mix is the quickest path to bacterial and fungal rot.
Do eyes need light before they sprout
Light does matter after shoots appear. Before sprouts break through, darkness is fine, but once you see green growth, keep it bright or under a grow light. If you wait too long, you can end up with tall, weak stems that never catch up even after transplanting.
Should I fertilize when I plant eye pieces
Too much fertilizer too soon is a common problem. At the sprouting stage, focus on warmth and a clean, airy mix. Start feeding only after the plant is actively growing (after sprout emergence and establishment), and dilute fertilizer to about half strength for the first application.
How deep should I plant eye pieces
Yes, the “right” planting depth is different for different storage organs. If you bury too shallow, the eye dries out and fails to root. If you bury too deep, the piece stays cool and wet longer. Use firm guidance based on the crop, but as a practical check, aim to cover eyes with enough medium to prevent drying while still allowing the piece to warm.
Can I use a heating mat to speed up sprouting
Yes for most crops, but the key is to avoid uneven temperatures. An indoor heat mat under the tray can warm the root zone more reliably than a room that swings day and night. Use a thermometer and keep the media in the target range for your plant (for example, potatoes typically need around the 50°F soil range to begin moving).
Why did my potato pieces sprout but then rotted later
For potatoes, bruising and improper storage are major culprits, and grocery potatoes can also be treated. Check each piece for a visible, intact bud, and if you notice blackened or mushy tissue at the eye area, discard that piece. Wipe tools between cuts to prevent spreading issues.
Can you take very small eye sections and still get success
A piece can have eyes and still fail if it is too small to carry enough stored energy to support new growth. The article notes minimum size for good chances, so if your pieces are tiny or the storage tissue is thin and shriveled, increase size and make sure the bud cluster is on intact tissue.
Can you treat sweet potatoes the same way as potatoes (cut into eye pieces)
Sometimes, but it depends on the plant type. Potatoes are usually cut into seed pieces with eyes, but sweet potatoes are commonly propagated by rooting slips produced from the whole root. If you cut sweet potatoes like you would potatoes, you may get inconsistent results compared with slip propagation.
Is it okay to cover the tray with plastic to increase humidity
Yes, but it should be controlled. Loosely covering during the callusing and pre-sprout period can reduce drying, yet wrapping too tightly can trap excess moisture and encourage rot. The goal is slightly higher humidity at the cuts without turning the mix into a wet, sealed environment.
My sprouts are leggy and pale, what should I change first
Often it is environmental rather than the bud itself. Leggy growth usually points to insufficient light after shoots emerge, and pale color can also suggest the medium is too wet or too nutrient-poor. Adjust light immediately, then check that your mix is not staying soggy.
Can I start eye propagation indoors and transplant outdoors later
You can, especially for experiments, but expect lower reliability. If the storage piece is firm and the eye is intact, starting indoors works, but harden off gradually and transplant only when temperatures are consistently in the safe range for that crop to avoid stalling or damage.
What should I do if an eye piece seems doubtful or I cannot find any buds
If you truly cannot identify any viable eye, there is nothing to grow from. Composting is best because rotting or diseased pieces can contaminate your potting mix. If only some pieces are questionable, keep the best-looking buds separate so one failure does not undermine the entire batch.
Do you need to cut the tuber, or can you plant eyes without cutting
For many tubers and rhizomes, cut surfaces must callus first, but for some crops you can avoid cutting entirely. For example, sweet potatoes are typically rooted to produce slips before separating. If you are unsure whether your crop benefits from cutting and callusing, choose the method known for that crop to reduce risk.