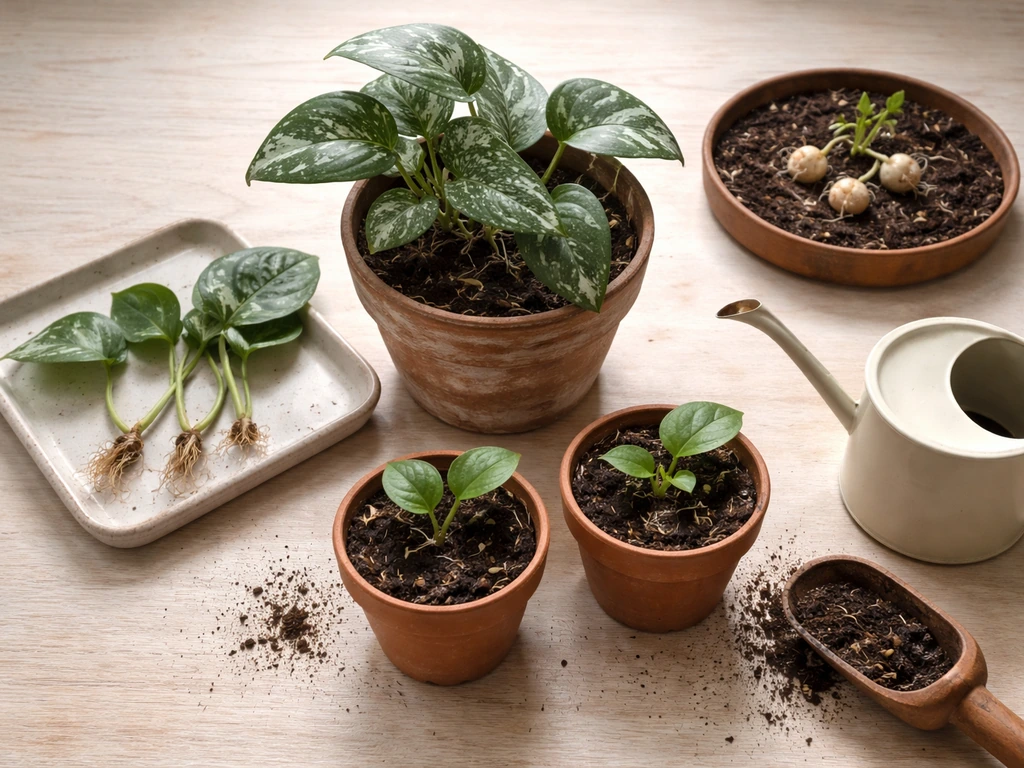
You can grow new plants from old ones using four main methods: stem, leaf, or root cuttings; dividing clumps; separating offsets, pups, or bulbs; and detaching suckers or side shoots. The right method depends entirely on what kind of plant you have. Most houseplants respond well to stem cuttings rooted in water or a perlite-peat mix. Succulents and bromeliads are easiest to multiply by separating offsets. Clump-forming perennials and ornamental grasses just need to be dug up and pulled apart. Pick the method that matches your plant's growth habit, follow a few non-negotiable rules about nodes and sterile tools, and you can have rooted babies in as little as two to four weeks.
How to Grow New Plants From Old Plants: Methods Guide

Marcus Holloway
23 May 2026
How to choose the best propagation method for your plant

Before you reach for a knife or a glass of water, take a good look at your plant. The way it grows tells you exactly how to multiply it. Stem-forming plants with obvious nodes (the little bumps or joints where leaves emerge) are classic candidates for stem cuttings. Fleshy-leaved plants like African violets, begonias, peperomia, and Sansevieria can be propagated from individual leaves. Plants that form tight clumps or spreading mats, like hostas, ornamental grasses, or rhubarb, are best divided. Succulents, bromeliads, and aloes produce miniature copies of themselves called offsets or pups that you simply detach. Rhizome-forming plants like iris or ginger can be cut apart as long as each piece includes a growing point (a node). If you're still not sure, a simple rule of thumb: if the plant has stems with leaves growing from joints, try a cutting; if it has babies growing at its base, separate them; if it forms a big clump, divide it.
| Plant Type | Best Method | Key Requirement |
|---|---|---|
| Monstera, pothos, philodendron, basil | Stem cutting (water or soil) | At least one node per cutting |
| African violet, Sansevieria, peperomia, begonia | Leaf cutting | Healthy leaf with short petiole (~0.5 inch) |
| Succulents, aloe, bromeliads | Offset/pup separation | Let cut callus 1–2 days before potting |
| Hostas, ornamental grasses, rhubarb, coneflowers | Division | Each division needs roots and growth points |
| Iris, ginger, mint, lily of the valley | Rhizome division | Each piece must include a node |
| Spider plant, strawberry, creeping fig | Stolon/runner detachment | Separate once baby has small roots |
| Lilies, tulips, daffodils | Bulb/bulblet separation | Handle bulbs gently; replant at correct depth |
| Shrubs, roses, woody perennials | Stem cutting (softwood or semi-hardwood) | Cut just below a node; use rooting hormone |
Stem, leaf, and root cuttings: step-by-step
Stem cuttings
Stem cuttings are the workhorse of plant propagation. Take a cutting that is 3 to 6 inches long and includes at least one node, ideally two. Cut just below a node using a sharp, clean knife or pair of scissors (more on sterilizing tools in the next section). Strip off the lower leaves so nothing is buried in your rooting medium and no leaf is sitting in water, because submerged leaves rot fast and can take the whole cutting with them. You want a clean stem from that bottom node down.
For water propagation, place the cutting in a glass or jar with the bottom node submerged and no leaves touching the water. Set it in bright indirect light and change the water every few days to keep it oxygenated. Roots typically appear within one to three weeks. Once you see two or three roots that are at least half an inch long, pot the cutting into soil. Do this transition gradually if you can: mix a little potting mix into the water over a few days, or move the cutting to a very well-draining mix and keep it consistently moist for the first week so the new roots can adapt.
For soil or medium propagation, stick the cutting vertically into your rooting mix with at least one node buried. Some plants root better when you lay the cutting horizontally with half the stem inserted into the mix. Water gently until the medium is evenly moist but not wet, cover with a humidity dome or loosely tented plastic bag, and place in bright indirect light. Check moisture every couple of days. You'll know roots have formed when the cutting begins producing new leaves and resists a gentle tug.
Leaf cuttings
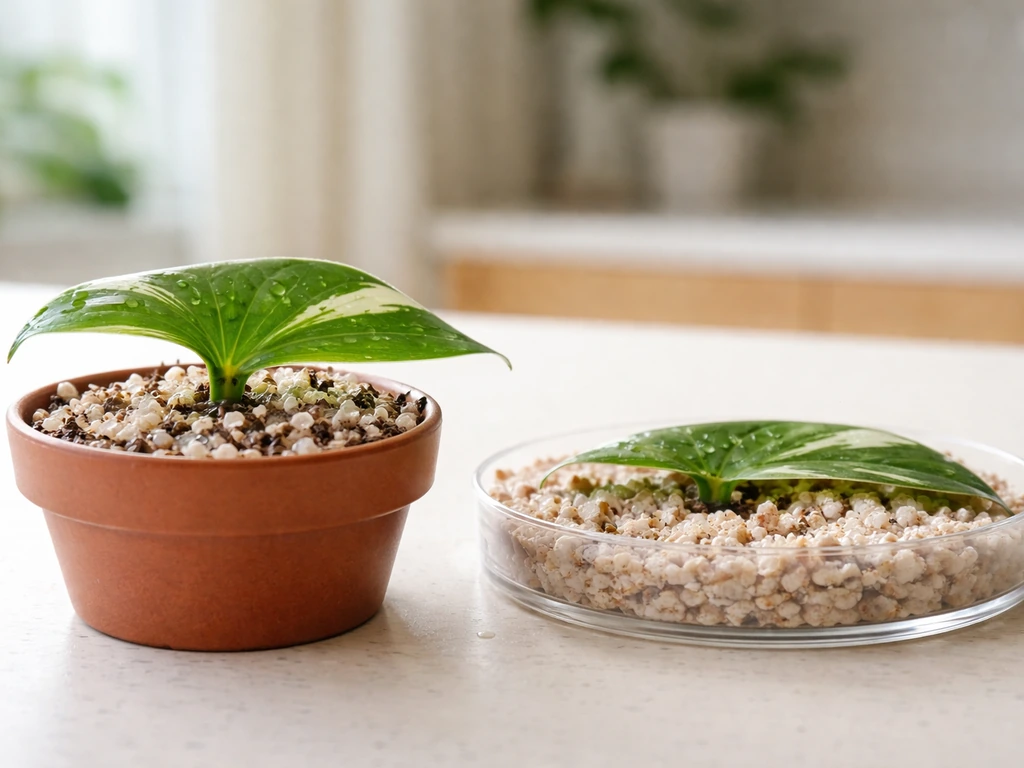
Leaf cuttings work beautifully for African violets, Sansevieria, peperomia, and begonias. For petiole-bearing leaves like African violets, snip a healthy leaf with no more than about half an inch of its stem (petiole) still attached. Dip the cut end in rooting powder, then insert it into moist rooting medium at a slight angle. The leaf itself should sit just above the surface without touching it. Cover with a humidity dome and wait: tiny plantlets will form at the base of the petiole within four to eight weeks. For Sansevieria, you can cut a leaf into sections of about two to three inches each, note which end was pointing up (they need to be planted the right way up), and push each section about half an inch into moist medium.
Root cuttings
Root cuttings are less common but useful for plants like Japanese anemone, Oriental poppies, and some perennials that spread underground. In late winter or early spring (when the plant is dormant), dig up a section of root and cut it into two- to four-inch segments. Thick roots can be planted vertically with the top end just at the soil surface; thin roots can be laid horizontally and covered with about an inch of mix. Keep the medium lightly moist and wait for shoots to emerge from the top.
Dividing and separating offsets, pups, bulbs, and rhizomes
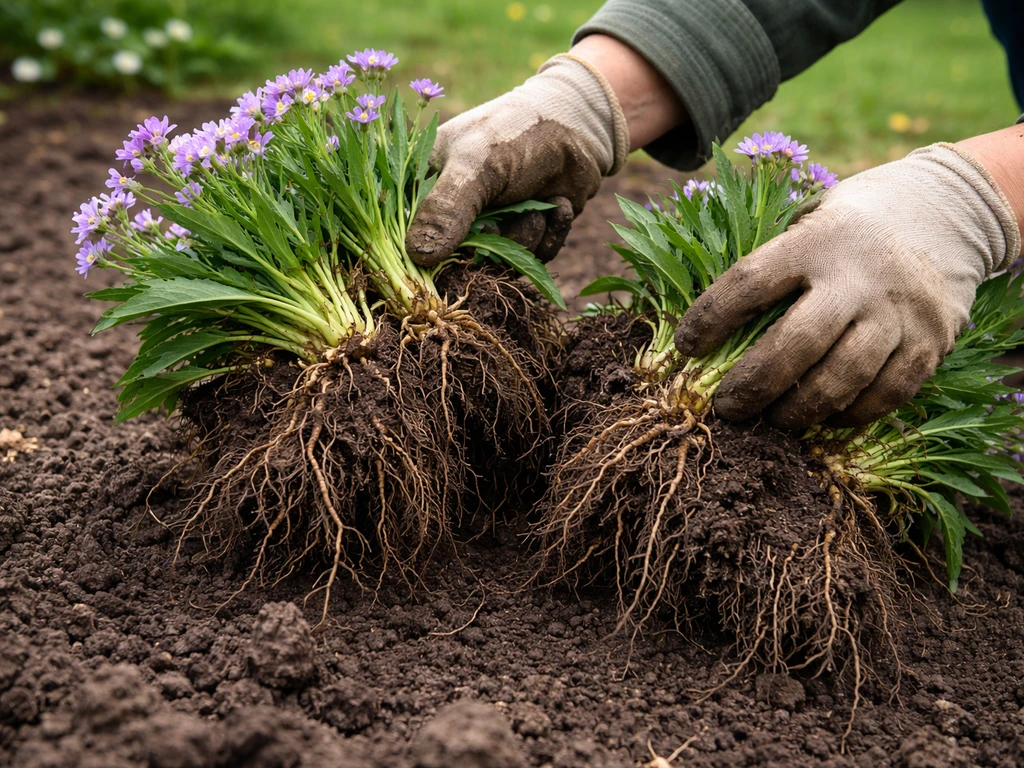
Division
Division is satisfying because it works fast and you see results quickly. For garden perennials like hostas or coneflowers, dig up the whole clump, shake off excess soil, and pull or cut it into sections with your hands or a sharp spade. Every division needs its own roots and at least one visible growth point. For rhubarb crowns, divide in early spring and plant each section so the top of the crown sits about one to two inches below the soil surface. For iris rhizomes, cut through the fleshy root with a sharp knife and dip the blade in a ten percent bleach and water solution between cuts to avoid spreading disease. Each division needs a healthy fan of leaves attached to a firm rhizome section.
Offsets, pups, and runners
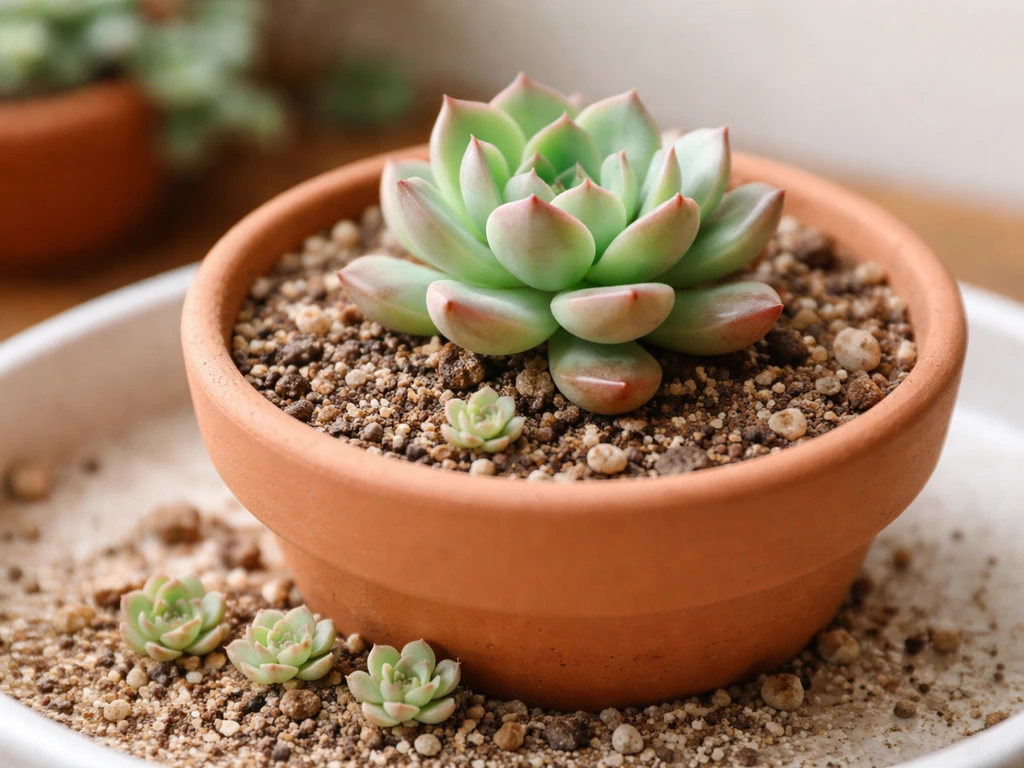
Offsets are the easiest thing in propagation. With succulents and aloe, a small rosette will form at the base of the mother plant. These are not the only “eyes” that can start new growth, and you can often use the same rooting rules to grow new plants from eyes or similar growth points offsets or pups. Wait until it's at least a third the size of the parent before removing it. If it already has its own roots, gently separate it and pot it directly. If it snapped off without roots (happens often when repotting), set it somewhere dry and shaded for one to two days until the wound forms a dry callus, then place it on top of dry cactus mix and mist lightly every few days. It will root on its own within two to four weeks. Spider plants and strawberries produce runners (stolons) with baby plants at the end. You can either pin the baby down into a nearby pot of soil while still attached to the parent, or wait until it sprouts small roots and snip it free.
Bulbs and rhizomes
Many flowering bulbs produce smaller bulblets or cormlets alongside the main bulb. When you dig them up after the foliage dies back, gently separate the babies from the parent and replant them at the appropriate depth for that species. Rhizome-forming plants like mint, ginger, and bearded iris are propagated by digging up the rhizome network and cutting sections that each include at least one growth node. This is also a core technique for plants like Monstera, where each cutting or division must include a node to produce new growth.
Preparing, rooting, and potting: tools, timing, hormones, and medium
Tools and sterilization
Sharp tools are non-negotiable. A dull blade crushes stem tissue rather than cutting cleanly, and crushed tissue is an open invitation for rot. Use a clean, sharp knife or pruning scissors and wipe the blade with a ten percent bleach solution or isopropyl alcohol between plants. This is especially important when dividing disease-prone plants like iris. Have small pots, rooting medium, and a spray bottle ready before you start so the cutting doesn't dry out on your counter while you scramble for supplies.
Timing
Spring and early summer are the best times for most cuttings and divisions. Growth is active, hormone levels in the plant naturally support rooting, and longer days give new roots the light energy they need. Softwood stem cuttings (from new, flexible growth) root fastest. Woody plants can also be propagated from semi-hardwood cuttings in mid to late summer when stems have firmed up a little. Divisions and rhizome cuttings are best done in early spring before the plant fully leafs out, or in early fall after the heat breaks. Succulent offsets can be separated year-round indoors, though spring and summer give faster results.
Rooting hormones
Rooting hormone isn't required for most easy-rooting plants like pothos, mint, or spider plants. However, for woody plants, slow-rooting species, or anything you've struggled to propagate before, it genuinely helps. Products containing IBA (indole-3-butyric acid), IAA, or NAA are the most effective. The most common approach is to dip the cut end of the stem into powder or liquid IBA before placing it in the medium. The key warning here: more is not better. Too much rooting hormone can actually damage the cutting. A light, even coat is all you need. Tap off any excess powder before inserting the stem.
Rooting medium
Never use field soil or heavy garden soil for propagation. It compacts, drains poorly, and carries pathogens that will kill cuttings fast. The ideal rooting medium is light, airy, and sterile. Equal parts perlite and peat moss is a tried-and-true combination. Vermiculite also works well on its own or mixed with peat. The medium needs to hold just enough moisture to keep the cutting turgid while allowing enough air to prevent rot. Virginia Tech notes that a rooting medium should provide a constant supply of moisture while also allowing aeration The medium needs to hold just enough moisture. Aim for a pH around 6.5 or lower for best root development. Once your cutting has rooted and you're ready to move it into a proper pot, a good-quality commercial potting mix is fine.
Light, temperature, humidity, and watering during rooting
During rooting, your cuttings need bright indirect light. Direct sun under a humidity dome or plastic bag acts like a magnifying glass and scorches leaves fast. A spot near a bright window with a sheer curtain, or under a grow light on a timer, is ideal. Aim for temperatures between 65 and 75 degrees Fahrenheit for most houseplants and garden cuttings. Warmer soil (a heat mat set to around 70 to 75 degrees) actively encourages root formation. Avoid letting soil temperatures climb above 77 degrees Fahrenheit consistently, as this raises the risk of damping off.
High humidity is your friend during the early rooting stage because it reduces the water loss through leaves before roots have formed to replace it. A humidity dome, a clear plastic bag loosely tented over the pot, or even a cut plastic bottle placed over the cutting all work. Vent the dome or crack the bag for an hour each day to prevent fungal buildup, and remove it entirely once you see new growth. The propagation medium should never fully dry out. Check it every two days and mist or add a small amount of water when the top starts to feel barely damp. That said, consistently wet or waterlogged medium is the fastest path to rot, so the goal is moist, not soggy.
Troubleshooting: rot, no roots, wilting, fungus, and pests
Cutting is rotting at the base
This is the most common failure and almost always comes down to one of three things: too much water, a non-sterile medium, or a buried leaf. Check the medium first. If it's consistently wet and you can squeeze water out, let it dry slightly and add more perlite for drainage. If the rot is advanced, don't try to save the cutting in the same spot. Cut off the rotted section with a clean blade, check what's left is healthy and firm, and re-root it in fresh sterile medium. This fresh-start approach works more often than people expect.
No roots after weeks
If a cutting looks alive but hasn't rooted after three to four weeks, first check whether your cutting includes a node. A cutting with no node cannot produce roots, full stop. If the node is there, consider adding a humidity dome to retain more moisture around the leaves, applying rooting hormone and trying again with a fresh cut, or switching from water to a perlite-peat mix (or vice versa). Some plants simply take longer: woody cuttings and certain tropicals can take six to eight weeks or more.
Wilting
Wilting in a cutting that hasn't rooted is normal and expected. The cutting has no roots to pull up water yet. This is exactly why humidity management matters so much early on. If the cutting is actively wilting and drooping, increase humidity immediately by covering it, mist the leaves lightly, and move it out of direct light. Check the medium isn't bone dry. If a cutting that seemed to be rooting suddenly wilts, check the roots for brown, mushy tissue, which indicates rot.
Gray mold and fungal issues
Botrytis (gray mold) appears as fuzzy gray or brown patches on leaves or stems and thrives in warm, humid, stagnant air, particularly at temperatures between 70 and 77 degrees Fahrenheit with poor airflow. The fix is to vent your humidity dome daily, remove any visibly affected material immediately, reduce misting frequency, and make sure your rooting medium drains well. Damping off, which causes seedlings or cuttings to suddenly collapse at the soil line, is driven by excessive soil moisture and overhead misting combined with high temperatures. Let the medium surface dry slightly between waterings and improve air circulation.
Pests
Fungus gnats love the moist conditions of propagation trays. Let the top layer of medium dry out a little between waterings to disrupt their life cycle, or use yellow sticky traps near your propagation area. Spider mites appear in hot, dry conditions; if you spot fine webbing, mist the plant and increase humidity. Always inspect parent plants before taking cuttings. Propagating from a plant that already has pests just creates more infested plants.
Aftercare for baby plants: feeding, transplanting, and hardening off
Once your cutting has roots two to three roots that are at least half an inch long, it's ready to move to a proper pot. A four-inch pot with good-quality potting mix is the right starting size for most cuttings. Don't jump straight to a large pot; excess soil around small root systems stays wet too long and encourages rot. Water lightly after transplanting and keep the plant in the same bright, indirect light spot for the first one to two weeks while it settles.
Hold off on fertilizer for the first four to six weeks after transplanting. New roots are delicate and a full-strength fertilizer can chemically burn them. Once you see consistent new leaf growth, you can start with a diluted balanced liquid fertilizer at half the recommended strength, once every two to three weeks through the growing season. After a month or two of healthy growth, you can step up to regular feeding.
If you're moving plants outdoors that were propagated inside, harden them off gradually. Start with one to two hours of outdoor shade each day, then increase sun exposure over one to two weeks. Sudden full sun exposure on a plant that's been under indoor light will bleach or scorch the leaves even if it's otherwise healthy. The same logic applies to moving a plant from a humid propagation dome to dry room air: open the dome a little more each day over three to five days rather than removing it all at once.
Propagation in terrariums and hydroponic setups
If you're propagating for a terrarium, water-rooted cuttings transition well to the humid, enclosed conditions. Stick with species that tolerate consistent moisture and indirect light. For hydroponic systems, water-propagated cuttings are a natural fit: root them in a glass first, then transfer to a net pot with hydroton or rockwool once roots are an inch or more long. The principles are exactly the same: node present, sterile conditions, consistent moisture, and good indirect light while roots establish.
Your quick decision framework and this week's action plan
If you're staring at a plant right now and wondering what to do, here's how to decide in under a minute. Does your plant have visible stems with joints or leaf nodes? Take a stem cutting. Does it have fat, fleshy individual leaves? Try a leaf cutting. Does it have babies growing at its base? Separate an offset or pup. Does it grow in a big clump with multiple crowns? Divide it. Does it spread underground? Cut the rhizome and make sure each piece has a node. That's it.
If you want to multiply plants in larger numbers from a single parent, the approach is essentially the same but repeated across more cuttings or divisions. If you want to learn how to grow more plants from one plant, focus on choosing the right propagation method and keeping each cutting’s growth point intact multiply plants. Using the right propagation method is the key to how to grow many plant from a single parent plant multiply plants in larger numbers. And if you're curious about growing from non-standard structures, the underlying rules still apply: every new plant needs a growth point, clean tools, the right moisture balance, and good light to get started. These same propagation principles can even guide you on how to grow a plant from another planet non-standard structures.
What to do this week
- Identify your plant type and match it to a method using the table above.
- Sterilize your cutting tools with a ten percent bleach solution or isopropyl alcohol.
- Prepare a small pot with a perlite-peat mix (or a clean glass of water for water propagation).
- Take your cutting or separate your offset, making sure a node is included.
- Dip in rooting powder if the plant is woody or slow-rooting, and shake off excess.
- Insert the cutting into medium (or water), cover with a humidity dome or plastic bag, and place in bright indirect light.
- Check moisture every two days. Mist leaves if they wilt; adjust medium moisture if soggy.
- Vent the dome daily to prevent fungal buildup.
- In two to six weeks, check for root development. Once roots are 0.5 to 1 inch long, transplant to a four-inch pot with potting mix.
- Wait four to six weeks before fertilizing. Harden off gradually if moving outdoors.
Propagation has a real learning curve, and not every cutting will make it. That's normal. The people who end up with shelves full of thriving plants are usually the ones who just kept trying, adjusted one variable at a time, and didn't give up after a few failures. Start with one method on one plant this week, watch what happens, and build from there.
FAQ
How do I know if my cutting actually can root?
Most failures happen because the cutting lacks a true growth point. For stem and leaf cuttings, verify there is at least one node (a bump where leaves emerge) before rooting. If you are trying to propagate something that only “looks leafy” but has no visible joints or growth bumps, it likely cannot root on its own and will need a different method (division or offset).
Do I need rooting hormone, and what happens if I use too much?
Yes, but the risk depends on the plant type. Woody or slow-rooting species often benefit from hormone, but easy-rooting houseplants usually do not. If you use hormone, dip only the cut end lightly, tap off excess, and avoid soaking the whole cutting, since too much can inhibit rooting.
My rooting mix feels wet all the time, is that okay?
If the medium stays wet, your odds drop quickly. Let the top layer dry slightly between waterings, then re-moisten, aiming for moist but not soggy. Add drainage (more perlite) if water pools or you can squeeze out liquid. A cutting in constantly waterlogged medium is much more likely to rot than to “take longer.”
Can I plant cuttings upside down, and how do I avoid orientation mistakes?
It depends on the direction of the plant’s growth. For Sansevieria, you must plant the sections the correct way up, so mark the top end when cutting. For most stem cuttings, orientation matters less than having a node buried, but for rhizomes and rhizome-like plants orientation can matter, so follow the growth pattern rather than guessing.
When should I remove the humidity dome or plastic bag?
For most propagations, leave the humidity cover off once you see new growth, not just once the cutting looks less wilted. Also, vent daily (or intermittently) before that stage to prevent mold and leaf scorch. Removing the cover too early can cause quick wilting before roots form.
What should I do if my cutting starts rotting?
If rot is advanced, re-rooting in fresh sterile medium is usually the fastest path. Cut back to firm, healthy tissue with a clean blade, then restart in new sterile perlite-peat (or similar). Do not put a partially rotted cutting back into the same wet mix, since the pathogens remain.
How can I tell normal stress from a problem like damping off or rot?
Yes. Yellowing that’s spreading quickly, blackened mushy stems, or a foul smell point to rot, while slow fading with otherwise firm tissue can be normal before new roots form. Check firmness at the cut end and look for new leaf growth as your “green light.” If the base becomes soft, stop and assess for rot.
When is it safe to pot up a rooted cutting?
For cuttings, waiting until the roots are about half an inch long and you can see at least two or three healthy roots is a good rule. For repotting too early, you often get collapse because the root system is too small to support normal watering. Choose a starting pot around four inches so the medium dries at a healthy pace.
When should I start fertilizing after propagation?
No, do not fertilize right away. Hold fertilizer for four to six weeks after transplanting, since new roots are delicate and fertilizer can burn them. Once you see consistent new leaf growth, start with diluted balanced liquid fertilizer at half strength every two to three weeks.
My cutting has a node but still hasn’t rooted, what should I try first?
In many plants, a node is non-negotiable. If a cutting has nodes but still won’t root after three to four weeks, try one change at a time: switch from water to a perlite-peat mix (or vice versa), increase humidity slightly, and ensure the node is truly buried with leaves kept out of the medium. Also confirm your light is bright but indirect.
How much should I mist during rooting?
Lighter or “just barely moist” is best. Over-spraying can keep stems and leaf bases wet, which feeds mold. Mist lightly only if leaves are drying or wilting, and prioritize stable humidity through the cover, venting, and correct medium moisture.
Should I worry about pests on the parent plant before propagating?
Yes, and it’s often the best move. For pests like spider mites or fungus gnats, treat the parent plant first so you do not scale up the problem. Sticky traps help for gnats, and increasing humidity can reduce mite pressure, but quarantine new cuttings if you are unsure.
How do I move new plants outdoors without shocking them?
For outdoor moves, harden off gradually to reduce scorch or bleaching. Start with a couple of hours of shade daily, then increase sun exposure over one to two weeks. If the plant was under a humidity dome, also open the dome gradually over several days so the transition is smooth.
What’s the best way to troubleshoot my propagation results over multiple attempts?
To multiply plants reliably, keep each batch consistent, then adjust one variable per attempt. Use the same medium, light level, and humidity approach, and record what you did when a cutting fails or succeeds. This prevents “random changes” that make it impossible to learn.