You can realistically grow dozens of plants at once in a small space if you match the right plants to your setup, use propagation methods that multiply fast, and build a simple routine that keeps everything alive without burning you out. The secret isn't a bigger grow room or an expensive setup, it's a plan that works with your actual space, light, and schedule. If you're curious about the extreme end of plant care, you can also look into how to grow a plant from another planet and what it would require.
How to Grow Many Plants: Scale Up Fast and Succeed

Marcus Holloway
16 May 2026
Turn 'many plants' into a real plan

Before you buy a single seed packet or cutting, you need four honest answers: How much space do you have? How much light can you realistically provide? What's your budget for setup and ongoing costs? And how soon do you want results? These four factors will determine everything else, so don't skip them.
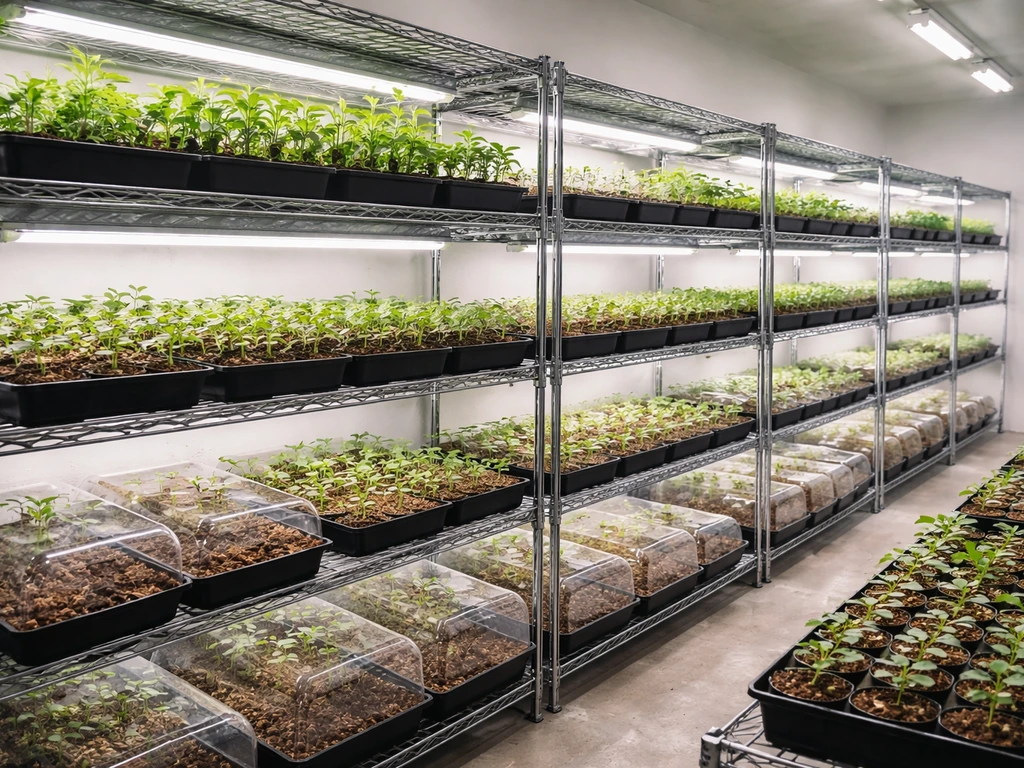
Space doesn't have to mean square footage, it means usable surface area with adequate light. A single south-facing windowsill can host a surprisingly productive microgreens operation. A spare shelf with a grow light becomes a legitimate propagation station. If you're working outdoors, a 4x8 raised bed or a cluster of containers on a patio counts. The key is mapping it out before you fill it up. Draw it, even roughly. Where will seedlings start? Where will mature plants live? Where do rooted cuttings wait?
Planning frameworks from cooperative extensions recommend sizing your garden to your actual capacity, including your time, not just your enthusiasm. If you can give 30 minutes a day, that's plenty to manage 20 to 40 small plants if the system is efficient. If you can only check in every few days, you'll want plants that forgive irregular attention, and you'll want to group them by water needs so you're not running a separate watering schedule for every single pot.
- Space: Count your available light zones, not just floor area. Vertical space counts — shelves, hanging planters, and tiered stands multiply your capacity.
- Light: Natural light through a south or west window works for many plants. Grow lights (LED panels or T5 fluorescents) give you control and let you stack growing levels.
- Budget: You don't need to buy everything at once. Start with seeds and cuttings (nearly free), cheap trays, and basic soil. Scale up when you see what's working.
- Timeline: Fast-turnaround crops like microgreens (7–21 days to harvest) give you early wins and confidence. Slower plants like tomatoes or herbs take weeks to months — plan both into your rotation.
The biggest beginner mistake is trying to grow everything at once with no sequence. Succession planting, staggering your sowings by 7 to 14 days, means you're always harvesting something without being overwhelmed all at once. This is how you keep momentum going and space turning over.
Pick the right plants for fast, dense, high-success growth
Not all plants are created equal when you're trying to grow many at once. You want plants that germinate quickly, tolerate close spacing, give you something to harvest or enjoy fast, and don't demand constant fussing. If you pick finicky, slow, space-hungry plants right out of the gate, you'll get discouraged before you ever hit 'many.'
Microgreens are the ultimate high-density, fast-turnaround crop. You're harvesting 7 to 21 days after germination depending on the species, cabbage family microgreens, for example, are typically ready at 14 days after sowing. You can run multiple trays in rotation on a single shelf. Radishes, sunflowers, peas, and broccoli are beginner-friendly microgreen choices with fast, predictable germination.
Lettuce and salad greens are the next tier, quick-maturing, cut-and-come-again friendly, and happy in containers or trays. Herbs like basil, cilantro, and chives are similarly forgiving and high-value for the space they take. For longer-term growing, pothos, spider plants, and succulents propagate so easily that one plant quickly becomes many, more on that in the propagation section. If you want another easy way to multiply, you can also learn can you grow new plants from eyes and use it to expand your collection propagate so easily.
| Plant | Time to First Harvest/Result | Best for Dense Growing | Propagation Method |
|---|---|---|---|
| Microgreens (radish, broccoli, pea) | 7–21 days | Trays, stacked shelves | Seed (direct sow dense) |
| Lettuce / salad greens | 21–45 days | Containers, rows, trays | Seed (succession sow) |
| Basil / cilantro / chives | 3–6 weeks to usable size | Pots, window boxes | Seed or cuttings |
| Pothos / spider plant | 2–4 weeks to rooted cutting | Shelves, hanging pots | Cuttings, division |
| Succulents / sedums | 4–8 weeks to established offsets | Trays, shallow pots | Leaf propagation, offsets |
| Tomatoes (compact/dwarf varieties) | 60–80 days from seed | Containers, raised beds | Seed, suckers |
The golden rule: stack fast plants with slow ones. While your tomatoes are still seedlings, your lettuce tray has already given you two harvests. This interplanting approach keeps your space productive and your motivation high.
Propagation basics: how to scale up quickly
Growing many plants means multiplying efficiently. You have three main tools: seeds, cuttings, and division. Each has a place in a smart growing plan, and the best setups use all three.
Seeds: high volume, low cost
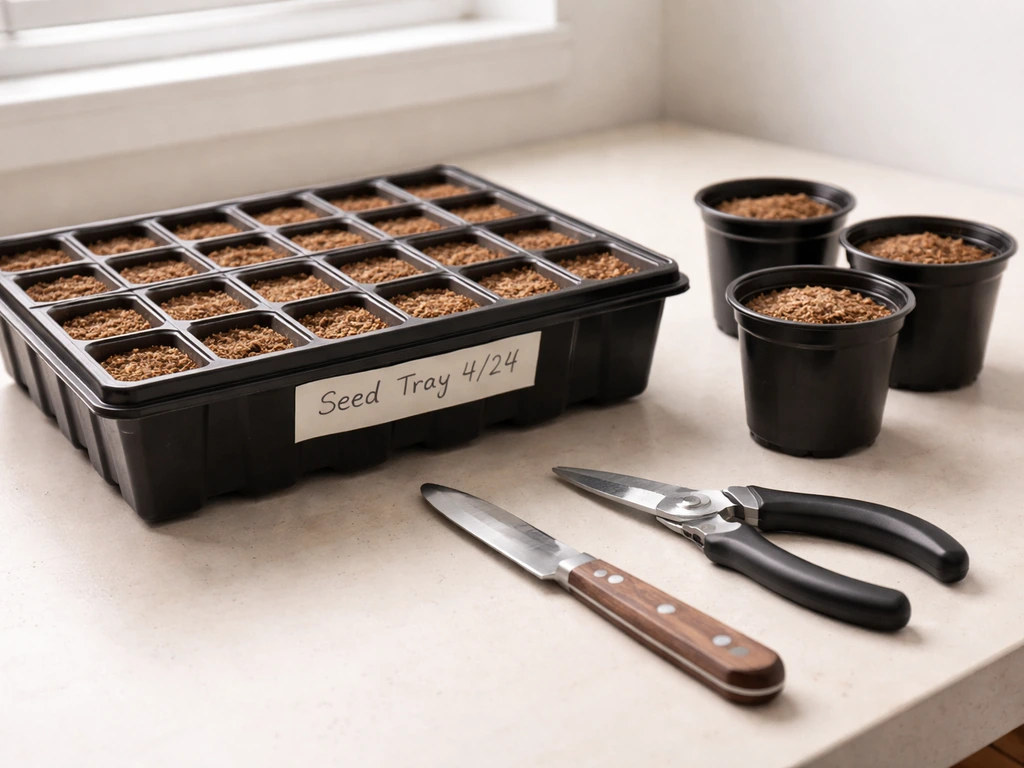
Seeds are the cheapest way to get plant count up fast. The trick is starting them right. Light-requiring seeds (like lettuce) should not be buried, press them gently onto the soil surface and keep them moist with misting until germination. Once you see true leaves emerging between the cotyledons (those first baby leaves), that's your signal to transplant or thin. Crowded seedlings compete aggressively for light, water, and nutrients, and they won't catch up later, thinning feels wasteful but it's essential. Starting seeds too early also causes problems: you end up with leggy, pot-bound seedlings with nowhere to go, which stunts the whole batch.
Succession sowing is your scaling lever with seeds. Instead of sowing everything at once, stagger batches every 7 to 14 days. Johnny's Selected Seeds and WVU Extension both recommend intervals of 7, 10, 14, 21, or 30 days depending on the crop and your harvest goals. For salad greens, a new tray every 10 days means you're always a week or two away from fresh harvest.
Cuttings: clone your best plants
Stem cuttings let you multiply a single good plant into dozens of identical copies. Take a 4 to 6 inch cutting just below a leaf node, strip the lower leaves, and stick it in moist potting mix, water, or a propagation medium. Reducing the leaf area on the cutting (by removing lower leaves or trimming large leaves in half) minimizes moisture loss while roots develop. A simple humidity chamber, a clear plastic bag or dome over the cutting, creates the moist environment cuttings need to root without wilting. Once you see new growth or resistance when you tug gently on the stem, roots have formed and you can start acclimating the cutting to normal conditions gradually.
Division: instant multiplication for clumping plants
Division is the fastest way to go from one plant to many. Spider plants produce offsets (babies on runners) you can snip and pot up. Chives, hostas, and many perennials form clumps you can physically separate with a clean knife or trowel. Each division becomes a new plant immediately. This is genuinely one-to-many in a single afternoon.
Lighting and layout for maximum throughput
Light is the single biggest limiting factor for anyone trying to grow many plants indoors. Insufficient light produces leggy, pale, struggling plants, and no amount of extra water or fertilizer fixes a light problem. After germination, seedlings should move off the heat mat and directly under appropriate plant lights. The closer the light, the better for most seedlings (6 to 12 inches for LED panels, depending on the wattage).
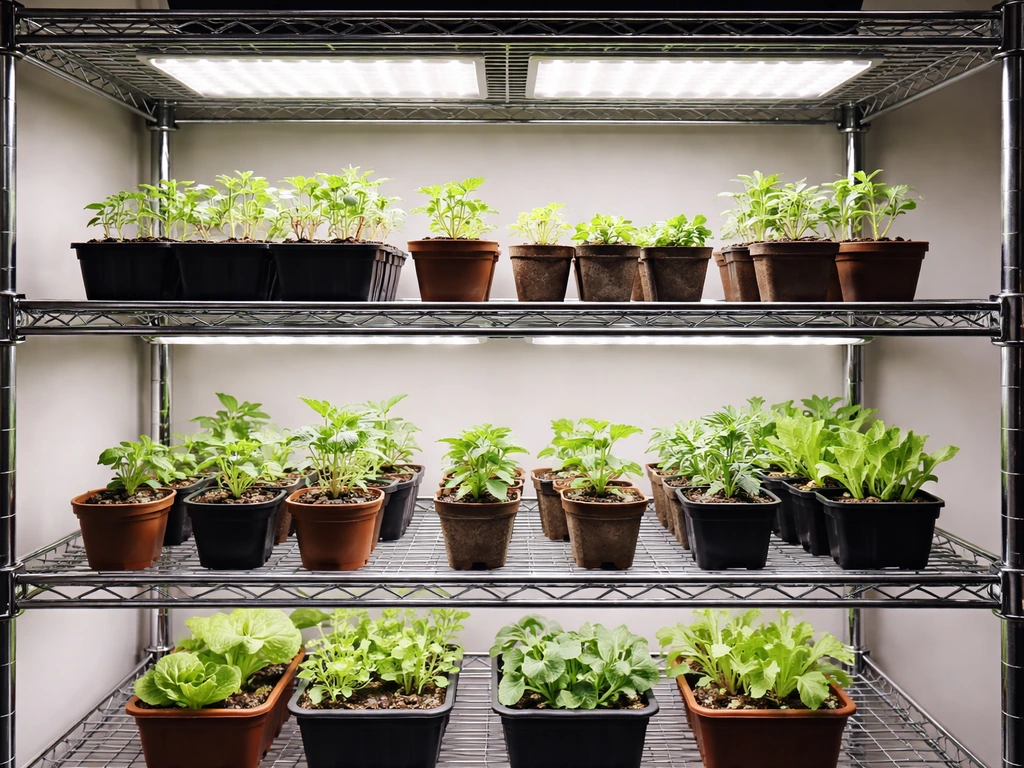
For layout, think in tiers. A metal shelving unit (the kind you find at hardware stores for under $50) with an LED strip or T5 panel clipped to the underside of each shelf gives you three or four independent growing levels in about 2 square feet of floor space. Place the fastest-growing or most light-hungry plants on the upper levels closest to the light source, and shade-tolerant plants lower down. Rotate trays every few days so plants on the edges get equal exposure.
Outdoors, use the same logic. Taller plants go to the north side of the bed or container cluster so they don't shade shorter plants. Interplanting quick crops (radishes, lettuce) between slower crops (tomatoes, peppers) uses every inch of productive space while the slow plants are still small.
- Aim for 14–16 hours of light per day for seedlings and fast-growing crops under grow lights.
- Full-spectrum LED panels are the most energy-efficient option for indoor growing shelves.
- Use a simple outlet timer so you're not manually switching lights on and off.
- Group plants by light needs: high-light plants closest to the source, lower-light plants further away.
- Keep airflow moving — a small fan prevents the stagnant, humid air that breeds disease in dense collections.
Watering and nutrients by growing medium
How you water and feed your plants changes completely depending on what they're growing in. The same instincts that save plants in soil will kill them in hydroponics. Here's how to think about each medium.
Soil
For most soil-grown plants, the goal is consistent moisture without waterlogging. Stick your finger an inch into the soil, if it's dry, water thoroughly until it drains from the bottom. If it's still moist, wait. Overwatering in soil is the most common killer of plant collections because it suffocates roots just as effectively as underwatering starves them.
Use well-draining potting mix, pots with drainage holes, and never let plants sit in standing water for more than an hour. For nutrients, a balanced liquid fertilizer (like a 5-5-5 or 10-10-10) every two weeks during active growth is plenty for most container plants. Microgreens and sprouts grown in soil or a soilless medium typically don't need fertilizer at all, they're harvested so quickly that the seed's own energy carries them through.
Hydroponics and water-based growing
In hydroponics, 'overwatering' is actually a root oxygen problem, not a water volume problem. When roots sit in stagnant nutrient solution without adequate oxygenation, they suffocate.
The fix is aeration: an air pump connected to an air stone bubbles oxygen through the solution, keeping roots healthy. A general guideline for small systems is one air stone per 10 square feet of growing area. [Keep your nutrient solution pH between 5. ](https://extension.
okstate. edu/fact-sheets/electrical-conductivity-and-ph-guide-for-hydroponics)5 and 6. 5 for most crops, lettuce, for example, does well at pH 6 to 7. An inexpensive pH meter and EC (electrical conductivity) meter are essential tools once you're running a hydro system with multiple plants, since imbalances affect every plant at once.
Aim for at least 18% air space in whatever growing medium you use (rockwool, clay pebbles) so roots can breathe between watering cycles.
Terrariums
A closed terrarium is its own mini ecosystem. The moisture cycles internally, which is why a properly set-up closed terrarium normally won't need watering for 4 to 6 months. When you do water, add sparingly, and don't replace the lid until any wet foliage has dried completely to prevent rot and mold. The plants that thrive here are moisture-loving, low-light species: ferns, moss, peperomia, and small tropicals. The challenge with terrariums in a 'grow many plants' context is that they're slow and controlled, not fast and scalable, think of them as a specialty display, not a production system.
Microgreens and dense trays
For microgreens and dense seedling trays, mist the surface for the first few days to keep seeds moist without displacing them. Once germination happens and roots are established, switch to bottom watering: set the tray in a shallow container of water and let it absorb from below. This keeps the foliage dry (reducing disease risk) and encourages roots to grow downward. No fertilizer is needed for microgreens, they're harvested before the seed's nutrients are depleted.
How to prevent the most common problems in big plant collections
The more plants you grow, the more any single problem can spread. A pest that's manageable on one plant becomes an infestation across 30 plants in a week if you're not watching. Here's what to protect against.
Overcrowding
Crowded plants compete for light, water, and nutrients, and they create the humid, stagnant air that pathogens love. Follow spacing recommendations, strawberries are a classic example where plants quickly overcrowd each other and production drops. For seedlings, thin ruthlessly. For established plants, resist the urge to cram extra pots onto a shelf. If a plant is touching its neighbors, something needs to move. Good airflow between plants is a disease prevention strategy, not just an aesthetic one.
Pests
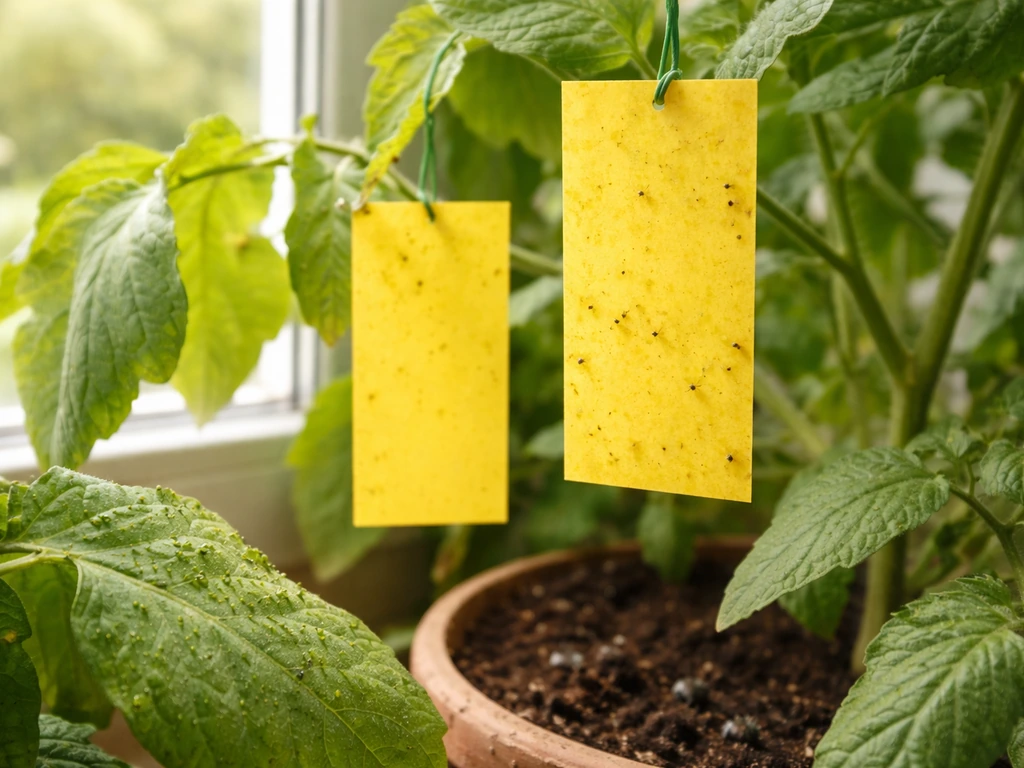
Sticky yellow traps (glue traps) hung among your plants do two jobs at once: they catch fungus gnats, whiteflies, and aphids, and they tell you what's present and how bad it is before you have a full outbreak. Walk your collection at least twice a week and flip leaves over, most pests hide on the undersides. Inspect any new plant carefully before it joins your collection. One infested new arrival can seed an entire shelf within two weeks. Quarantine new plants for a week before introducing them to the group.
Disease and rot
Most disease problems in plant collections trace back to excess moisture: wet foliage, waterlogged soil, poor drainage, or stagnant humid air. Bottom watering instead of overhead watering keeps leaves dry. A small fan running on low keeps air circulating. Remove dead or dying leaves promptly, they're disease incubators. If you spot mold on soil surfaces, let the medium dry more between waterings and increase airflow.
Nutrient imbalances and transplant shock
When you're managing many plants, it's tempting to over-fertilize to 'help' them grow faster. Resist this. More fertilizer than the plant can use causes nutrient burn (brown leaf tips, crispy edges) and can kill seedlings outright. Start with half the recommended dose and increase only if plants show deficiency signs (yellowing lower leaves, slow growth). Transplant shock happens when roots are disturbed without adequate preparation, water plants well before transplanting, handle roots gently, and keep transplants out of harsh sun for a few days while they settle in.
Your scaling schedule for the next 7–30 days
This is where everything comes together. You don't need to build the perfect system on day one, you need a sequence that builds momentum and catches problems early. Here's a realistic 30-day runway.
- Days 1–3: Audit your space and light. Decide on your growing medium (soil, hydro, or trays). Buy seeds, basic trays or pots, and a bag of quality potting mix. If growing indoors, confirm you have adequate light or order a simple LED grow light panel.
- Day 3–4: Sow your first fast batch — a tray of microgreens or a row of lettuce seeds. Mist the surface, cover loosely with a dome or plastic wrap, and place near light or on a heat mat.
- Days 5–7: Check germination daily. Once you see sprouts, remove the dome, move seedlings directly under lights, and switch from misting to gentle bottom watering. Set up sticky traps now, before you have a problem.
- Days 7–10: Sow your second batch (succession planting). Thin the first batch if seedlings are crowding each other. Take cuttings from any houseplants you want to multiply — pot them up in moist mix under a humidity dome.
- Days 10–14: Check cuttings for rooting (gentle tug test). Harvest microgreens if they're at cotyledon stage (most will be ready 10–14 days after germination for fast species). Sow batch three.
- Days 14–21: Transplant rooted cuttings to individual pots. Assess which plants are thriving and which are struggling — adjust light, spacing, or watering accordingly. Don't wait for problems to get worse.
- Days 21–30: You should now have multiple generations of plants in rotation. Review your spacing, check for pests weekly, and continue staggered sowings every 7–14 days. By day 30 you'll have a functioning system, not just a collection.
Weekly routine checklist
- Check soil moisture or hydro solution levels and water/top up as needed.
- Inspect plants for pests (check leaf undersides) and check sticky traps.
- Remove dead or yellowing leaves immediately.
- Sow the next succession batch if you're on a 7–14 day schedule.
- Rotate trays or pots so all sides get even light exposure.
- Record what's working — note germination dates, harvest dates, and any problems. Even a simple notebook saves you from repeating mistakes.
Growing many plants isn't about doing everything perfectly, it's about doing enough things consistently. The growers who end up with thriving, full collections aren't the ones with the fanciest gear. They're the ones who check in regularly, fix small problems before they become big ones, and keep sowing the next batch. You can start today with what you have, and in 30 days you'll have more plants than you started with, and the system to keep going.
FAQ
How do I avoid starting too many plants and not having enough light for all of them?
Use “plant count per light unit” instead of total number. If you do not have enough brightness for the new batch, it will stretch and slow, which kills scaling. A quick rule is to only start the next tray when your current trays are fully lit, then rotate trays so all edges get similar exposure.
Can I grow many plants with low light if I increase watering or fertilizer?
Yes, but treat it as a short trial with a strict timeline. If you are short on light, pause new sowings for 7 to 14 days and concentrate on finishing the current batch. Leggy starts usually cannot be corrected later without sacrificing time and space.
What’s the best way to manage watering schedules when I want many plants at once?
Don’t rely on a calendar alone. Group crops by watering behavior, then check the highest-need group first (often warmer, leafier, and faster-growing). If you can only water every few days, prioritize cut-and-come-again greens and microgreens, and avoid slow-drying plants like many succulents.
How can I tell whether my issue is overwatering versus a nutrient or disease problem?
If you see yellowing plus mushy stems or soggy soil, assume overwatering or poor drainage first. For soil plants, water only when the top inch is dry and confirm pots have drainage holes. For seedlings, avoid watering from above after germination, switch to bottom watering to keep foliage dry.
Why are my seeds germinating poorly when I’m trying to grow many plants?
That’s usually due to wrong seeding depth or inconsistent moisture. Light-demanding seeds should sit on the surface, press gently, and stay evenly moist until germination. If germination is uneven, increase uniformity by using the same medium thickness across trays and mist more consistently for the first days.
What should I do if my seedlings are getting leggy or pot-bound?
If seedlings are getting pot-bound, you started too early or transplanted too late. Start later, and transplant or thin as soon as true leaves appear, not weeks afterward. For scaling, keep a fixed “seed-to-tray” schedule and discard trays that miss the timing so they don’t consume shelf space.
How do I prevent stem cuttings from rotting when I multiply plants for scale?
For cuttings, humidity is critical at the start, but stagnant air also increases rot. Use a humidity dome or bag for the first rooting period, then ventilate briefly each day once you see new growth. Also ensure the lower leaves are removed so they do not sit in the medium.
What’s the fastest way to stop one new plant from turning into an infestation across all my shelves?
Quarantine first and inspect second. Keep new plants separate for about a week, check undersides with a bright light, and use sticky yellow traps near the quarantine spot. After quarantine, introduce plants gradually by placing them on the outer edge of your collection first.
Can I grow more plants by packing them closer together?
Yes, but choose the spacing based on airflow, not just plant size. If leaves touch, reduce density, thin earlier, or stagger more sowings so you harvest before the crowded stage. Airflow and spacing are often more important than changing fertilizers.
How do I adjust fertilizing when I’m scaling up and some plants start showing nutrient burn?
Most nutrient-related problems show up after the seedling stage. Start with half strength fertilizer for container plants only during active growth, and stop when you are in rapid harvest mode like microgreens. If you see burnt tips, flush the pot with plain water and pause feeding until new growth looks normal.
What routine keeps my shelves from turning into a backlog when I have multiple batches running?
Plan for a “rotation buffer.” If you harvest and move trays on a fixed rhythm, it prevents orphan trays that sit in the dark or get missed. A simple approach is to label sowing dates, then rotate trays every few days and always keep at least one finished tray ready to harvest and clear space.
Do I need different watering techniques for microgreens, soil plants, and terrariums?
Use a moisture-control method that matches the crop speed. Microgreens usually do best with misting early and bottom watering after roots establish, while many soil-grown container plants should be top-watered until runoff. Terrariums are different, they generally should not be “watered on demand.”
How should I choose which plants to start with when my goal is many plants fast?
Most collections do better when you start with 2 to 4 “fast multipliers” and 1 slow anchor crop. Build volume using seeds plus one or two easy propagation methods (like division or cuttings) so you always have something you can replace quickly when losses happen.
How do I interplant quick crops with slow crops without reducing yields?
Yes, and it’s mainly a scheduling issue. For example, overlap lettuce harvests with the early stage of tomatoes by using short-cycle trays first. If your slower crop starts shading before the fast crop finishes, adjust placement, move the fast crop up to the top shelf, or stagger sowings.