To grow massive outdoor plants, you need four things working together at the same time: maximum direct sunlight (at least 8 hours of full sun daily), a large and unrestricted root zone, consistent water and nutrients scaled to a big plant's appetite, and enough time in the vegetative stage before flowering kicks in. If you are specifically asking how to grow combat plants, use the same big-plant fundamentals here, starting with maximum light and enough root space. Get those four things right and the size will follow. Miss even one of them and you'll hit a ceiling no matter how well you handle everything else.
How to Grow Massive Outdoor Plants: A Step-by-Step Guide

Marcus Holloway
12 May 2026
What Actually Drives Massive Outdoor Growth
Understanding the levers behind plant size saves you from chasing the wrong fixes. Big plants are not magic. They are the result of stacking favorable conditions until the plant has no reason to stop growing.
Light is the single biggest driver. Researchers measure this as Daily Light Integral (DLI), which is basically the total amount of usable light your plant receives in a full day. Studies show that reducing DLI by even 26 to 40 percent cuts shoot dry weight by roughly 22 to 23 percent. That means a partially shaded spot can cost you nearly a quarter of your potential plant size before you even factor in nutrients or water. Outdoors, you want the highest DLI you can get, which means a south-facing location (in the Northern Hemisphere) with zero shading from trees, fences, or buildings during peak hours.
Roots are next. A meta-analysis covering 65 studies confirmed that rooting volume directly determines plant size. A cramped root system is a growth ceiling. If roots hit the wall of a container or run into compacted soil, the plant shifts resources away from upward growth and into stress management. In-ground plants with loose, deep soil almost always outgrow container plants when everything else is equal, simply because the roots have nowhere to stop.
Water and nutrients are the raw materials. A big plant is literally building biomass out of water, CO2, and dissolved minerals. During peak vegetative growth, a large outdoor plant can drink several gallons of water per day in hot weather. Starve it of either and growth slows immediately. Overwhelm it with nutrients and you cause lockout or burn, which slows growth just as effectively.
Photoperiod (day length) controls the clock, especially for photoperiod-sensitive plants like cannabis. Short-day plants, including most cannabis varieties, begin transitioning to flower when day length drops below a critical threshold, often around 12 hours or less. Photoperiod studies use short-day versus long-day categories and distinguish obligate versus facultative responses based on critical day length, which helps explain when flowering will begin. The longer you can keep the plant in vegetative growth before that threshold is crossed, the larger it will be when flowering begins. Planning your start date around your local photoperiod calendar is one of the highest-leverage decisions you will make.
Wind is something most growers underestimate. A little airflow is healthy. It triggers thigmomorphogenesis, the process where plants grow thicker, stronger stems in response to mechanical stress. But chronic strong wind is a net negative. It forces the plant to allocate carbon to stem reinforcement instead of height and canopy, it increases water loss from leaves, and it changes how moisture sits on foliage, which affects mold and pest risk. Think of wind as a dial: some is good, too much slows you down.
Choosing Genetics, Timing, and Matching Your Climate
Genetics set the ceiling. No amount of perfect technique will push a naturally compact plant into tree-sized territory. For maximum outdoor size, you want genetics that are bred for long vegetative cycles, vigorous growth rates, and suitability for your specific climate. Sativa-dominant cannabis strains or sativa-heavy hybrids grown outdoors in warm, long-season climates are the classic example of genetics bred to get enormous. Indicas finish faster but stay shorter. Autoflowering varieties flower based on age rather than day length, which limits how large they can get.
Timing is everything. For photoperiod-sensitive plants, you want to start them as early as the weather safely allows so they accumulate the maximum amount of vegetative growth before shorter days trigger flowering. In most of the continental US, that means starting seeds or rooted clones indoors in late February or March, then transitioning them outdoors after your last frost date. A plant that goes outside in early May with 8 weeks of indoor vegetative growth behind it will be dramatically larger by harvest than one started outdoors in June.
Match your genetics to your climate honestly. A strain bred for equatorial conditions may not finish flowering before your first fall frost if you live in a northern climate. Conversely, a strain that finishes early may flip to flower in midsummer before it has reached its size potential. Research the flowering time and latitude recommendations for any variety you choose. Talk to growers in your specific region if you can.
| Plant Type | Veg Period Control | Max Outdoor Size Potential | Best For |
|---|---|---|---|
| Photoperiod cannabis (sativa-dom) | Controlled by day length | Very high (6–15+ ft) | Long-season warm climates |
| Photoperiod cannabis (indica-dom) | Controlled by day length | Medium (4–8 ft) | Shorter seasons, northern growers |
| Autoflowering cannabis | Age-based, not photoperiod | Lower (2–5 ft) | Beginners, quick harvests |
| Tomatoes (indeterminate) | Day-neutral | High with support (6–10 ft) | Most outdoor climates |
| Sunflowers (giant varieties) | Day-neutral to long-day | Very high (10–14 ft) | Full-sun gardens anywhere |
Setting Up Your Site for Maximum Size
Sun and wind exposure
Pick the sunniest spot you have. A south-facing slope or a location against a south-facing wall that gets unobstructed sun from 9am to at least 6pm is ideal. Walk the site on a clear day and watch for shading from trees, structures, or fences throughout the day, not just at noon. Partial shade in the morning or late afternoon costs you real DLI and real size. For wind management, a natural windbreak like a hedge or fence on the prevailing wind side is worth the effort. You want airflow, not a wind tunnel.
Soil pH and drainage
Most plants want a soil pH between 6.0 and 7.0. Cannabis specifically does best between 6.0 and 6.8. pH matters because it controls nutrient availability. Even if your soil is loaded with nutrients, a pH that is too high or too low locks those nutrients into forms the plant cannot absorb. This is called nutrient lockout and it looks exactly like a deficiency even when you are feeding heavily. Get your soil tested before you plant. NC State Extension has a solid guide on how to do this accurately, and most state cooperative extensions offer low-cost tests. Adjust pH with lime to raise it or sulfur to lower it, following the test recommendations.
Drainage is equally non-negotiable. Roots suffocate in waterlogged soil. If your site holds standing water after rain, you need to either amend the soil heavily, build a raised bed, or choose a different location. A simple test: dig a hole about 12 inches deep, fill it with water, and see how long it takes to drain. It should empty within an hour or two. If it takes longer, your drainage is poor.
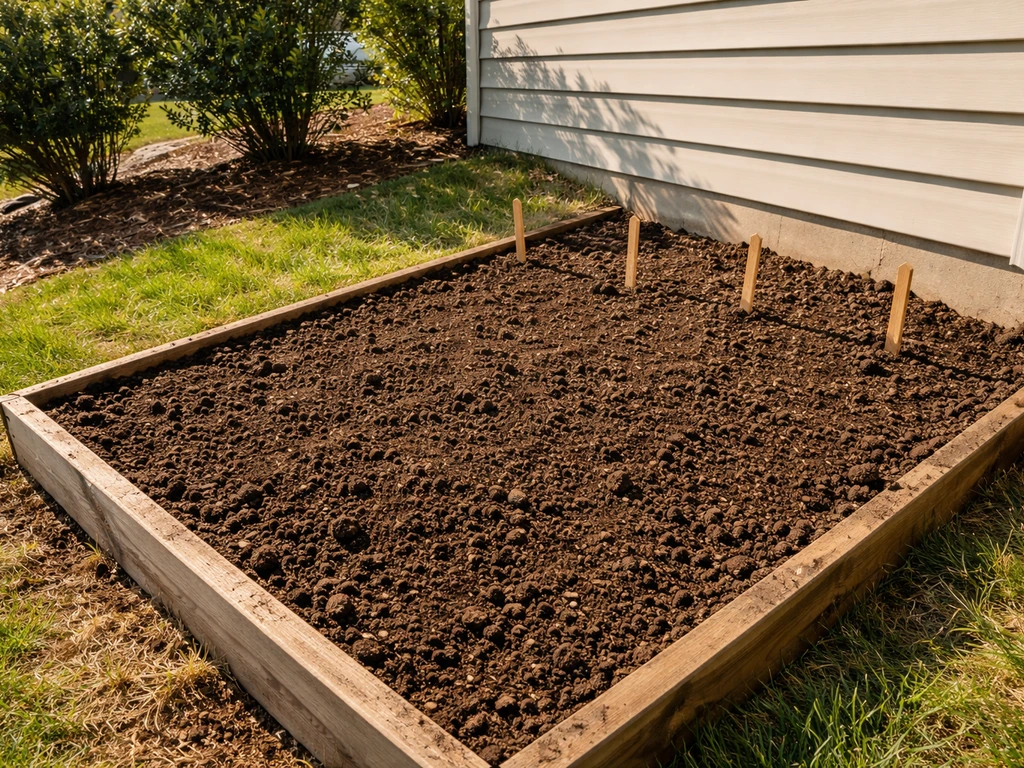
Soil amendments for big growth
Outdoor soil for massive plants needs to be loose, deep, and rich. Before planting, work at least 12 inches of soil (18 to 24 inches is better) to remove compaction and allow roots to dive deep. Mix in generous amounts of high-quality compost, ideally several inches worked into the top foot of soil. Add perlite or coarse sand if drainage is an issue. For a nutrient head start, a balanced slow-release organic amendment like worm castings, composted manure, or a balanced granular fertilizer worked into the hole at transplant will feed the plant through its early weeks without burning tender roots.
Containers vs in-ground: which wins for size?
In-ground is the answer for absolute maximum size. With no walls to restrict roots, the plant can access as much soil volume as it needs. If you go in-ground, dig a large planting hole (at minimum 2 feet wide by 2 feet deep, larger if possible) and fill it with amended soil even if your native soil is decent.
Containers are useful when you need portability, when your native soil is genuinely terrible, or when you want more control over root zone temperature and nutrition. If you use containers, size up aggressively. For very large cannabis plants, growers commonly use 30 to 100+ gallon fabric pots or smart pots, which also prevent the root circling that kills growth in standard hard-sided containers. Research confirms that container type and placement affect root zone temperature, so in hot climates, keep dark containers off hot pavement and consider wrapping them to reflect heat. Make sure every container has large, unobstructed drainage holes. A pot sitting in a puddle of its own runoff will rot roots and slow growth fast.
| Factor | In-Ground | Large Container (30-100 gal) |
|---|---|---|
| Max size potential | Highest | High |
| Root restriction | None (good native soil) | Possible if undersized |
| Drainage control | Harder to modify | Easy, built-in holes |
| Nutrient control | Less precise | More precise |
| Portability | None | Possible when small |
| Root zone temp | Stable | Can overheat outdoors |
| Best use case | Long-term, large scale | Movable or poor native soil |
Starting Seeds or Clones and Getting Them Outside Safely
Seedling and clone startup
Seeds started indoors need warmth, moisture, and light from day one. Use a seedling heat mat to keep the root zone between 70 and 80°F. Once sprouted, give them 16 to 18 hours of light per day under a grow light or on a very bright south-facing windowsill. Weak, leggy seedlings at this stage usually mean insufficient light, not a nutrient problem. Clones need high humidity (70 to 80 percent) and indirect light until roots establish, usually 7 to 14 days. Once they have a healthy root system, treat them like established seedlings.
Hardening off: the step most beginners skip
Moving a plant directly from a warm, controlled indoor environment to full outdoor sun and wind is one of the most common reasons plants stall, get sunburned, or die after transplant. Hardening off is the process of gradually introducing your plant to outdoor conditions over 7 to 14 days. Start with 3 to 4 hours outside in a shaded, sheltered spot on a warm day, then bring the plant back in. Each day, add an hour or two and gradually increase sun exposure. By the end of two weeks, the plant should be spending full days outside and tolerating direct sun without stress. This is not optional. Skipping it will cost you weeks of lost growth time while the plant recovers.
Transplanting without shock
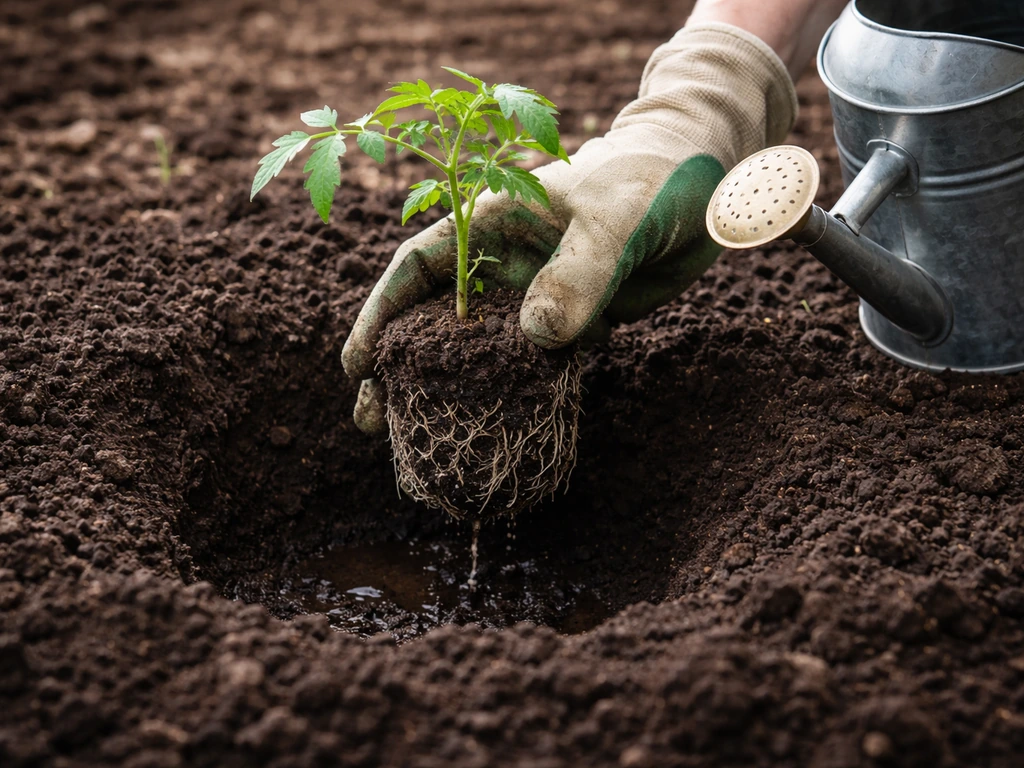
Transplant on a cloudy day or in the evening to reduce stress. Water the plant thoroughly before moving it so the root ball holds together. Dig a hole slightly larger than the root ball and water the hole before dropping the plant in. Minimize root disturbance as much as possible. A diluted high-phosphorus starter solution applied to the roots at transplant can help establish faster. After planting, water deeply and keep the soil consistently moist (not waterlogged) for the first week while the plant adjusts. Expect a brief pause in visible top growth while the roots settle in. That is normal.
Nutrients and Watering for Explosive Vegetative Growth
Building a feeding schedule
During the vegetative stage, plants need nitrogen most of all. Nitrogen drives leaf and stem growth. A balanced or nitrogen-heavy NPK formula (something like 3-1-2 or higher N ratio) is appropriate for veg. Phosphorus supports root development and energy transfer. Potassium builds strong cell walls and stems. Potassium deficiency in particular shows up as leaf-margin browning and scorching, weak stalks, and slowed growth. If you see those symptoms, potassium is the first thing to check.
Start at half the recommended dose on any liquid fertilizer when plants are young. Nutrient burn from overfeeding is one of the most common problems and it looks deceptively like deficiency in some cases. The classic sign of burn is yellow or brown leaf tips that curl slightly, usually appearing on the newest growth. If you see burn, flush the soil with plain water and back off feeding for a few days before resuming at a lower dose. Scale up feeding as the plant grows, matching your inputs to the plant's actual size and growth rate.
- Weeks 1-3 outdoors: Half-strength balanced fertilizer, focus on root establishment
- Weeks 4-8: Full-strength nitrogen-heavy vegetative formula, increase frequency as plant size grows
- Weeks 8+: Maintain heavy N feeding until you see signs of pre-flower, then begin transitioning to a bloom formula with lower N and higher P and K
- Always check pH of your nutrient solution before applying: target 6.0-6.8 for soil-grown plants
- Flush with plain pH-adjusted water every 3-4 weeks to prevent salt buildup and nutrient lockout
Watering for maximum growth without rot
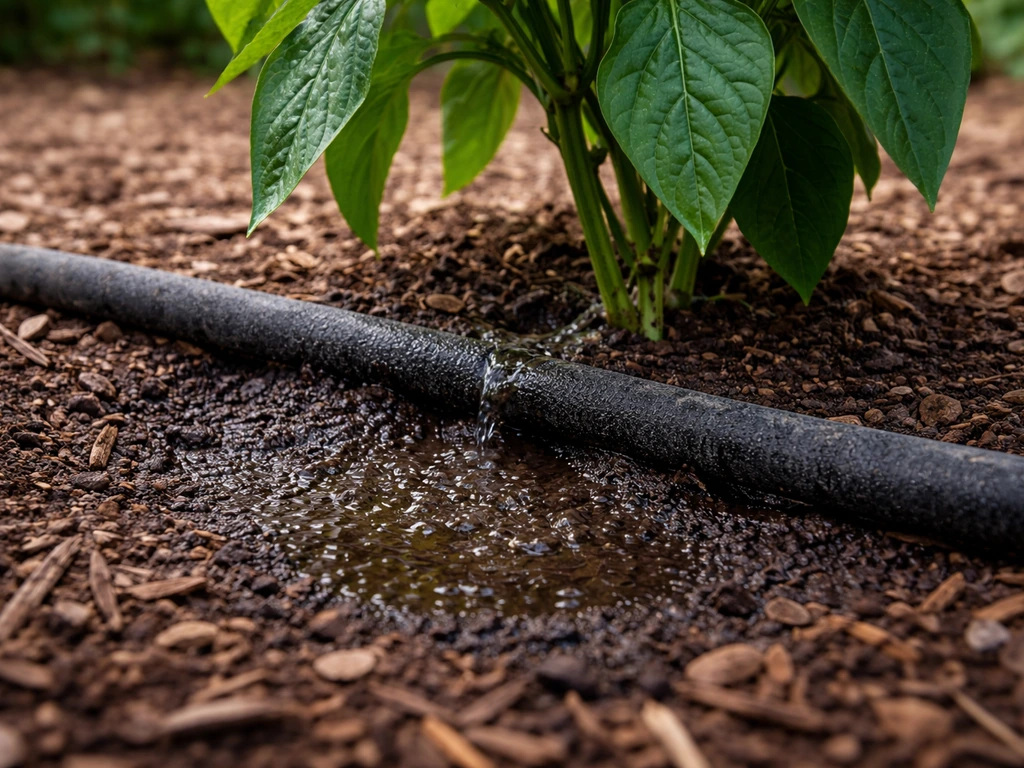
The rule of thumb is to water deeply and infrequently rather than lightly and often. Deep watering encourages roots to chase moisture downward, which builds a larger root system. Shallow, frequent watering keeps roots near the surface and limits plant size. Water until you get runoff from the bottom of containers or until you have saturated the root zone in-ground, then let the top inch or two of soil dry before watering again.
During heat waves (when temperatures push above 95 to 100°F), everything speeds up. Water demand can double and plants may show stress even with adequate moisture. Add a 3 to 4 inch layer of straw mulch around the base to slow evaporation and buffer soil temperature. Water early in the morning so soil has moisture reserves before peak afternoon heat. Drip irrigation is ideal in heat because it delivers water to the root zone without wetting the foliage. Wet foliage in hot conditions invites disease, and wet leaves during a heat event can cause additional stress.
Training and Pruning to Maximize Canopy
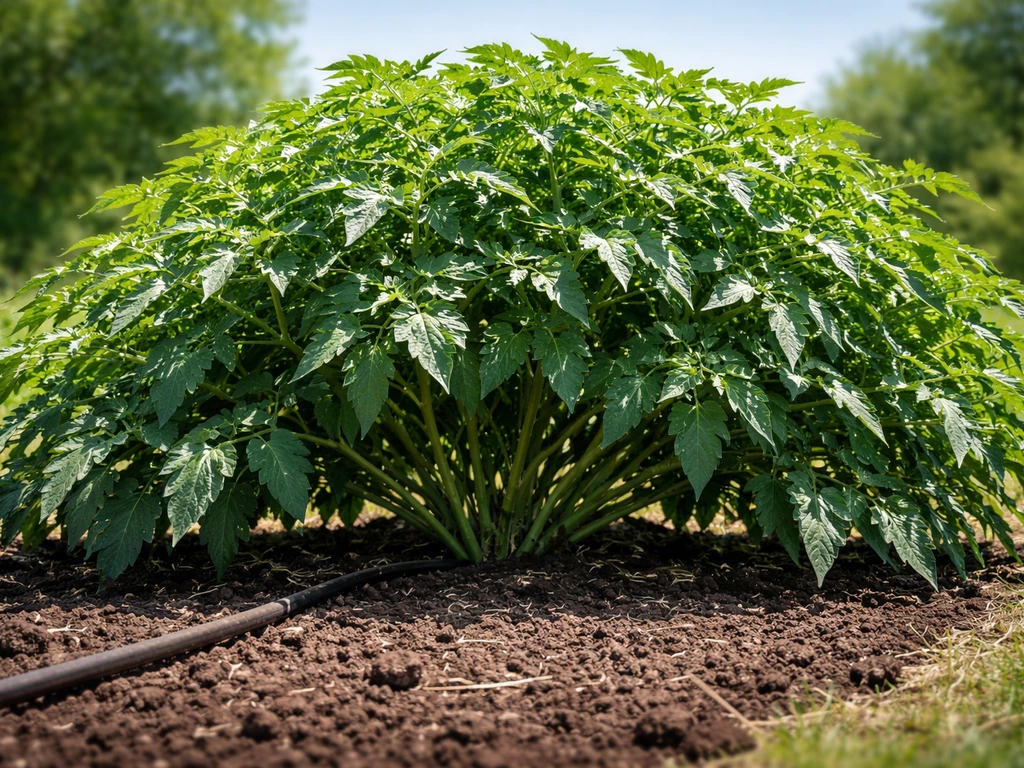
Training is how you turn a single tall plant into a wide, bushy one with dozens of productive growth sites. The principle is simple: light hits the top of a plant most. If you have one main stem reaching up, only the top gets full light. If you spread the plant out horizontally, more of the canopy is in the light simultaneously. This is the difference between a plant with a few large colas and a plant that is an absolute monster.
Low-stress training (LST)
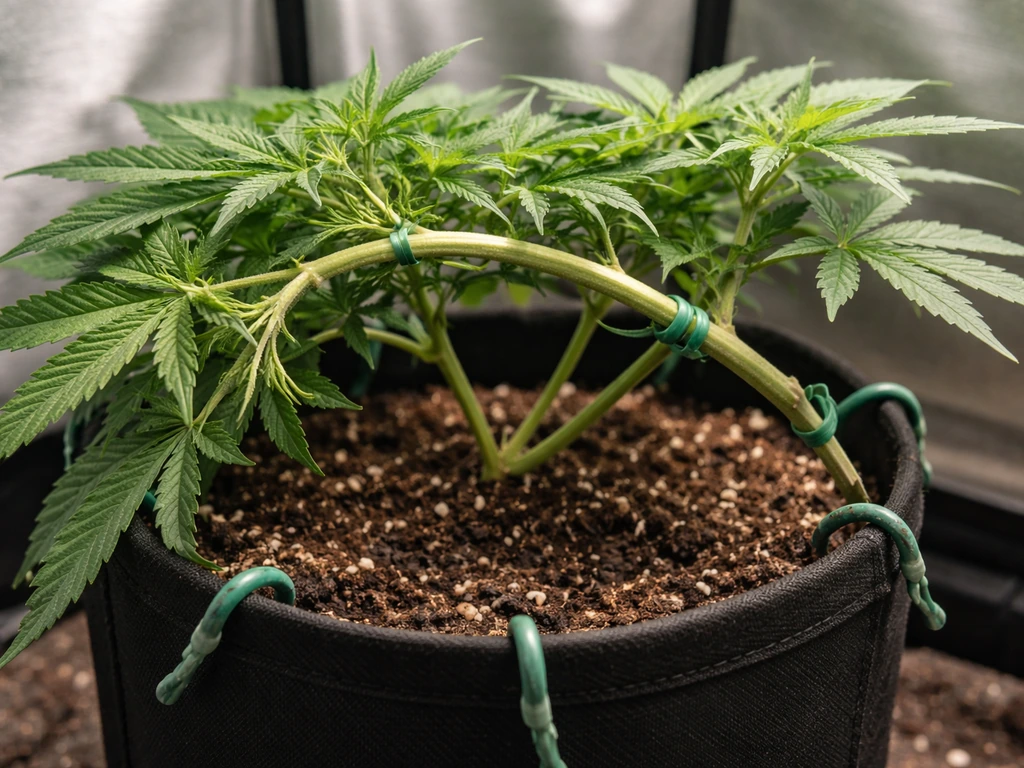
LST involves bending and tying branches down rather than cutting them. Start when the plant has 4 to 6 nodes. Gently bend the main stem sideways and secure it with soft garden ties or clips to the edge of the pot or a stake in the ground. As new growth emerges and reaches upward, bend and tie those branches too. The goal is a flat, even canopy spreading outward. LST is low-risk, works on any plant type, and is the single best technique for beginners who want bigger plants without risking major stress.
Topping and FIMing
Topping means cutting off the main growing tip, which forces the plant to develop two main colas instead of one. Do it cleanly with sterile scissors above the 4th or 5th node. The plant will pause briefly and then explode with new growth. You can top multiple times to create four, eight, or more main colas. FIMing (pinching rather than fully cutting the tip) achieves a similar result but with slightly less stress. Both techniques are most effective during active vegetative growth and should not be done during flowering or within a week or two of transplant stress.
Defoliation and lollipopping
Removing large fan leaves that are blocking light from lower bud sites can improve canopy light penetration and airflow. Do this selectively and in small amounts at a time. Aggressive defoliation on an outdoor plant can backfire by reducing the plant's photosynthetic capacity. Lollipopping, which is removing the lower third of growth that receives no meaningful light, keeps the plant's energy focused on the productive upper canopy. It also improves airflow at the base, which reduces humidity and mold risk.
Spacing matters more than you think
Outdoor plants that are too close together compete for light and air. For truly massive plants, space them at least 6 to 10 feet apart in all directions. Yes, that feels like a lot of space when they are small. But a plant trained with LST and multiple toppings can easily spread 8 to 12 feet wide by late summer. Give them room to grow into that space. Plants that are crowded tend to stretch upward instead of spreading out, which makes them weaker and harder to manage.
Outdoor Pest and Disease Prevention for Big Plants
Big plants attract more attention from pests simply because they are a bigger target. The best strategy is prevention through healthy growing conditions, not reactive spraying. A plant growing vigorously in good soil with proper airflow and water management is genuinely more resistant to pest and disease pressure than a stressed plant.
Mold and mildew
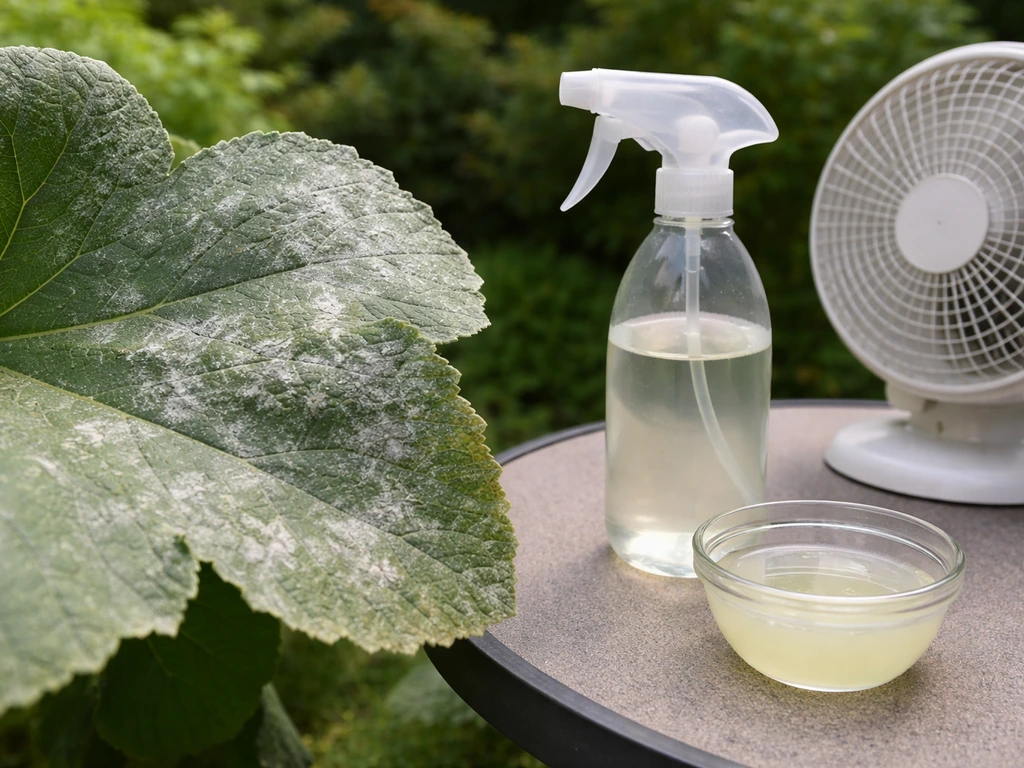
Powdery mildew and gray mold (botrytis) are the most common outdoor fungal issues for large, dense plants. Both thrive in humid, stagnant air. Your main tools are airflow, dry foliage, and avoiding dense overcrowding. Strategically removing interior leaves to open up the canopy helps significantly. Research on wind and foliage motion shows that wind changes how long moisture sits on leaf surfaces, which directly affects pathogen development. A light breeze moving through the canopy is your friend. An impenetrable wall of wet foliage is where mold starts.
If you see white powdery coating on leaves (powdery mildew), act immediately. A diluted potassium bicarbonate or neem oil spray applied to affected areas works well. Remove and dispose of heavily affected leaves. For botrytis (gray fuzzy mold that usually starts inside dense colas), the affected area needs to be cut out completely with sterile scissors and removed from the garden.
Insects and caterpillars
Spider mites, aphids, whiteflies, and caterpillars are the most common outdoor insect threats to large plants. Scout your plants at least twice a week, checking the undersides of leaves where most pests hide. Catching an infestation early makes it much easier to manage. Beneficial insects like ladybugs and lacewings are your allies. Avoid broad-spectrum pesticides that kill them along with the pests.
- Spider mites: Tiny dots on leaves, fine webbing underneath. Spray with water to dislodge, then follow with insecticidal soap or neem oil
- Aphids: Clusters of soft-bodied insects on new growth. Knock off with water, introduce ladybugs, or use insecticidal soap
- Caterpillars: Look for frass (dark droppings) and chewed leaves. Apply Bacillus thuringiensis (Bt) spray, which is effective and organic
- Whiteflies: Clouds of tiny white insects that fly up when you disturb leaves. Yellow sticky traps plus insecticidal soap
Wind damage
Chronic wind exposure forces plants to divert growth resources into thicker stems instead of height and canopy expansion. Research on wind-induced thigmomorphogenesis confirms this directly: plants reduce elongation and increase diameter in response to persistent mechanical stress. This is why a plant in a constantly windy spot often looks stocky and slow-growing. Use a windbreak on the prevailing wind side. Temporary stakes and garden netting can protect plants during storms. If a large branch gets snapped by wind, you can often tape it back into place with grafting tape and it will heal if the damage is not too severe.
Weekly Monitoring and Troubleshooting Playbook
Massive plants do not happen by accident. They happen because the grower checks in consistently and catches small problems before they become big setbacks. Here is a practical weekly routine that takes less than 20 minutes.
Weekly monitoring checklist
- Check leaf color: Deep green is healthy. Yellow lower leaves can signal nitrogen deficiency. Yellow between leaf veins on new growth suggests iron or magnesium deficiency (often a pH issue). Brown leaf margins point to potassium deficiency or nutrient burn
- Inspect undersides of leaves: Look for spider mites, aphid colonies, eggs, or any unusual speckling
- Check soil moisture: Insert your finger 2 inches into the soil. Water if it is dry at that depth. Do not water if still moist
- Check runoff pH: Catch a small amount of water draining from your container and test pH. If it is drifting outside 6.0-6.8, adjust your input water accordingly
- Assess canopy spread and new growth: Plants should be visibly growing each week during veg. If growth has stalled, it is a signal to investigate water, nutrients, or light
- Look for mold, white powder, or gray fuzzy patches: Especially in dense interior growth and lower canopy where air moves less
- Inspect stems: Healthy stems should feel firm. Soft, hollow, or mushy stems near the base can indicate stem rot or overwatering
- Adjust training: Re-tie any branches that have sprung back or are growing in an unproductive direction
Troubleshooting playbook for common problems
| Symptom | Most Likely Cause | Immediate Fix |
|---|---|---|
| Yellowing lower leaves | Nitrogen deficiency | Apply nitrogen-heavy fertilizer at full strength |
| Yellow between veins on new growth | Iron or Mg deficiency, often pH lockout | Test and adjust pH to 6.0-6.8, flush soil, then feed |
| Brown crispy leaf tips and edges | Nutrient burn or potassium deficiency | Flush with plain water, reduce fertilizer dose, check pH |
| Stunted growth with no visible deficiency | Root restriction or compaction | Transplant to larger container or loosen in-ground soil |
| White powder on leaves | Powdery mildew | Apply potassium bicarbonate or neem oil spray immediately |
| Gray fuzzy patches inside canopy | Botrytis (gray mold) | Remove affected tissue, improve airflow, reduce humidity |
| Leggy, stretchy growth with weak stems | Insufficient light or chronic wind stress | Move to sunnier location, add windbreak, adjust training |
| Wilting despite moist soil | Root rot from poor drainage | Improve drainage, reduce watering frequency, treat with beneficial microbes |
| Yellowing whole plant, slow growth | Overwatering (oxygen starvation) | Stop watering, let soil dry out, check drainage holes |
| Spots, holes, or frass on leaves | Caterpillars or chewing insects | Apply Bt spray, scout for pests, handpick if possible |
Your action plan starting today
If you are starting fresh right now in mid-May 2026, you still have a viable window for a big outdoor season in most climates. The priority order is: get your site assessed and amended this week, start or source genetics immediately (clones or established seedlings are faster than seeds at this point in the season), and begin hardening off any indoor plants right away. Every week you delay outdoor planting at this stage costs you vegetative growth time before photoperiod triggers flowering later in the season.
- This week: Test your soil pH, assess your sun exposure throughout the day, and choose your planting site or final container size
- This week: Source your genetics. If starting from seed, do it now. If sourcing clones, prioritize vigorous rooted cuts over anything cheap or stressed
- Days 1-14: Begin hardening off any indoor plants. Start with 3-4 hours of outdoor shade, increasing sun exposure daily
- Day 14-21: Transplant to final outdoor location once hardened. Water deeply and mulch the base
- Week 3 onward: Begin full vegetative feeding schedule, start training (LST, topping), and implement weekly monitoring routine
- Ongoing: Adjust watering to plant size and weather, scout for pests twice weekly, check pH of inputs monthly, and keep training canopy wide and open
Growing massive outdoor plants is genuinely achievable with consistent attention. If you are specifically growing crawling plants, focus on vine-friendly support, consistent pruning, and keeping the root zone fed so the plant spreads vigorously. Carnivorous plants can also be grown outdoors successfully, as long as you match sunlight and provide proper moisture and nutrient conditions carnivorous plants outdoors. The growers who get the biggest plants are not necessarily the ones with the most expensive inputs. They are the ones who set up the fundamentals correctly at the start and then show up every week to make small adjustments before problems compound. If this is your first season going big, expect to learn a lot and do even better next year. The process itself is part of the reward.
FAQ
How much sun is “enough” if my yard doesn’t get 8 full hours?
You can still grow large plants with less than 8 hours, but you must maximize the quality of the sun that you do get. Track shading at mid-morning and late afternoon, not just noon, and consider moving containers to a south-facing spot during the season to reduce daily light integral losses caused by partial shade.
Does more fertilizer always make plants grow bigger outdoors?
No. Oversupplying nutrients can reduce growth by causing nutrient burn or nutrient lockout, especially if soil pH is off. If you are seeing tip burn on new growth or leaf edges browning, pause feeding, flush the root zone, and only restart at a lower dose once symptoms stop.
What soil should I use if my native soil is heavy clay?
For clay, the biggest gains usually come from improving drainage and rooting depth, not just adding compost. Build a raised bed or dig out and replace soil in the planting hole, mix in coarse amendments for structure, and re-test drainage with the fill-the-hole water test before you commit.
How do I tell whether my plant needs more water or better drainage?
If the soil stays wet for a long time after rain, roots are likely oxygen-starved and watering more will worsen the problem. If the soil dries quickly and the plant droops despite warm conditions, watering is the likely issue. Check moisture 2 to 4 inches down, and only water when that zone begins to dry, while ensuring it can drain.
Can I grow massive plants in containers year-round?
Yes, but you must manage root zone temperature and aeration. Use very large fabric or smart pots, place them so hot pavement does not overheat the root zone, and ensure runoff never sits in trays. In very cold winters, plan insulation or seasonal moving to prevent root damage.
When should I start training (LST or topping) for the biggest outdoor size?
Begin LST once there are enough nodes to bend without tearing, typically after early vegetative growth is established. For topping, do it during active vegetative growth and avoid doing it in the first week or two after transplant or during flowering transitions, since the plant needs recovery time to keep accumulating vegetative mass.
How many times should I top a plant to maximize size outdoors?
More topping is not always better. Limit the number of cuts based on your climate’s season length and how much time the plant has before day length triggers flowering. If you top too late or too often, the plant may shift energy to recovery and never reach full canopy potential.
Is it better to remove fan leaves to improve airflow, or should I leave the plant alone?
Selective removal helps when leaves block light to lower sites and when dense canopy keeps foliage wet. However, removing too much reduces photosynthesis and can stunt growth outdoors. Remove gradually and reassess after several days, prioritizing leaves that are clearly shading productive areas or trapping moisture.
How far apart should plants be when I am aiming for monster size?
If you are training for a wide canopy, plan for large spacing from day one. A practical guideline is 6 to 10 feet between plants in all directions, because dense overcrowding increases mold risk and forces plants to stretch upward instead of spreading.
What’s the best way to prevent transplant shock after moving outdoors?
Harden off is the core step, but also avoid transplanting into full sun at midday. Move on a cloudy day or late afternoon, water the root ball before lifting, and water the prepared hole so the roots do not dry out mid-transfer. Expect a brief pause in visible top growth while roots restart.
How should I adjust watering during extreme heat waves?
During heat above about 95 to 100°F, plant water demand can spike quickly. Water early in the morning, use a mulch layer to reduce evaporation, and consider drip irrigation to keep moisture focused at the root zone while keeping foliage drier to reduce disease pressure.
What pH problems look like, and what should I do first?
Nutrient lockout from wrong pH can mimic deficiency symptoms even when you feed. If you suspect pH issues, test the soil first, then correct gradually within the recommended range rather than making large immediate changes. Re-check after amendments, because rapid swings can destabilize availability.
How do I know if my plant is stalling due to roots, nutrients, or day length?
Look at the pattern. If new growth is weak and growth stays small right after transplant, root stress is likely. If leaves show progressive burning or chlorosis after feeding changes, nutrient issues are likely. If the plant suddenly shifts behavior when days shorten, photoperiod timing is the cause, and no feeding adjustment will reverse it.
What are the most common causes of powdery mildew or botrytis on huge outdoor plants?
Both are strongly tied to canopy humidity and airflow. Dense interior foliage that stays wet is the biggest risk factor, along with overcrowding and lack of wind penetration. The fastest improvement usually comes from opening the canopy and removing heavily affected interior growth promptly.
Should I use broad-spectrum pesticides if pests show up on a big plant?
Try to manage early with prevention and targeted approaches. Broad-spectrum pesticides often kill beneficial insects and can make the problem worse over time. Scout at least twice weekly, remove early pest hotspots, and favor methods that preserve beneficial insects.
What weekly routine should I follow to keep a massive outdoor plant on track?
Do a quick weekly checklist: inspect leaf undersides for insects, check for mold spots or powdery growth inside the canopy, verify soil moisture 2 to 4 inches down, confirm drainage is not pooling after rain, and look for early nutrient stress signs before they spread across new growth.