Growing plants specifically to dry and preserve them is one of the most rewarding things you can do in a garden or on a windowsill. The process is straightforward: choose plants that dry well, harvest them at exactly the right moment (just before the flowers open), dry them slowly with good airflow, and store them in airtight containers away from light and heat. Get those four steps right and you'll have fragrant herbs, vibrant dried flowers, and craft-ready botanicals that last for months.
How to Grow Dried Plants: Step-by-Step Drying Guide

Marcus Holloway
21 May 2026

Choosing the right plants for drying
Not every plant dries equally well, and starting with forgiving varieties makes a huge difference when you're learning. Some plants are naturally low-moisture and dry predictably with minimal fuss. Others are so water-heavy that they'll go moldy before you know it if you're not careful.
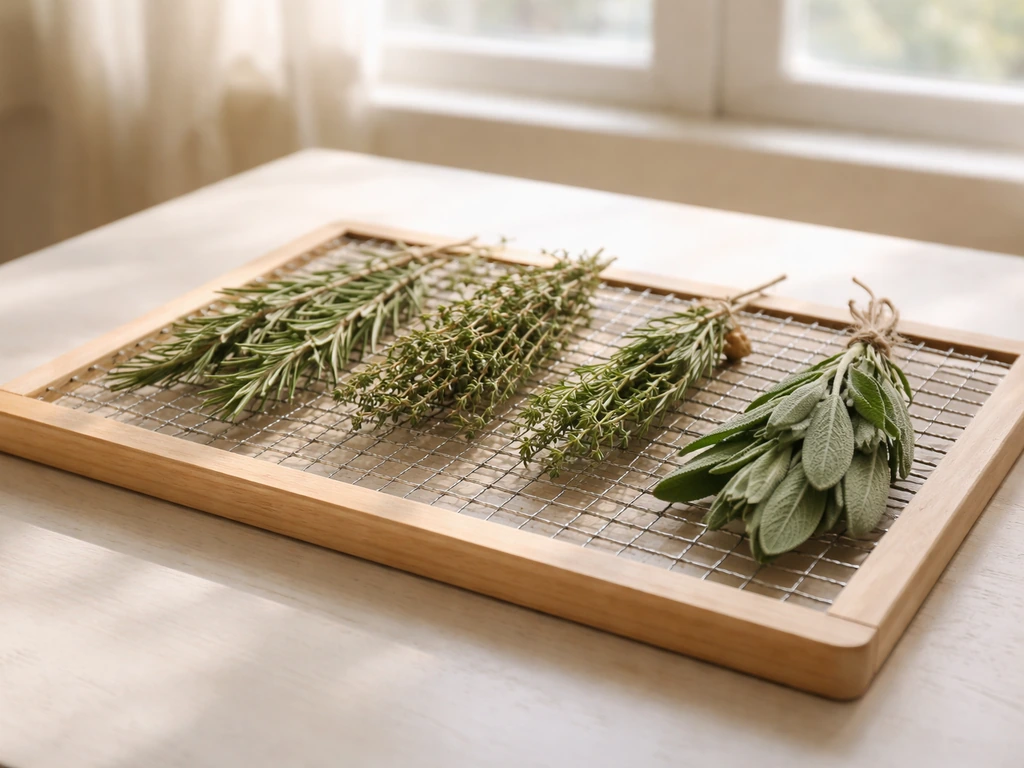
Sturdy, low-moisture herbs are the easiest starting point. Rosemary, thyme, sage, parsley, and lavender have woody stems and relatively low moisture content, which means they tolerate slower drying and are unlikely to mold. These are the plants to start with if you've never done this before.
Higher-moisture herbs like basil, mint, lemon balm, tarragon, and oregano are absolutely worth drying, but they need faster drying conditions and a bit more attention. Because they hold more water in their leaves, the window between "perfectly drying" and "molding" is narrower. That doesn't mean avoid them, it just means don't let them sit in a slow, humid spot.
For flowers and crafts, think about what you want to end up with. Statice, strawflowers, globe amaranth, and lavender hold their color and structure beautifully after drying and are nearly foolproof. Roses, chamomile, and calendula dry well too, but need a bit more care to keep their shape and color. If you're also interested in growing plants for their visual or decorative appeal while they're still living, decorative plant cultivation overlaps naturally here, since many ornamental varieties are chosen specifically because they dry beautifully.
- Easiest to dry (low moisture, forgiving): rosemary, thyme, sage, parsley, lavender, statice, strawflowers, globe amaranth
- Worth drying but need faster conditions: basil, mint, lemon balm, tarragon, oregano
- Good for pressing (flowers and leaves): ferns, pansies, violas, flat-faced flowers, herb foliage
- Popular for teas: chamomile, lemon balm, mint, lavender, holy basil (tulsi)
- Popular for cooking: thyme, rosemary, sage, oregano, parsley, dill
If you're growing from seed or buying starts specifically for drying, plant more than you think you need. You'll lose some volume in the drying process, and it's always better to have extra than to run short of your favorite herb mid-winter.
Best harvest timing and handling
Timing is the single factor that most beginners get wrong, and it's also the most important one. The sweet spot for harvesting most herbs for drying is just before the flowers first open, what's often called the "bursting bud" stage. At that point, the plant's essential oil content is at its absolute peak. The flavor is more concentrated, the fragrance is stronger, and the dried result will be noticeably better than if you'd waited until the plant was in full bloom.
You'll know you're at the bursting bud stage when you can see the buds are plump and showing color but the petals haven't actually opened yet. For herbs that don't flower dramatically (like rosemary or thyme), harvest once the plant is actively growing and healthy but before it goes to seed.
Harvest in the morning, after the dew has dried off the leaves but before the midday heat kicks in. Wet plant material going into the drying process is asking for mold trouble. If it has rained recently, wait a day or two for the foliage to dry out naturally before cutting.
Only cut as much as you can process and hang in one session. Letting harvested stems sit in a bucket or on a counter while you try to find more rubber bands is where quality starts to slip. Cut, bundle, and hang the same day.
Handle the stems gently. Bruised leaves release their oils early and can darken or smell off during drying. Use clean, sharp scissors or pruners, and don't cram stems together in your hand while you carry them inside.
Step-by-step drying methods
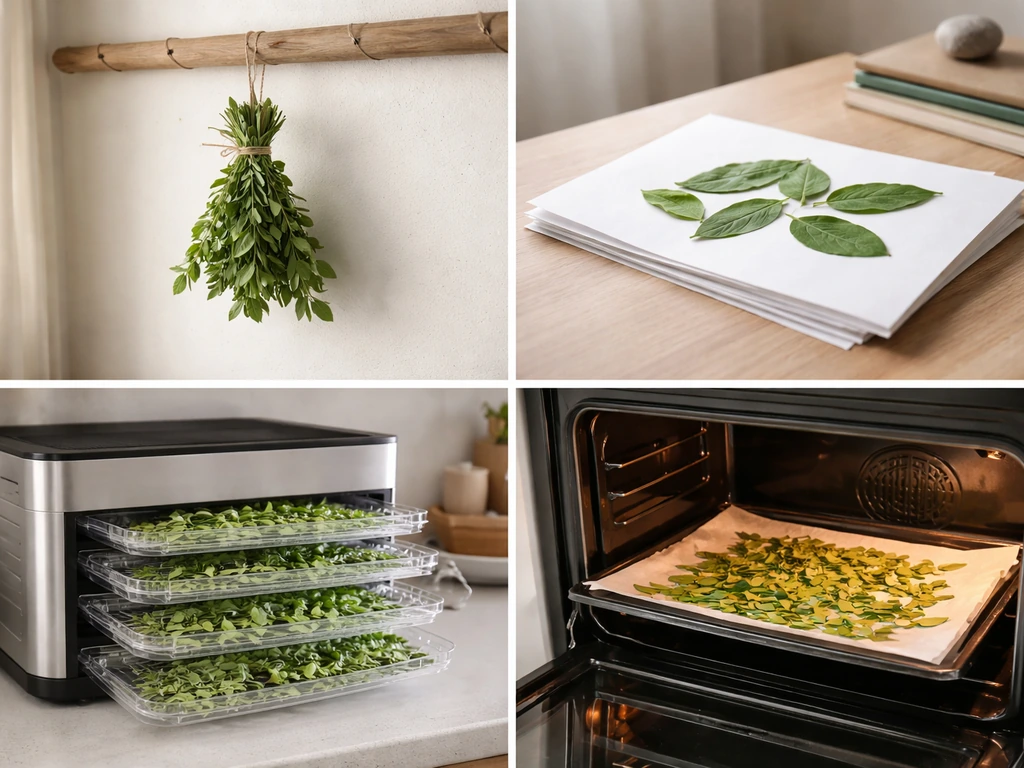
There are four main drying methods, and the right one depends on what you're drying, how fast you need it done, and what equipment you have available. Here's how each one works in practice.
Air drying (the classic method)
Air drying is the most traditional approach and, with the right conditions, produces excellent results. It requires no equipment beyond string or rubber bands, and it works well for most low-to-medium-moisture herbs and flowers.
- Strip off any leaves that would sit inside the bundle or get pinched by the rubber band, because trapped, airless leaves are where mold starts.
- Bundle stems loosely, no more than 5 to 10 stems per bunch. Larger bundles block airflow through the middle and the inner stems won't dry properly.
- Secure the bundle at the cut ends with a rubber band (rubber bands contract as stems shrink during drying, keeping the bundle tight without falling apart).
- Hang the bundles upside down in a warm, dry, dark, well-ventilated space. A closet with a fan, a spare room, a covered porch, or even a kitchen cabinet with the door left cracked all work.
- Leave enough space between bundles so air can move around each one.
- Check after 7 days and plan for up to 14 days depending on the herb and conditions.
For higher-moisture herbs like basil and mint, try the paper bag method: put the bundle inside a paper bag with several ventilation holes poked in the sides, then hang it upside down. The bag catches falling leaves, keeps the herbs in the dark (which protects color), and still allows airflow through the holes.
Pressing (for flat botanicals)
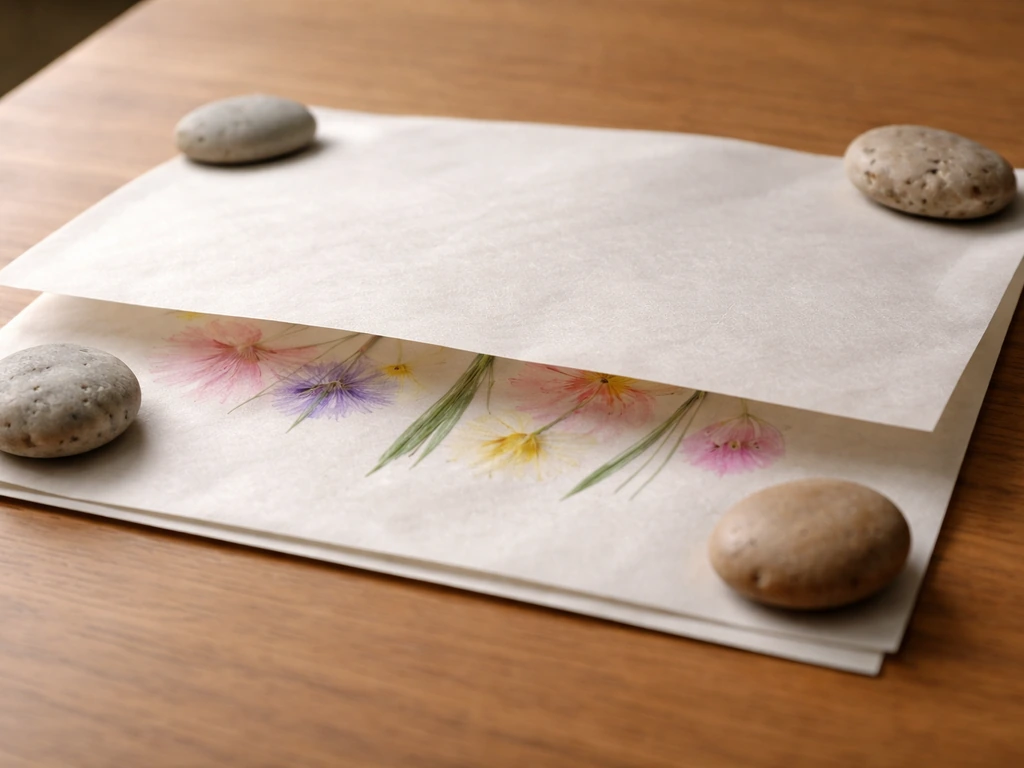
Pressing is ideal for flowers and leaves you want to use in crafts, art, or decoration, where flat, two-dimensional preservation is the goal. It doesn't work well for herbs you plan to steep or cook with, since the pressing process compromises the aromatic structure.
- Lay your flowers or leaves flat on absorbent paper (parchment, newspaper, or blotting paper all work).
- Place another sheet of absorbent paper on top, then close them inside a heavy book or flower press.
- Add weight on top if using a book: more weight means faster, flatter results.
- Change the paper every 2 to 3 days for the first week to pull moisture away more effectively.
- Most materials are fully pressed and dry within 2 to 4 weeks.
Dehydrator drying (fastest and most controlled)
A food dehydrator is genuinely the best tool for drying herbs if you have one. You control both the temperature and the airflow, which means you get consistent results much faster than air drying, with less mold risk. The National Center for Home Food Preservation recommends drying herbs at 95 to 115°F in a dehydrator. Stay at the lower end of that range for delicate, fragrant herbs where you want to preserve volatile oils; the higher end works for sturdier herbs.
- Remove leaves from stems, or lay small stem segments flat on dehydrator trays in a single layer without overlapping.
- Set the dehydrator to between 95°F and 115°F.
- Check every couple of hours; drying time varies significantly by herb and machine but often runs between 1 and 4 hours.
- Pull trays out when herbs are fully crisp and snap cleanly (see the drying targets section below).
- Allow to cool completely before storing, because residual heat creates condensation in airtight containers.
Oven drying (low and slow)
The oven works in a pinch, but you have to be careful. Most ovens can't reliably hold temperatures as low as 95°F, so there's a real risk of cooking the herbs rather than drying them, which kills the flavor and turns everything brown. If your oven has a "warm" setting, check its actual temperature with an oven thermometer. Anything below 150°F is workable, though staying closer to 100 to 120°F is ideal.
- Spread herbs in a single layer on a baking sheet lined with parchment paper.
- Set the oven to its lowest possible temperature and prop the door open slightly to allow moisture to escape.
- Check every 30 minutes and turn the herbs gently to promote even drying.
- Most herbs will take 1 to 3 hours in the oven.
- If you collected herbs by hanging in open air first, note that sun-dried or air-dried herbs should be briefly heated in the oven before storage anyway, to destroy any insects or insect eggs that may be present.
Drying targets: how to prevent mold and preserve color and shape
The most common mistake people make is packaging dried herbs before they're actually dry. Slightly damp material in a sealed container will mold within days, and you won't always see it coming until the whole batch is ruined. Knowing exactly what "fully dry" looks, feels, and sounds like is how you protect your work.
Here are the tests to run before you declare anything done:
- The snap test: bend a stem between your fingers. A fully dried stem snaps cleanly and crisply. If it bends or feels rubbery, it needs more time.
- The crumble test: rub a leaf between your fingers. Properly dried leaves crumble easily and feel almost brittle.
- The jar test: put a small amount of dried material in a clear glass jar, seal it, and leave it for 24 hours. If any condensation appears on the inside of the glass, the material is still too moist and needs more drying time.
- The smell test: fully dried herbs should still smell clearly of themselves. A flat, grassy, or musty smell is a sign of either poor harvest timing or the beginning of mold.
To prevent mold during the drying process itself, the three things that matter most are airflow, temperature, and spacing. Keep bundles small and separated. Aim for a drying space that's warm (not cold or damp) and has some air movement. If your drying space is too humid and you're not getting a crisp result within two weeks, increase temperature and add a small fan to boost circulation. A dehumidifier in the drying room helps if you're working in a naturally humid climate or during summer.
To preserve color, keep drying herbs away from direct sunlight. UV light bleaches plant pigments quickly, which is why dark or shaded drying spaces produce more vibrant results. For flowers especially, speed also helps: faster drying (dehydrator or warm air with a fan) tends to lock color in better than a slow, multi-week air dry.
Storing dried plants and keeping them fresh
Once your herbs or flowers have passed the dryness tests, strip the leaves from the stems before storing. This step is easy to skip when you're tired after a long drying process, but stems hold onto moisture long after leaves have dried, and those stems in a sealed jar can re-hydrate everything around them and cause mold weeks later.
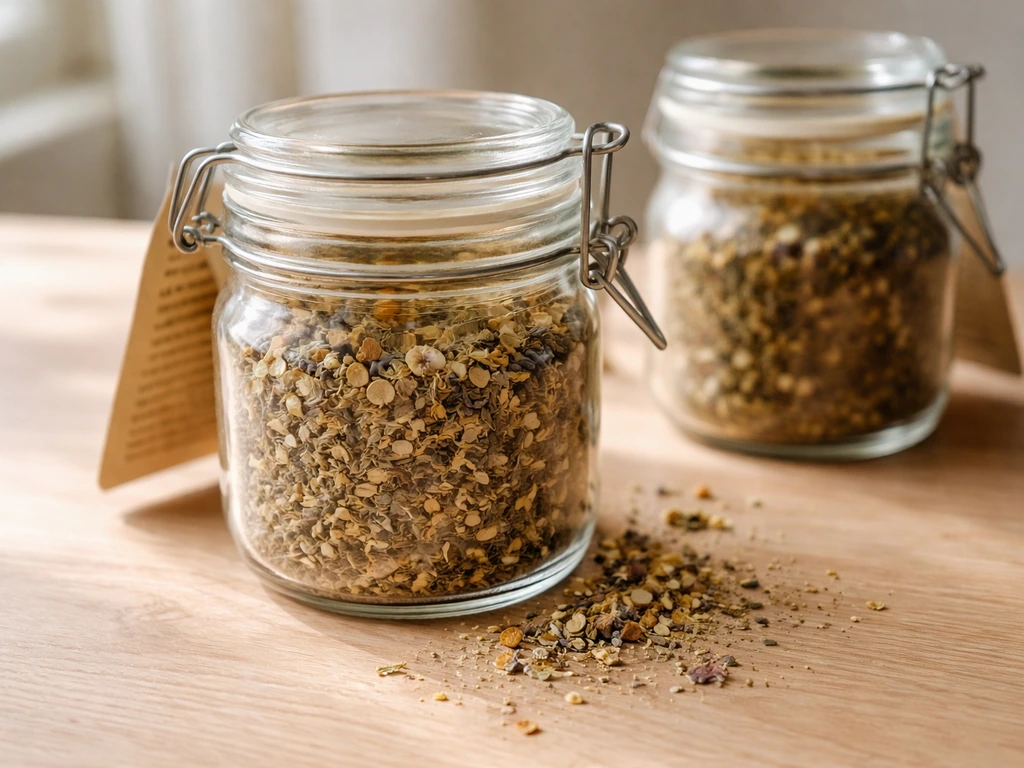
Store dried plant material in airtight containers, glass jars with tight-fitting lids are ideal, kept in a cool, dry, dark location. A kitchen cabinet away from the stove, a pantry shelf, or a drawer all work. Avoid storing near windows, above the stove, or anywhere that gets warm regularly, because heat and light both degrade essential oils and fade color faster.
Label every jar with the plant name and the date you dried it. This sounds obvious but is easy to skip, and six months later you'll be grateful you did it. As a general guide, dried herbs used for cooking and tea stay potent for about 4 months to 1 year depending on the herb, with more delicate, aromatic herbs (like basil or lemon balm) losing potency faster than hardier ones (like rosemary or thyme). The National Center for Home Food Preservation notes that dried foods, including dried herbs, keep for roughly 4 months to 1 year depending on the product dried herbs used for cooking and tea stay potent for about 4 months to 1 year depending on the herb. Dried flowers for crafts can last significantly longer if kept away from light and moisture.
| Herb or Plant | Typical Shelf Life (Dried) | Storage Priority |
|---|---|---|
| Basil, lemon balm, tarragon | 4 to 6 months | Airtight, cool, dark (degrades quickly) |
| Mint, oregano, chamomile | 6 to 9 months | Airtight, dark, away from heat |
| Rosemary, thyme, sage | Up to 1 year | Airtight, any cool dark spot |
| Lavender (culinary or craft) | 1 year or more | Airtight, dark, low humidity |
| Dried flowers for crafts | 1 to 2+ years | Low light, low humidity, avoid crushing |
Using dried plants safely and effectively
How you plan to use your dried plants should actually influence how you grow and dry them. It's worth thinking about this before harvest, not after.
For teas and culinary use
Dried herbs are significantly more concentrated than fresh ones. When substituting dried for fresh in a recipe, use about one quarter to one third of the amount called for. So if a recipe calls for 1 tablespoon of fresh thyme, start with about 1 teaspoon of dried. You can always add more, but over-seasoning with dried herbs is easy to do.
For teas, use 1 to 2 teaspoons of dried herb per cup of hot water, steeped for 5 to 10 minutes depending on how strong you like it. Herbs that are particularly good for tea include chamomile, lemon balm, peppermint, lavender, and holy basil. Always make sure anything you're steeping is truly food-grade and grown without pesticides, especially if you've sourced seeds or plants from garden centers where ornamental varieties (not safe to consume) can look identical to culinary ones.
Store herbs used for tea and cooking separately from those used for crafts. It helps to label clearly at harvest which batch is which, especially if you're drying multiple varieties at once.
For crafts and decoration
Dried flowers and botanicals used for wreaths, arrangements, potpourri, or pressed art don't need to meet food-safe standards, which gives you more flexibility. You can use floral preservative sprays to extend their life and keep petals from shattering. Store finished arrangements away from direct sunlight to prevent bleaching, and keep them in low-humidity spaces to prevent rehydration and drooping.
If you're drawn to the decorative side of this, it's worth exploring how some native and exotic plant varieties can produce striking dried specimens that look nothing like typical supermarket dried flowers. If you want to grow native plants specifically, start by choosing local species that dry well and match your available drying conditions how to grow native plants. Growing unusual species specifically for their dried form is a genuinely fun direction to take this hobby.
Troubleshooting common drying problems
Things go wrong sometimes, and that's normal. Here's how to quickly diagnose what happened and whether your batch is salvageable.
| Problem | Most Likely Cause | What to Do |
|---|---|---|
| Mold on leaves or stems | Too much moisture, too little airflow, or bundles too large | Discard moldy material. Improve ventilation, reduce bundle size, or switch to a dehydrator for the rest. |
| Leaves turning brown or black | Heat too high, too much direct sunlight during drying, or harvest was too late | Use lower heat and a dark drying space. Harvest earlier next time (bursting bud stage). |
| Herbs lost their smell | Dried too hot, dried too slowly, or stored too long | Reduce dehydrator/oven temp next time. Check storage dates and replace old stock. |
| Stems going limp after storage | Material wasn't fully dry before sealing, or container wasn't airtight | Re-dry on low heat until crisp. Use the jar condensation test before sealing next time. |
| Uneven drying (some parts dry, some not) | Poor spacing, bundles too large, or insufficient airflow | Separate bundles and add a small fan. Rotate material every few days during air drying. |
| Leaves shatter or crumble too easily | Over-dried or dried too fast at high heat | Lower temperature next time. Harvest at peak to give leaves more structural oils to hold onto. |
| Color faded or washed out | Direct sunlight during drying, or slow drying in warm conditions | Dry in a dark space. Consider a dehydrator for faster, color-preserving results. |
One last thing worth knowing: even an imperfect batch teaches you something. If your first round of basil went limp and slightly musty, you now know it needs faster drying than you gave it. If your lavender came out beautifully fragrant but the stems were crumbly, you know to take them down a day earlier. Every batch gives you information you can use the next time, and after two or three rounds you'll have a feel for this that no guide can fully replace.
FAQ
Can I dry plants, store them, and later “revive” them for crafts or arrangements?
Yes, but only if you dry and store them in a way that avoids rehydration. Use airtight jars for everything, include the stems only if they are completely brittle, and let the jars sit for 24 to 48 hours. If you see condensation inside, reopen and dry longer (or use a dehydrator for a short finishing cycle).
What exactly counts as “fully dry” for herbs, especially if my batch feels dry but not crisp?
For air-dried herbs, a good rule is that leaves should crumble easily, and stems should snap or feel very dry when bent. For “crisp and dry” verification, rub a small amount of dried leaf between your fingers, it should powder or flake, not feel cool and rubbery. If the batch feels slightly cool or flexible, it is not dry enough.
I may have jarred herbs too early and they smell off, can I salvage them?
Avoid sealing until dryness tests pass. If you packaged slightly damp material and it is only a day or two old, you can sometimes salvage by spreading the herb on a tray (or paper bag with airflow) and drying it again, then re-checking before re-bottling. If it already has visible fuzz, strong musty odor, or discoloration, it is safer to discard.
My air-drying room is humid, how do I adjust drying time without ruining color or fragrance?
Humidity and airflow combine. If your space is muggy, increase airflow first (small fan) and keep bundles separated, then raise temperature moderately (dehumidifier or warm, dry room). A full two-week slow air dry can work in dry climates, but in humid weather the target is consistently reaching crisp dryness well before that.
How do I use the paper bag method correctly for basil and mint, so they do not mold or turn dark?
Paper-bag drying for basil and mint works best when the bag is not tightly packed. Leave enough space for circulation, poke ventilation holes large enough for steady airflow, and check every 1 to 2 days for mold or damp spots. If leaves darken quickly, your bag may be trapping heat, so move to a cooler airflow location.
If I dry multiple plants at once, what is the best way to avoid mixing food-safe and craft-only botanicals?
Separate batches by use even during storage. Keep cooking and tea herbs in one set of labeled containers, and craft botanicals in another set, because you might use floral preservative sprays on the craft batch later, or you might handle petals differently. This prevents accidental mixing and helps you trust what you brew or cook with.
Can a dehydrator ruin delicate herbs, and how do I set it up to keep basil or lemon balm looking and smelling good?
Dehydrator-drying is gentler than oven baking, but you still need to spread material for airflow. Arrange leaves in a single layer, use perforated trays or racks, and rotate trays if your dehydrator has uneven airflow. For small, tender leaves, start at the lower temperature and check early so you do not overdry into brittle, browned fragments.
What oven temperature and technique should I use if I do not have a dehydrator?
Oven drying can cook rather than dry because the “warm” setting varies by oven. Use an oven thermometer, keep a low target temperature, and crack the door slightly if needed for moisture escape. Check frequently, because drying can happen faster than you expect once the oven truly warms.
Are there special steps for drying plants with thicker stems or more stubborn moisture?
Yes, you can dry thicker stems, but you must compensate by bundling smaller and spacing more. Thicker stems trap moisture, so they take longer to become brittle, and leaves can overdry before the stem is safe. If stems are slow, finish the batch by drying in a dehydrator on low heat for a short time, then store only when fully crisp.
How should I store tea herbs differently from herbs I only use for cooking or craft projects?
For teas, you typically want the most aromatic material, so avoid high heat and do not over-dry to the point of “powdery-burnt” color. For storage, use smaller containers so you minimize repeated air exposure when you scoop. Also, buy or grow pesticide-free plants if you will steep them, even if they look identical.
I think I harvested too late, will the dried plants still be usable, or did I ruin the batch?
If buds are opening, you are likely past the best “bursting bud” moment for maximum essential oil and appearance. For many herbs, drying after petals open can still work, but you may notice quicker color fade and less strong scent. The fix is to harvest slightly earlier next time and label batches by harvest date so you can compare results.