Plants grow by converting light into chemical energy through photosynthesis, absorbing water and dissolved minerals through their roots, and using a set of hormones to decide when to push out new leaves, stretch toward light, or slow down for winter. Every growing method you'll ever try, whether it's a pot of soil on a windowsill, a glass of water with a cutting, a hydroponic rig, or a sealed terrarium, is really just your attempt to give those four things (light, water, nutrients, and the right hormonal signals) in the right amounts at the right time.
How Do Plants Grow Wikipedia: A Beginner Guide to Growing

Marcus Holloway
26 Apr 2026
What actually makes plants grow
At the most basic level, plants are solar-powered sugar factories. They pull carbon dioxide from the air, water from the soil (or whatever medium their roots are in), and light energy from the sun, then combine them to produce glucose. That glucose fuels every biological process in the plant: building new cells, producing roots, flowering, and even defending against pests. Chlorophyll, the green pigment inside leaf cells, is what captures the light energy to make that reaction happen. Without it, there's no fuel, and without fuel, there's no growth.
Growth itself happens at specific points called meristems, located at the tips of stems and roots. This is why plants grow from their tips outward rather than expanding uniformly like a balloon. When you blank" rel="noopener noreferrer">pinch a stem tip, you're removing the meristem, which is exactly why that trick encourages bushier growth. Understanding where growth originates helps you make smarter pruning and training decisions right from the start.
The whole system is regulated by plant hormones, environmental cues like day length and temperature, and the availability of water and nutrients. These aren't separate topics, they're one interconnected loop. Mess with one part, say, cut off all the light, and the rest of the system stalls too. That's the big picture. Now let's break each piece into something you can actually act on.
Light and photosynthesis: getting this right from day one
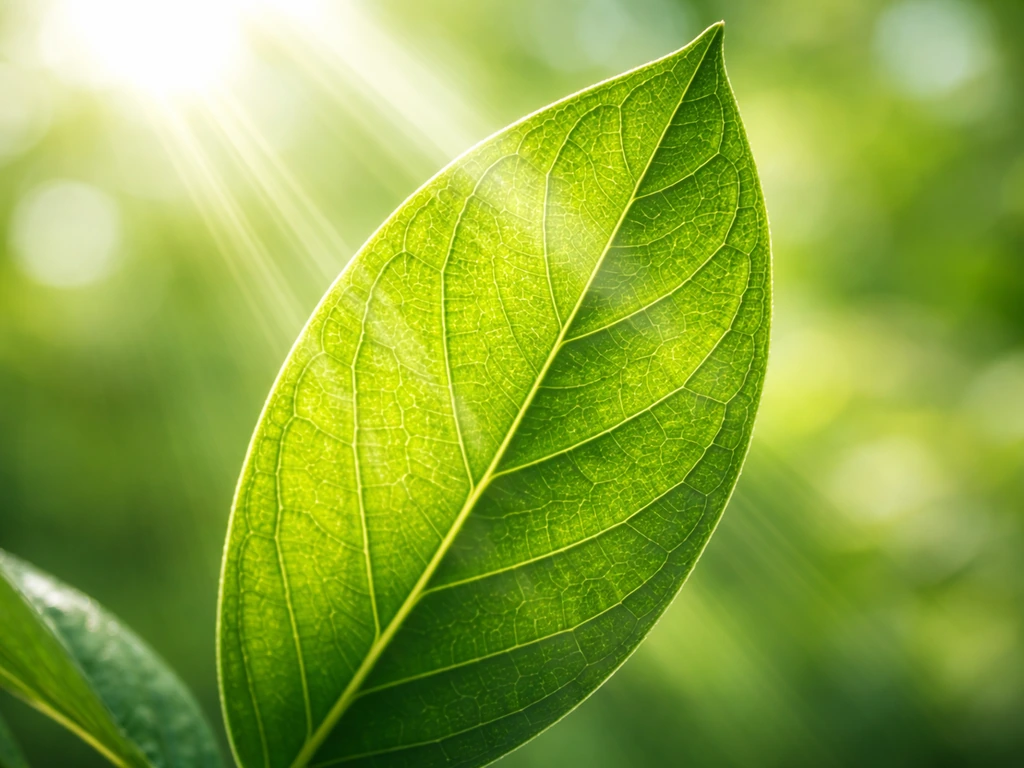
Photosynthesis converts light energy into chemical energy (in the form of ATP and NADPH in the light reactions), which the plant then uses to build sugars. The process can be limited by four things: how much light is available, how much leaf area the plant has to capture it, whether there's enough water, and whether temperatures are in a suitable range. If any one of those is off, the plant's energy production drops, and growth slows or stops.
Not all wavelengths of light are equally useful. Plants absorb and use red and blue wavelengths most efficiently for photosynthesis. Blue light also regulates chlorophyll production and controls stem elongation, which is why plants grown under red-only light can get leggy and stretched. If you're using grow lights, look for full-spectrum LEDs that cover both red and blue wavelengths. Far-red light matters too, especially for triggering flowering and other developmental signals.
One physics fact that beginners often miss: light intensity drops off extremely fast as you move away from the source. A plant sitting three feet from a window gets a fraction of the light that one sitting right on the sill does. If your plant is stretching toward the window and getting leggy, move it closer rather than just rotating it.
Setting up light for indoor plants
- Place light-hungry plants (herbs, vegetables, succulents) within 12 inches of a south- or west-facing window, or directly under a grow light.
- For grow lights, keep full-spectrum LEDs 6 to 12 inches above the canopy and adjust as the plant grows.
- Run grow lights for 12 to 14 hours per day for most plants. Never exceed 16 hours, because plants need a dark period to complete certain biological processes.
- If stems are elongating and leaning, increase light intensity or move the source closer before assuming there's a nutrient problem.
- Low-light tolerant plants (pothos, ZZ plant, snake plant) can survive several feet from a window, but 'low light tolerant' doesn't mean 'no light needed.'
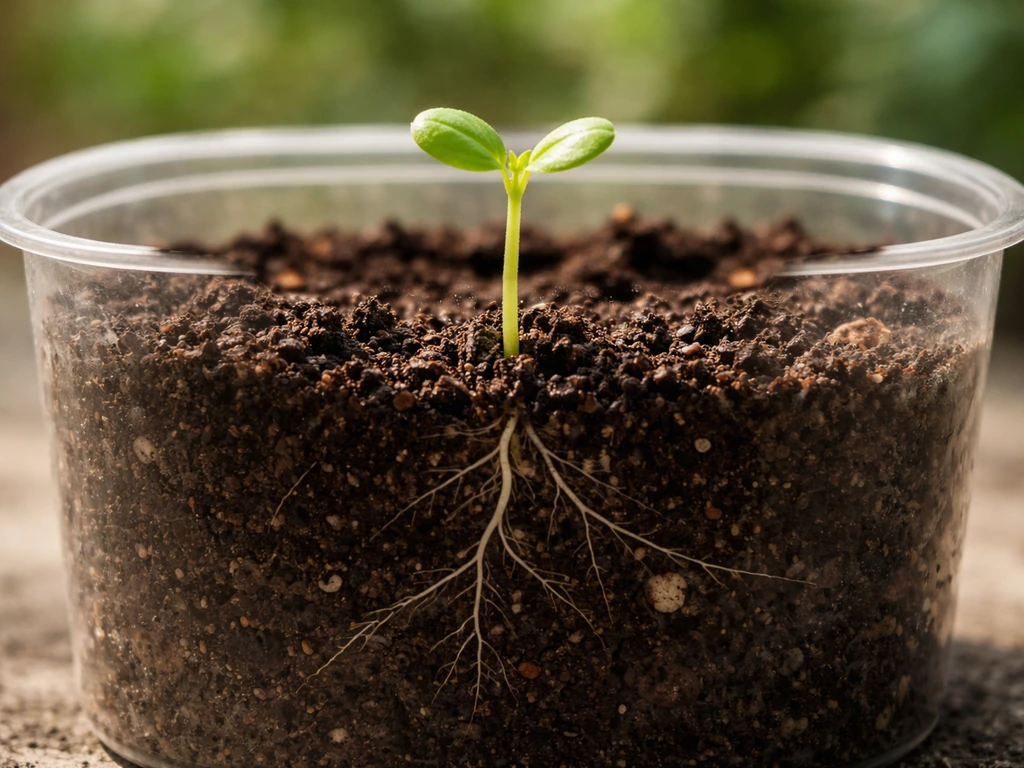
Water, roots, and nutrients: what's really happening underground
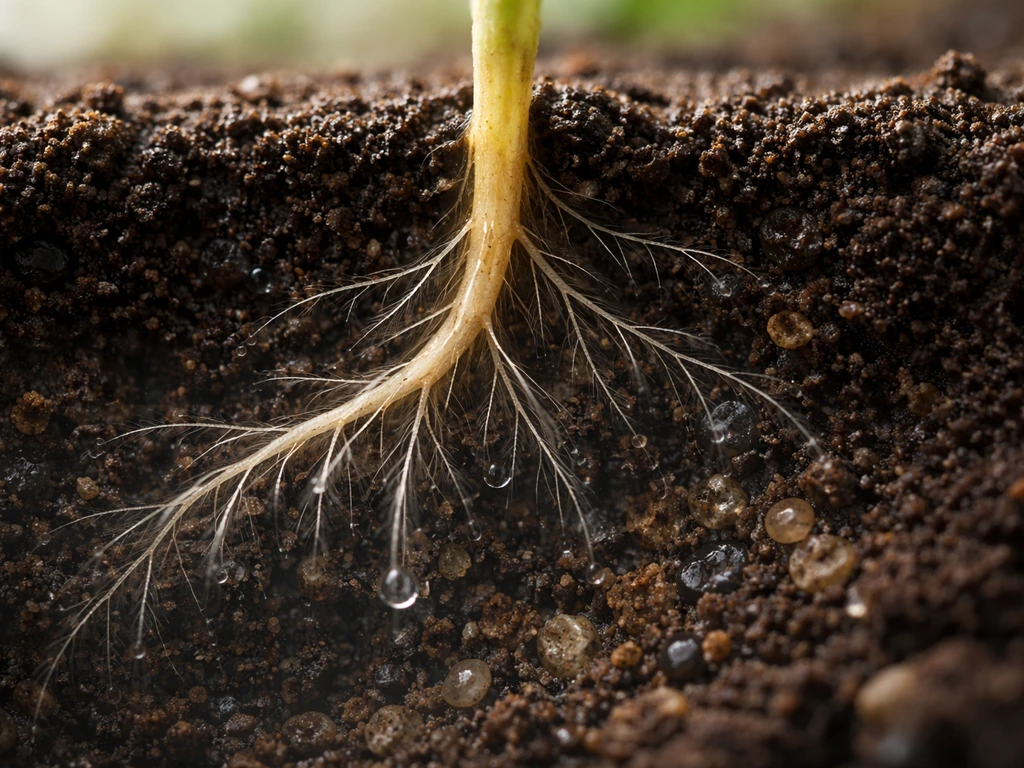
Roots absorb water by osmosis. When a root cell has a higher concentration of dissolved solutes than the surrounding soil water, water flows in across the cell membrane to balance things out. From there, water travels upward through the xylem, a network of hollow tubes, pulled by a phenomenon called the cohesion-tension mechanism. As water evaporates out of leaves through tiny pores called stomata (a process called transpiration), it creates a negative pressure that pulls the entire water column upward from the roots. It's like sipping through a straw where the liquid is connected all the way down into the soil.
Dissolved minerals like nitrogen, phosphorus, and potassium hitch a ride with that water into the plant. Once inside, sugars and nutrients are distributed through a separate system called the phloem, using pressure-driven bulk flow. Phloem sap can carry sugars, minerals, amino acids, and even plant growth regulators to wherever the plant needs them most, usually toward actively growing tips and developing fruit.
The practical takeaway: if roots can't function properly (because the soil is waterlogged, bone dry, or the pH is off), the whole nutrient transport system breaks down. Yellow leaves and wilting aren't always about water on the surface. Often they're about what's happening at the roots. Check root health before assuming a plant just needs more fertilizer.
Underfertilized plants show recognizable symptoms: slow growth, weak stems, pale or yellowing leaves, and reduced flowering. But adding fertilizer when a plant is in poor light is counterproductive. The plant can't use extra nutrients if it doesn't have enough light to run photosynthesis. Fix light first, then fertilize.
How plant hormones and seasons steer growth
Plants use five main hormone groups to coordinate growth: auxins, gibberellins, cytokinins, abscisic acid (ABA), and ethylene. Each plays a different role. Auxins drive cell elongation and are concentrated at stem tips, which is why the tip grows fastest and shades lower buds (a phenomenon called apical dominance). Gibberellins promote stem elongation and seed germination. Cytokinins promote cell division. ABA acts like a brake pedal, triggering seed dormancy, closing stomata under drought stress, and slowing root development when conditions are poor. Ethylene regulates ripening and leaf drop.
Seasons matter because plants use day length and temperature as cues. Shortening days trigger dormancy in many plants and flowering in others. This is why forcing a plant into an artificially long dark period can sometimes trigger blooming out of season. For indoor growers, the practical implication is that your grow light timer isn't just about energy: it's also sending hormonal signals to the plant about what 'time of year' it is.
When you use rooting hormone powder or gel on a cutting, you're applying synthetic auxin. It mimics the plant's natural signal to initiate root cell division at the cut end, which is why it speeds things up. You're not tricking the plant, you're just amplifying a signal it already understands.
Growing in soil: practical steps for fast, healthy plants
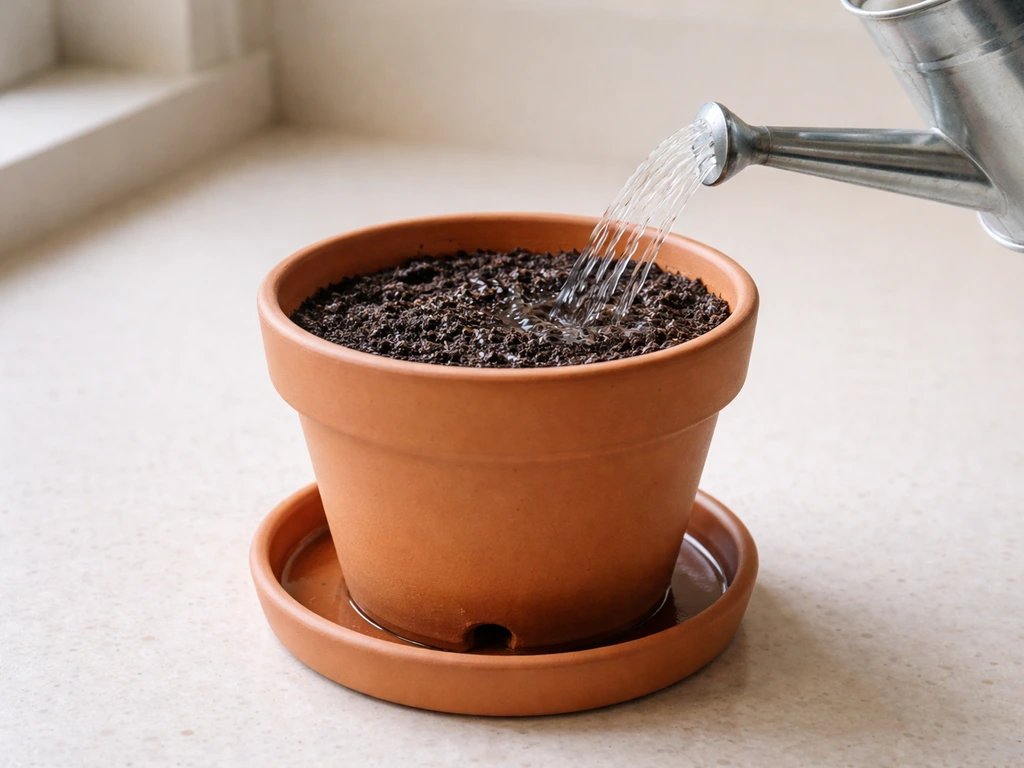
Soil growing is the most forgiving method for beginners because good potting mix buffers a lot of mistakes. The key variables are drainage, pot size, watering habits, and fertilizing schedule. Get those four right and most plants will thrive.
- Choose a pot with a drainage hole. Plastic or glazed ceramic works well. Unglazed clay dries out fast and can accumulate salt deposits if you're using tap water or fertilizer regularly.
- Use a quality potting mix. If it's very light and drains fast (high perlite or vermiculite content), you'll need to water and fertilize more frequently than with a denser mix.
- When repotting, go only 1 to 2 inches larger in diameter than the current pot. Too big a pot holds excess moisture around roots that aren't using it yet, which leads to rot.
- Water when the top inch or two of soil is dry for most houseplants. Stick your finger in. If it feels damp, wait.
- Start fertilizing with a balanced liquid fertilizer at half the recommended strength, once a month during active growth. Indoor plants need less than outdoor plants.
- Don't fertilize a plant sitting in poor light. It won't help and can stress the roots.
If growth is slow despite good light and regular watering, check whether the plant is rootbound. Roots circling the bottom of the pot or poking out of drainage holes are a sign it's time to repot. A rootbound plant can't absorb water or nutrients efficiently no matter how much you give it.
Water growing and propagation: what works and what doesn't
Rooting cuttings in water is one of the simplest entry points into plant growing, and it works surprisingly well for many common houseplants. Pothos, philodendron, coleus, impatiens, and many herbs will root in a glass of water on a bright windowsill. Soft-stemmed, water-filled plants tend to root within a week. Woodier stems take 10 to 14 days or longer.
The process is straightforward: take a 4 to 6 inch cutting just below a node (where a leaf attaches to the stem), remove lower leaves so they don't rot in the water, and set the cutting in a clean glass or jar. Change the water every few days to prevent bacterial buildup. Keep it in bright indirect light. When roots reach about one inch long, it's time to pot the cutting into soil.
Using rooting hormone gel or powder on the cut end before placing it in water can speed root development. Keep the pH of your water below 6.5 if possible for best root development. Most tap water falls in an acceptable range, but if you're having trouble with cuttings that won't root, testing and adjusting pH is worth trying.
What commonly fails: cuttings left in water too long after roots appear. Water-grown roots are adapted to low-oxygen, aquatic conditions. Once you transfer them to soil, they go through a brief transition stress period. Pot them up when roots are 1 inch, not 4 inches, and the transition will be much smoother.
Hydroponics for beginners: the essential variables

Hydroponics is growing plants with their roots directly in a nutrient solution instead of soil. The plant gets everything it needs dissolved in water, and because those nutrients are immediately available to the roots, growth is often faster than in soil. But without soil to buffer things, you have to actively manage what soil was doing passively.
blank" rel="noopener noreferrer">There are five variables you need to monitor in any hydroponic system: pH, electrical conductivity (EC), dissolved oxygen, water temperature, and water alkalinity. Dissolved oxygen above 6 ppm is the target. Most nutrient solution problems trace back to pH being off, because even if nutrients are present in the water, plants can only absorb them within a specific pH range (generally 5.5 to 6.5 for most crops).
| Variable | Target range | What happens if it's off |
|---|---|---|
| pH | 5.5 to 6.5 | Nutrients become unavailable; deficiency symptoms appear even with full nutrient solution |
| EC (electrical conductivity) | 1.5 to 2.5 mS/cm for most crops | Too low = nutrient deficiency; too high = nutrient burn and root stress |
| Dissolved oxygen | Above 6 ppm | Low oxygen causes root rot and slows uptake |
| Water temperature | 65 to 72°F (18 to 22°C) | Warm water holds less oxygen; cold water slows root activity |
| Water alkalinity | Low to moderate | High alkalinity pushes pH upward over time, requiring more frequent adjustment |
A basic home hydroponic setup stores nutrient solution in a reservoir and delivers it to the root zone via a pump and timer. You don't need an elaborate system to start. A simple deep water culture (DWC) setup, where plant roots hang directly into an aerated nutrient solution, is cheap to build, easy to monitor, and very effective for leafy greens and herbs. Check pH and EC every two to three days when starting out. As you get a feel for how your system behaves, you'll naturally dial in a rhythm.
Terrariums and small-space growing: setup and troubleshooting
A terrarium is a glass or clear-walled container that creates its own mini-environment. Closed terrariums in particular are fascinating because they recycle moisture through condensation and evaporation, meaning you may only need to water once when you set them up and then rarely after. Heat and light enter through the transparent walls and drive photosynthesis, while the trapped humidity keeps moisture levels high.
The balance you're managing in a closed terrarium is condensation. Some moisture on the glass is normal and healthy. If the walls are completely fogged all day, that's too wet and you'll get mold. Crack the lid or add a small air hole to let some moisture escape. If the glass is bone dry inside, add a small amount of water and reseal.
Setting up a terrarium that actually works

- Add a false bottom layer of pebbles or LECA (lightweight expanded clay aggregate) at least 1 to 2 inches deep to keep roots out of standing water.
- Add a thin layer of activated charcoal on top of the drainage layer to reduce bacterial buildup.
- Use a loose, well-aerated substrate appropriate for your plants. Moisture-loving ferns and mosses like a peat or coco coir mix. Succulents need a fast-draining mix and an open terrarium.
- Plant small, slow-growing species. Closed terrariums reward patience: fittonia, mini peperomia, moss, and small ferns all work well.
- Water lightly at setup, seal the lid, and place in bright indirect light. Avoid direct sun, which will overheat the interior.
- If you see mold patches, remove affected material immediately, improve airflow, and reduce moisture.
Troubleshooting slow growth in any setup
Slow growth in any system usually comes down to one of four culprits. Work through them in order before making changes: check light first (is the plant getting enough hours and intensity?), then water (overwatering is more common than underwatering for beginners), then nutrients (are you fertilizing at all, and is the pH right for nutrient uptake?), and finally roots (are they healthy, not rotted, and not rootbound?). Changing multiple variables at once makes it impossible to know what worked, so adjust one thing, wait a week, and observe.
- Yellowing lower leaves with slow growth: usually a nitrogen deficiency or overwatering causing root damage
- Leggy, stretched stems reaching toward light: move the plant or light source closer
- Wilting even when soil is moist: check for root rot; unpot and inspect if necessary
- No new growth for months in a terrarium: usually insufficient light or the system is too wet
- Cuttings in water that won't root after 3 weeks: try rooting hormone, fresher water, or more warmth
Every growing method covered here, soil, water propagation, hydroponics, and terrariums, relies on the same underlying biology. Many of the same requirements for producing new leaf growth are covered earlier, including how do plants grow leaves, so use that as a quick related reference when diagnosing slow or stunted growth. Once you understand that plants need light to make energy, roots to move water and nutrients, and hormonal signals to know what to grow and when, troubleshooting gets much less mysterious. These growth needs are also what make it possible to create simple how plants grow pictures that show each step from light to roots. You're not guessing anymore, you're working through a checklist of what the plant actually needs. Step by step, start by giving the plant the right light, water, and nutrients, then support the hormonal and seasonal cues that tell it to grow the plant the right light, water, nutrients, and the right hormonal signals. In other words, if you dial in light, water, nutrients, and the right hormonal signals, you give plants what they need to grow. That shift in thinking is what takes someone from 'I always kill plants' to 'I know exactly what went wrong and how to fix it.'
FAQ
How much light do I actually need to grow plants indoors without causing stress?
Most beginner failures come from not matching light schedule to the plant’s growth cycle. If you see slow growth plus pale leaves, increase hours gradually (for example, add 30 to 60 minutes every few days) and make sure light is close enough that leaves are not leaning strongly. Sudden big jumps in light can stress plants even if the final total seems “enough.”
How can I tell if my plant is rootbound, and when should I repot?
Repotting timing is easier to judge by root activity than by calendar. If you see roots circling hard, roots emerging consistently from the drainage holes, or the pot drying out in less than half the usual time, that usually means the plant has outgrown its container and nutrient uptake is being limited.
Does pH matter in soil growing too, or is it only important for hydroponics?
Yes, pH can interfere even if you’re using the “right” fertilizer. For soil, the effective pH depends on your water and the potting mix, so symptoms can lag behind the cause. A practical approach is to test both your irrigation water and your soil (or at least your water) and then adjust slowly, not with one large change.
How do I tell whether my plant needs more water or less water?
Underwatering and overwatering can look different, but not always. Overwatered plants often have consistently wet soil, limp leaves, and sometimes leaf yellowing from the bottom up due to root stress. Underwatered plants usually have lighter, drier soil and droop that improves after watering, but if the plant is allowed to dry too far repeatedly, recovery slows and leaves can still yellow.
My water-propagation cutting isn’t rooting, what are the most common reasons?
If cuttings refuse to root, two common causes are the wrong cutting type and rot from water conditions. Choose a healthy cutting with at least one node, remove all lower leaves that touch water, and keep the jar clean. Also avoid leaving the cutting in water after roots form; transition to soil when roots are about one inch to reduce shock.
What should I do if my plant isn’t growing and I keep adding fertilizer anyway?
Phloem can’t move sugars out of leaves efficiently if the plant can’t photosynthesize well. That’s why fertilizing a low-light plant often leads to weak growth and sometimes leaf yellowing rather than improvement. Fix the light first, then use a gentle fertilizer dose (or resume fertilizing only after you see steady new leaf growth).
What are the fastest checks when hydroponic plants suddenly stall?
In hydroponics, oxygen is as critical as pH and nutrients. If roots look dark, slimy, or the plant is stalling, check dissolved oxygen and water temperature first, then verify pH and EC. Root-zone heat can reduce oxygen and accelerate nutrient issues even when pH “looks close.”
How do I adjust a closed terrarium if it gets too wet (or too dry)?
For terrariums, mold risk rises when there is constant high moisture and little air exchange. If you see dense fogging all day, crack the lid or add a small vent, and remove any visibly moldy material. If it’s bone dry inside, add a small amount of water, reseal, and then watch whether moisture settles into intermittent condensation instead of permanent fog.
Why does my plant get leggy even when I’m using a grow light?
Plants can be leggy from too little light, but also from turning them too often or not enough light intensity at the leaf surface. Rotate the pot only occasionally (for example, once per week) rather than daily, and move the plant closer to the light if stems are stretching strongly.
What’s the best step-by-step method to troubleshoot slow growth when I’m not sure what’s wrong?
Start troubleshooting with one change at a time because growth responds slowly. Use the article’s four-step order as a checklist: light first, then water, then nutrients (and pH for uptake), then roots. After you change something, give it about a week before deciding it “didn’t work.”