You can grow a new plant from an existing one using a handful of reliable techniques, and the most beginner-friendly of them all is taking a cutting, rooting it, and transplanting it once roots form. That single process works for most houseplants, herbs, and soft-stemmed plants you already have sitting on a shelf or windowsill. No special equipment required, no greenhouse needed. This guide walks you through every step, including how to pick the right method for your specific plant and what to do when things go sideways.
How to Grow a New Plant From an Existing Plant

Marcus Holloway
10 Apr 2026
Choose the right propagation method for your plant
Not every plant propagates the same way, and starting with the right method saves you a lot of frustration. Soft-stemmed houseplants like pothos, philodendron, coleus, and most herbs are ideal candidates for stem cuttings. Succulents and plants like snake plants, jade, or African violets can often be propagated from a single leaf. Woody shrubs and trees take longer and may need a hardwood cutting approach. Growing different types of plants each comes with its own quirks, but the core logic is the same: you're asking the plant to regenerate itself from a living piece.
Here's a quick guide to matching plant type to method:
| Plant Type | Best Method | Rooting Speed |
|---|---|---|
| Soft-stemmed houseplants (pothos, philodendron, mint) | Stem tip cutting | 1–2 weeks |
| Succulents and cacti | Leaf cutting or stem cutting | 2–6 weeks |
| African violets, begonias | Leaf cutting with petiole | 3–6 weeks |
| Woody shrubs (roses, hydrangea) | Stem cutting (softwood or hardwood) | 4–12 weeks |
| Perennials (hostas, coneflower) | Division | Immediate transplant |
| Large overgrown houseplants (rubber plant, croton) | Air layering | 4–8 weeks |
If you're working with a plant that has distinct nodes along its stem, stem tip cuttings are almost always your best starting point. Nodes are where leaves attach to the stem, and they're where roots will eventually emerge. The whole game of propagation by cuttings revolves around getting at least one node into a rooting medium and keeping it alive long enough to sprout roots.
Take cuttings correctly (what to cut, where to cut, how big)
Take your cuttings first thing in the morning. This isn't arbitrary advice: plants are fully hydrated at the start of the day, before heat and sun have had a chance to pull moisture out through their leaves. A well-hydrated cutting roots more reliably than a stressed, wilted one.
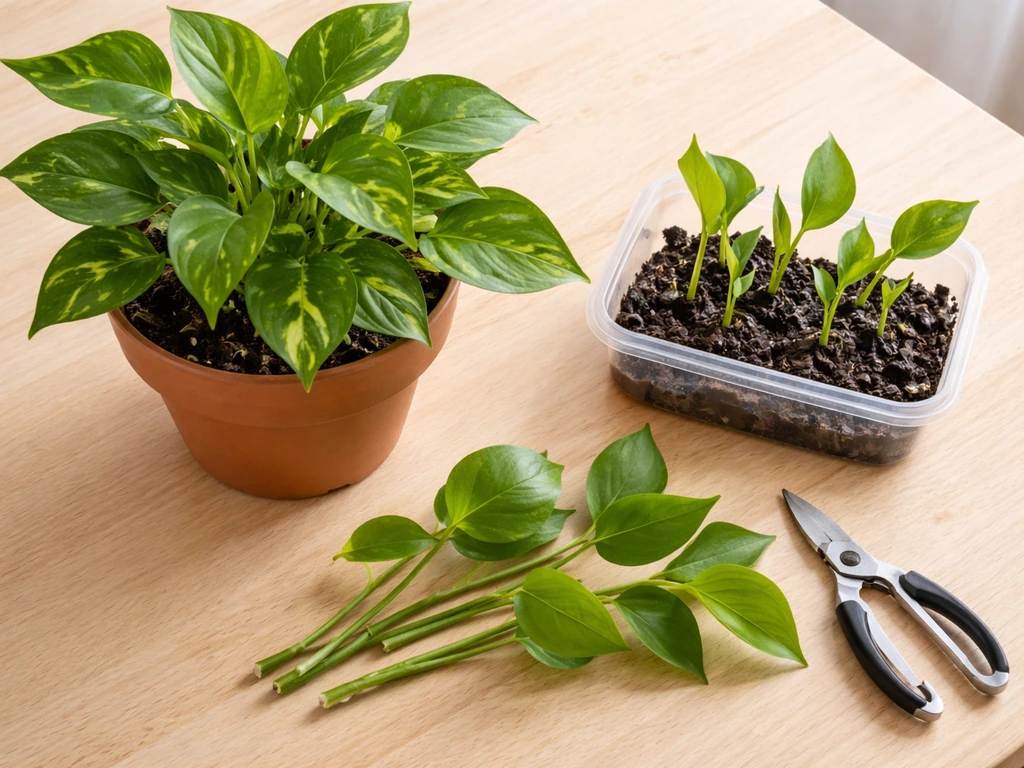
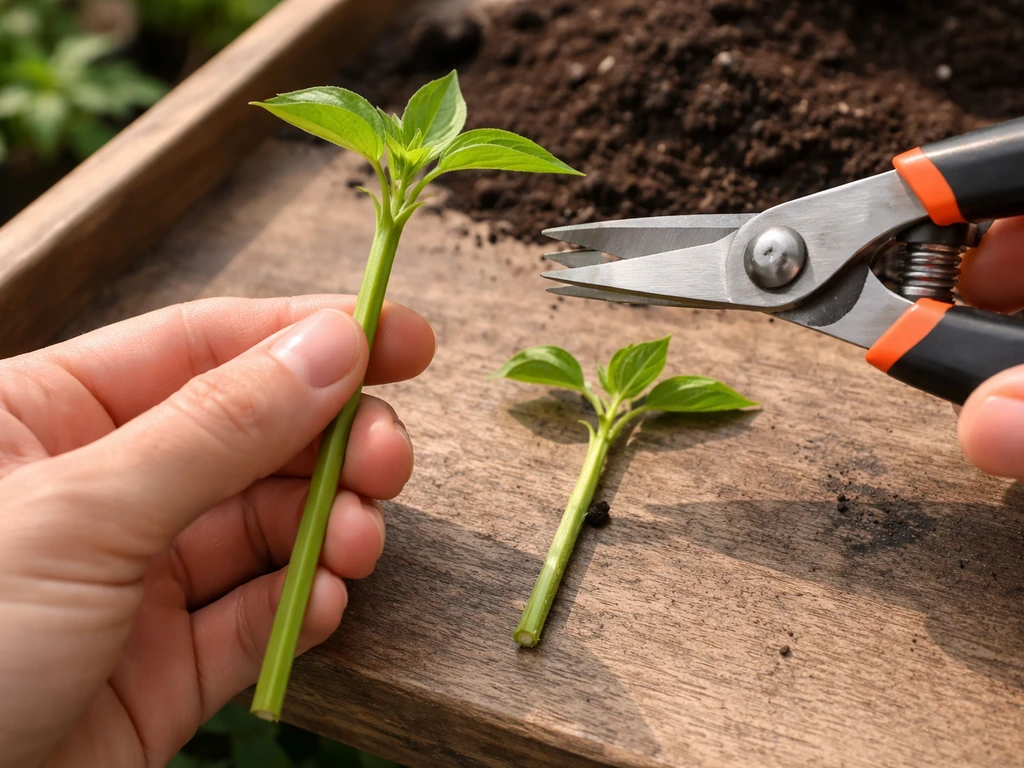
For a stem tip cutting, look for a healthy, non-flowering shoot with at least two or three sets of leaves. Cut just below a node using clean, sharp scissors or a blade. The cut end should be smooth, not crushed. Aim for a cutting that's roughly 3 to 5 inches long. Longer isn't necessarily better since a bigger cutting means more surface area losing water before roots form.
Once you have your cutting, strip off the lower leaves so that only two or three leaves remain above the rooting medium. Burying leaves leads to rot. If any of those remaining leaves are large, you can cut them in half to reduce the amount of water they lose while the cutting is rootless. Remove any flowers or flower buds too: a cutting trying to bloom is spending energy in the wrong place. You want everything redirected toward root development.
For leaf cuttings (common with African violets and succulents), leave no more than about half an inch of the petiole, which is the stalk connecting the leaf to the stem, attached to the leaf. Treat it similarly to a stem cutting from there. For plants like pothos or monsteras where individual nodes carry a lot of propagation potential, you can even learn how to grow a plant from a node alone, without any extra stem attached.
Rooting options: water vs soil vs other mediums
You have real choices here, and each has genuine trade-offs. Water rooting is the most beginner-friendly option: you can see exactly what's happening, and it's hard to mess up the setup. Soil or a dedicated propagation mix produces roots that are already adapted to growing in a solid medium, which means less transplant shock later. Perlite sits in the middle: it's sterile, drains fast, and gives roots the air they need.
Whatever medium you choose, the goal is the same: sterile, low in fertility, and well-drained. High-fertility mixes encourage leaf growth, not root growth. Poor drainage causes rot. A commercial propagation mix, straight perlite, or even a 50/50 blend of perlite and coco coir all work well.
If you're sticking the cutting into a solid medium, water and drain the medium before inserting the cutting so excess moisture has already escaped. Then insert the cutting so that at least one node is buried below the surface with no leaves trapped underneath. For Monstera deliciosa stem cuttings, UMN Extension recommends cutting 1 to 2 inches below the node and keeping the rooting medium supportive of root development cut 1 to 2 inches below the node and keep the rooting medium supportive of root development. You can either push the stem in vertically or lay it horizontally with roughly half the stem inserted, depending on the plant and the shape of your container.
Rooting hormone is optional but genuinely useful, especially for slower-rooting plants. If you use powder, dip the cut end into a sterile dish of the powder and tap off the excess. Liquid formulations tend to be more effective than powder at equivalent concentrations, so if you're buying rooting hormone for the first time, look for a liquid auxin-based product. Just don't double-dip the cutting back into the main container since that can contaminate your supply.
Aftercare while roots develop (light, humidity, timing)
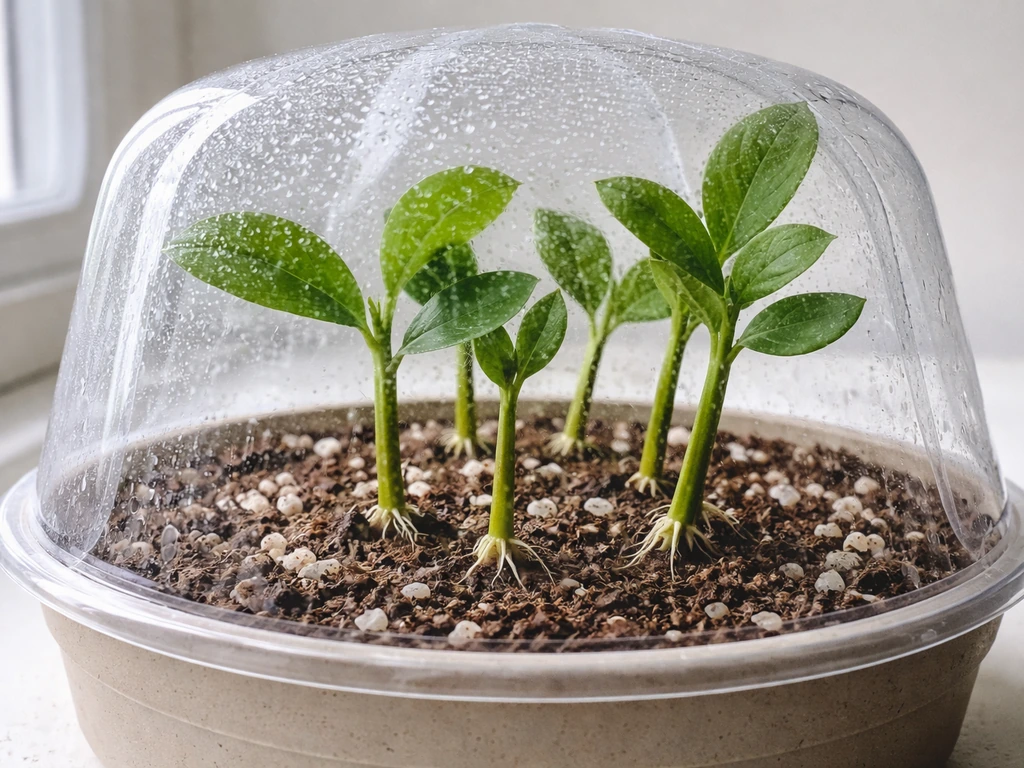
Here's the thing most guides skip over: a cutting can't drink water yet. Until roots form, it has no way to replace the moisture it loses through its leaves. This is why humidity management is so important during propagation. Cover your cutting with a clear plastic bag, a plastic bottle with the bottom cut off, or a dedicated humidity dome to trap moisture around the leaves and slow water loss.
Keep the cutting in bright indirect light, not direct sun. Direct sun through plastic turns the inside into an oven and cooks the cutting. Bright, diffused light is enough for the cutting to stay alive while it works on roots. Aim for an air temperature of around 60 to 75°F for most plants. The rooting medium itself benefits from slightly warmer temperatures: somewhere in the 65°F to 85°F range encourages root initiation. A seedling heat mat placed under the propagation container can make a real difference in colder rooms.
How long will this take? Tender, water-filled plants like mint, basil, or coleus can root in as little as a week. Tougher-stemmed plants often take 10 to 14 days. Woody cuttings can take several weeks to months. Check for rooting by gently tugging the cutting: if it resists, roots have formed. If you're rooting in water, you'll be able to see them directly.
If you want to level up your propagation setup and eventually maintain a dedicated source plant for ongoing cuttings, it's worth reading about how to grow a mother plant for clones so you always have healthy material to work from.
Transplanting the new plant and early growth setup
Once roots are at least half an inch to an inch long, the cutting is ready to move. If you rooted in water, this transition is the most critical step: going from a high-humidity, water-saturated environment into soil is a real shock for a young root system. Don't rush it. Pot the rooted cutting into a small container with a well-draining potting mix, water it in gently, and keep humidity higher than normal for the first week by loosely covering it or misting regularly.
If you rooted directly in perlite or propagation mix, the transition is smoother. Still, start in a small pot rather than a large one. Excess soil around small roots tends to stay wet too long and can cause rot before the plant establishes.
For the first few weeks after transplanting, keep the new plant out of harsh direct light and hold off on fertilizing. The root system is still fragile. Once you see new leaf growth, that's your signal that the plant has settled in and is ready for more normal care. At that point you can move it into its long-term spot, whether that's a soil pot, a hydroponic setup, a terrarium, or a water-growing jar.
It also helps to think about how you'll prune and manage the new plant going forward. Understanding how to cut plants to grow more will help you keep your new plant bushy and healthy rather than leggy, and give you more material for future propagation rounds.
Troubleshooting common problems (rotting, no roots, mold, wilting)
Things go wrong during propagation. That doesn't mean you did it all wrong: it usually means one variable was off. Here's how to diagnose the most common problems:
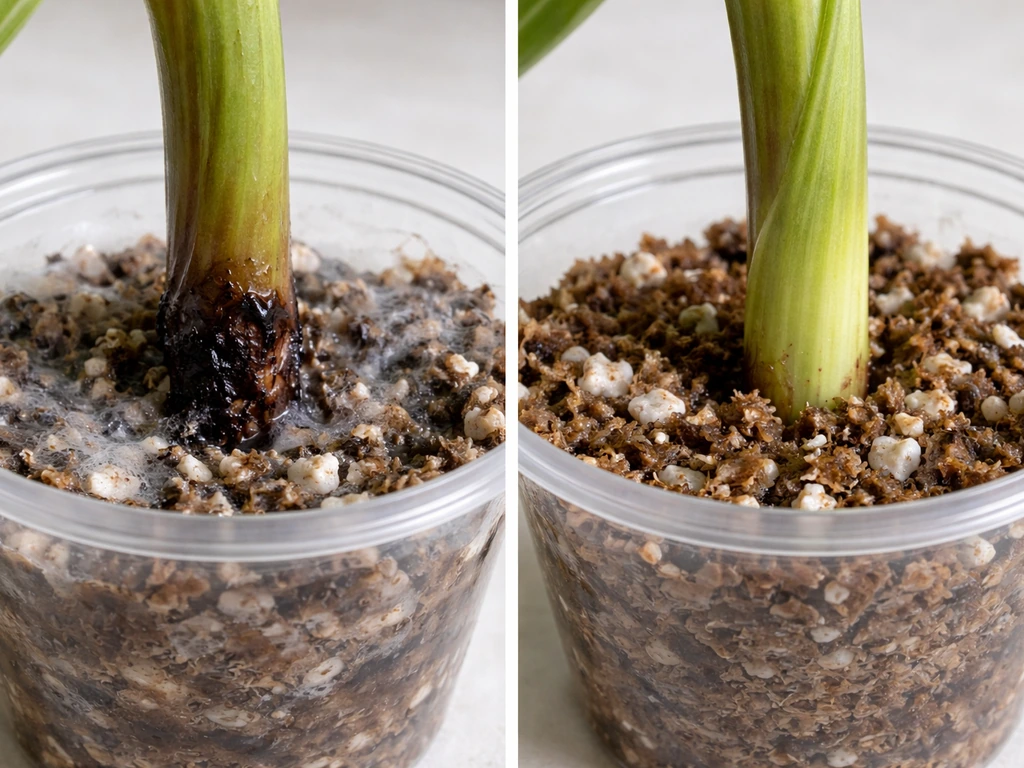
- Cutting is rotting at the base: The medium is staying too wet or wasn't sterile. Let the medium dry out slightly between checks, use fresh perlite or propagation mix next time, and make sure no leaves are buried below the surface.
- No roots after two to three weeks: The temperature may be too cold (below 65°F), or the node wasn't actually buried in the medium. Check placement, add a heat mat, and consider applying rooting hormone if you haven't already.
- White or gray mold on the cutting or medium: Too much humidity with too little airflow. Briefly open the plastic cover daily to allow a small exchange of air. Remove any dead or blackened leaves immediately.
- Cutting is wilting despite high humidity: Check that the plastic seal is actually holding moisture in. A loose bag lets too much dry air in. Also check that the medium hasn't dried out completely at root level.
- Leaves yellowing and dropping: Some leaf drop is normal early on as the cutting adjusts. If all leaves drop, the cutting has likely died. Let it sit another few days anyway: occasionally a cutting with no leaves will still push new growth from a node if the stem is still firm and green.
- Rooted cutting wilts immediately after transplanting: Classic transplant shock from moving out of high humidity too fast. Cover the transplanted cutting again for a few days and gradually reduce humidity over a week rather than going cold turkey.
Don't throw out a failed batch without doing a quick post-mortem. Pinch the cutting's stem: if it's still firm and green inside, it wasn't dead yet. Rot starts from the cut end and works upward, so if only the bottom inch is affected you can sometimes trim it back to clean tissue, re-prepare the end, and try again.
Propagating beyond cuttings: seeds vs division vs layering
Cuttings aren't the only way to get a new plant from an existing one. Depending on what you're growing, other methods might actually be faster or more reliable.
Division
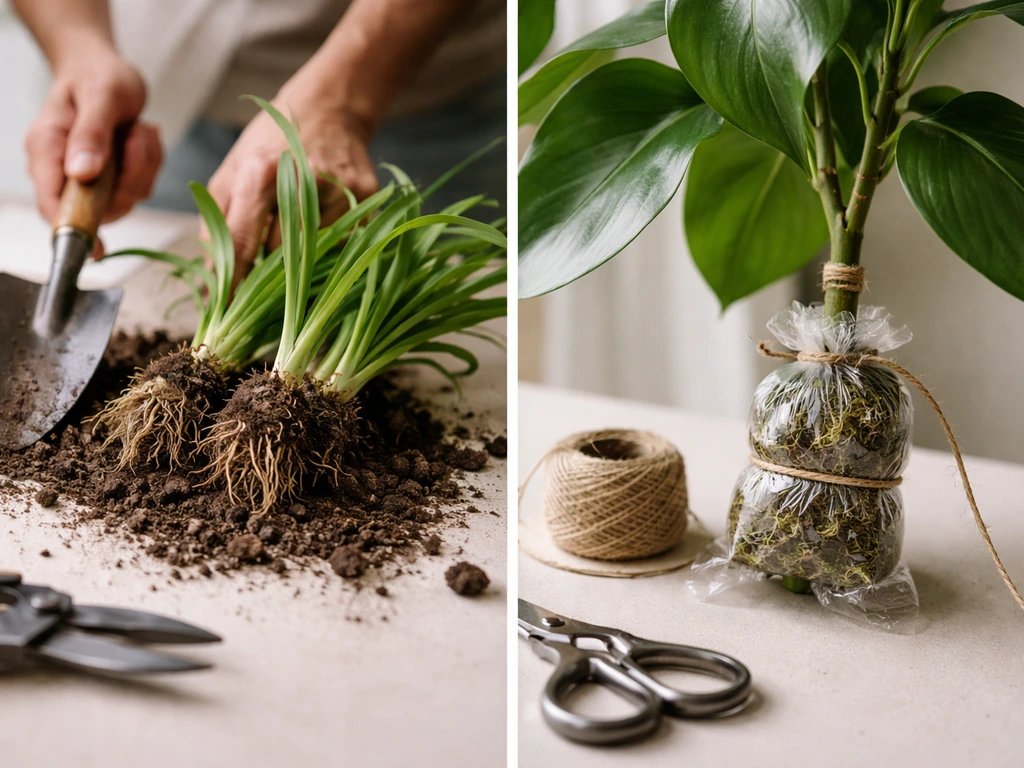
If you have a clumping perennial like a hosta, ornamental grass, or a root-bound houseplant that's sending up multiple stems, division is your fastest path to a new plant. You're simply splitting the root ball into two or more sections and replanting each. The key is timing: divide plants when they're not actively flowering so energy goes into reestablishing roots and leaves rather than blooming. Each division needs roots and at least a few leaves to survive.
Air layering
Air layering is a great option for large houseplants that have gotten leggy or lost their lower leaves, like rubber plants, crotons, or dieffenbachia. The technique involves wounding a section of stem while it's still attached to the parent plant, wrapping the wound with moist sphagnum moss and plastic, and waiting for roots to form directly on the stem. Once you see roots through the plastic, you cut the stem below the new root zone and pot up the rooted section. It works because the roots develop before the new plant is ever separated from its food and water supply, so the survival rate is high.
Seeds vs vegetative propagation
Seeds are technically growing a new plant from an existing plant's reproductive output, but the result isn't a genetic clone of the parent. If you're propagating a specific cultivar you love, cuttings, division, or air layering will give you an identical copy. Seeds introduce genetic variation, which can be wonderful or frustrating depending on your goals. For annuals, herbs grown primarily for flavor, or plants where genetic consistency doesn't matter much, seeds are cheap and practical. For everything else, stick with vegetative propagation.
The method you choose really comes down to your plant, your timeline, and your setup. Start with a stem cutting if you're new to this: it's forgiving, fast enough to be rewarding, and teaches you the fundamentals that apply to every other propagation technique. Once you've rooted a few cuttings successfully, the rest of the methods make a lot more intuitive sense.
FAQ
Can I propagate a new plant from a cutting that I accidentally let wilt or dry out?
Often yes, but act fast. Trim back to fresh, green tissue (if the cut end is brown or mushy, it may be too far gone). Rehydrate the cutting, then restart with a clean cut below a node. For the next week, use higher humidity and keep light bright and indirect, because a partially dehydrated cutting loses its ability to root reliably.
Is it better to root in water or straight in soil for the easiest success?
In general, water is easiest for beginners because you can monitor root formation and avoid hidden rot. If you know you will transplant carefully and you want fewer steps, a sterile, well-draining propagation mix is a close second. Avoid starting in heavy potting soil, since it holds too much moisture around rootless cuttings and increases rot.
How do I prevent rot when my cuttings turn black or get mushy at the base?
Blackening and mushiness usually means the cut end is staying too wet and oxygen-poor. Use a sterile medium (propagation mix, perlite, or a blend), ensure the container drains, and bury at least one node without trapping leaves under the surface. Also keep humidity high but add airflow (for example, partially open the bag occasionally) so condensation does not constantly pool on the cutting.
Should I fertilize during rooting to speed things up?
Usually no. The cutting needs energy to form roots, but adding nutrients early often encourages leaf growth or microbial buildup in the medium. If you want a boost, wait until you see new leaf growth after transplanting, then use a diluted fertilizer for the next couple weeks only if the plant looks established.
What’s the right humidity level when I cover the cutting with a bag or dome?
Aim for consistently humid air around the leaves, not standing water. If you see frequent dripping or the leaves are constantly wet, remove and vent briefly to prevent rot. A simple check is condensation that clears partially between openings is safer than condensation that never breaks up.
Can I propagate from a plant that’s flowering or already has buds?
You can, but it often performs worse. Remove flowers or buds so the cutting can redirect energy to root formation. If the plant is stressed or the flowering stalk is weakened, use a non-flowering shoot for the cutting when possible.
Do cuttings need light to root, and how can I avoid sunburn through plastic?
They need light, but mostly to support survival and slow, steady growth, not direct intensity. Use bright indirect light. If you use a clear bag or dome, keep it away from hot window sun because heat buildup can damage tissue quickly even when the cutting looks fine from a distance.
How do I know when roots are ready to transplant from water?
Transplant when roots are at least about half an inch to an inch long and look healthy (not translucent and collapsing). If roots are only tiny threads, wait longer in water. When moving, handle gently and keep the new mix light and well-draining so the roots are not sitting in wet, low-oxygen conditions.
My cutting rooted but keeps dropping leaves after potting. What should I do?
This is common after the humidity and water conditions change. Give it a week or two of extra humidity (loose cover, not a sealed, dripping setup), keep light bright and indirect, and do not fertilize yet. Make sure the pot drains well, then avoid overwatering, since root damage combined with soggy soil is the most common cause of continued leaf loss.
Can I propagate from a node using just a piece of stem, without a whole cutting?
Yes for many plants that root from nodes (commonly used for pothos and similar types). The key is that the node must be cleanly exposed to the medium and not buried in a way that traps leaves underneath. Keep the piece stable and humid, and expect slower rooting if the segment has fewer leaves to photosynthesize.
What’s the best way to take cuttings from the parent plant so it stays healthy?
Use clean, sharp tools to make a smooth cut and avoid tearing. Take cuttings from healthy, non-stressed growth and avoid removing too many shoots at once. After cutting, return the parent to its normal conditions and water appropriately, because heavy cutting can reduce its ability to recover and can lower the quality of future cuttings.
Are hardwood cuttings harder than soft-stem cuttings, and how should I adjust my approach?
They take longer and need more patience, but the preparation matters more. Use thicker, mature wood, keep the rooting environment warm enough for the species, and keep the medium consistently lightly moist rather than wet. Because timelines can stretch to months, check progress periodically without disturbing the cutting too often.
Should I use rooting hormone for all cuttings?
No, it’s optional. It helps most for slower-rooting plants or when you want a higher success rate. For quick-rooting soft-stem cuttings, the cutting’s freshness, humidity control, and a sterile, well-draining medium usually matter more than hormone use.
How often should I check on my propagation setup?
Check just enough to prevent problems, usually every few days. For water rooting, look for cloudiness, bad smell, or stagnant water, and refresh as needed. Avoid frequent re-handling of solid-medium cuttings because constant disturbances can bruise the cut end and delay root initiation.