Yes, you can grow a whole new plant from a single stem cutting with at least one node. That little bump or joint on a stem is where all the magic happens: it's the structural point where leaves and buds attach, and it's the tissue that can produce brand-new adventitious roots when you give it the right conditions. This guide walks you through every step, from picking the right cutting to transplanting a rooted plant without shocking it to death.
How to Grow a Plant From a Node: Step-by-Step Guide

Marcus Holloway
14 Apr 2026
What node cuttings are and which plants work best
A node is the distinct area on a stem where a leaf, bud, or branch attaches. It's not just a cosmetic feature. Nodes contain undifferentiated cells that can revert to meristematic activity, meaning they can be "reprogrammed" to grow roots when separated from the parent plant. Vegetative propagation using nodes is essentially cloning: every new plant will be genetically identical to the one you took it from.
Not every plant roots from a node with equal ease. The best candidates for beginners are soft-stemmed, fast-growing houseplants. Pothos (Epipremnum aureum), heartleaf philodendron (Philodendron hederaceum), English ivy (Hedera helix), and coleus are all reliable starters. Rubber plants, dracaena, and croton will work too, but they have woodier stems and take more patience. If you want to explore how to grow different types of plants from cuttings beyond the usual suspects, the same node-based logic applies across a surprisingly wide range of species.
The most important rule before you even pick up scissors: start with a healthy parent. A stressed plant (one that's underwatered, sunburned, or fighting pests) makes a poor cutting donor. Roots form better when the cutting carries stored energy and healthy tissue, and a struggling plant simply doesn't have enough of either to share.
Picking the right cutting and prepping it properly
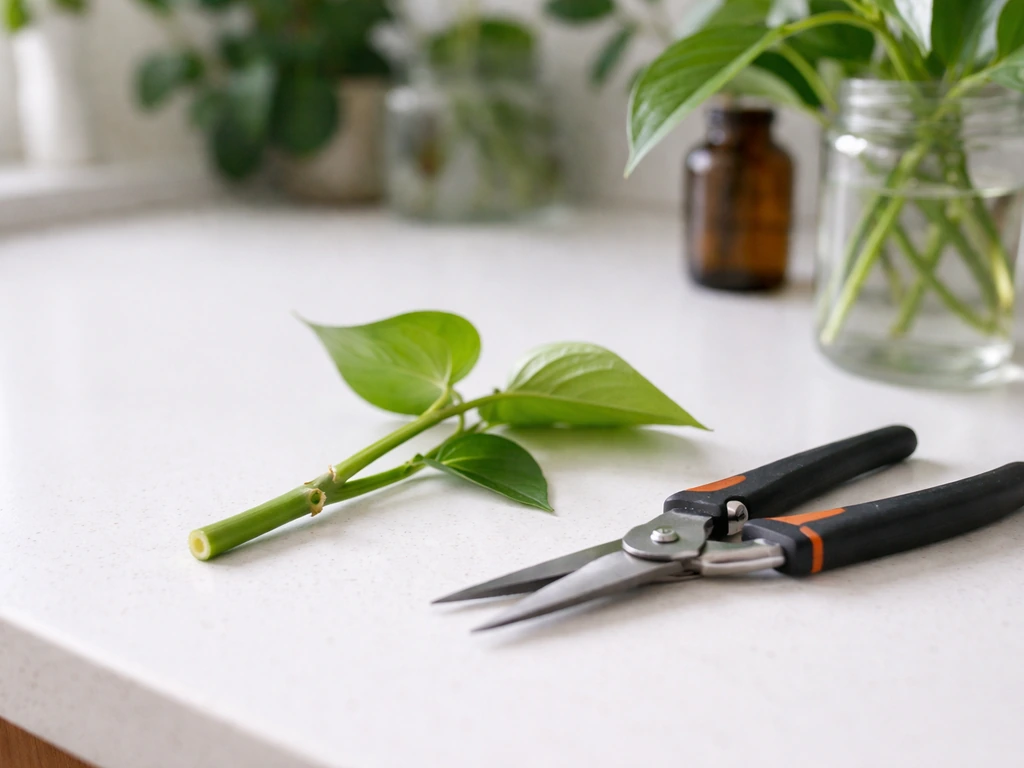
Aim for a stem that's 3 to 5 inches long with at least one node, ideally two. Soft, actively growing tips work best for most houseplants. Avoid stems that are yellowing, mushy, or have visible pest damage. If the parent plant looks like it's been through a rough month, wait until it recovers before taking cuttings.
Your tools matter more than people think. Use a clean, sharp pair of scissors or pruning shears. Dirty or dull blades can crush the stem tissue and introduce bacteria right at the wound site, which dramatically increases the chance of rot. Wipe blades with rubbing alcohol before you cut.
Once you have your cutting, strip off any leaves that would sit below the waterline or soil surface. Submerged leaves rot fast and turn the rooting medium into a bacteria soup. Leave two or three healthy leaves at the top so the cutting can still photosynthesize. For succulents or woodier stems, let the cut end sit out in the open air for a few hours to a day so it can callus over. That dry, slightly sealed surface makes the cutting much less likely to rot before roots appear. For soft-stemmed plants like pothos, you can skip the callusing step and go straight into your rooting medium.
Rooting hormone is optional but genuinely helpful, especially for plants that aren't the easiest to root. WSU Extension notes that rooting hormone and creating a wounded surface on the cutting can encourage adventitious root formation by activating cell division in the tissue between bark and wood blank" rel="noopener noreferrer">Rooting hormone is optional but genuinely helpful. UNR Extension also notes that rooting powder can be used when planting the cutting into the media blank" rel="noopener noreferrer">Rooting hormone is optional but genuinely helpful. Products containing IBA (indole-3-butyric acid) are the standard. For easy-to-root houseplants, a powder or gel at around 1,000 to 2,000 ppm IBA is plenty. Moderately tricky plants respond better to 3,000 to 5,000 ppm. Dip the cut end lightly, tap off any excess, and go. More is not better: overdoing the hormone can actually injure the tissue and slow rooting.
Water vs. soil rooting: pick your method
Both methods work. The choice comes down to your setup, how closely you want to watch the process, and which plant you're working with. Here's a direct comparison:
| Factor | Water Rooting | Soil/Perlite Rooting |
|---|---|---|
| Visibility | You can watch roots grow in real time | Roots are hidden until you check |
| Root quality | Roots can be coarser, less adapted to soil | Roots form already adapted to the medium |
| Rot risk | Lower if water is changed regularly | Higher if medium stays too wet |
| Transplant shock | More likely (roots need to adapt) | Less likely if medium matches final pot |
| Best for | Soft-stemmed plants like pothos, coleus, philodendron | Woodier stems, succulents, or any plant long-term |
| Maintenance | Change water 1-2x per week | Monitor moisture, mist or tent if needed |
Water rooting is the most beginner-friendly starting point. It's satisfying to watch, and you'll know exactly when roots are ready. Soil or perlite rooting produces roots that are already adapted to a solid medium, which means less transplant drama later.
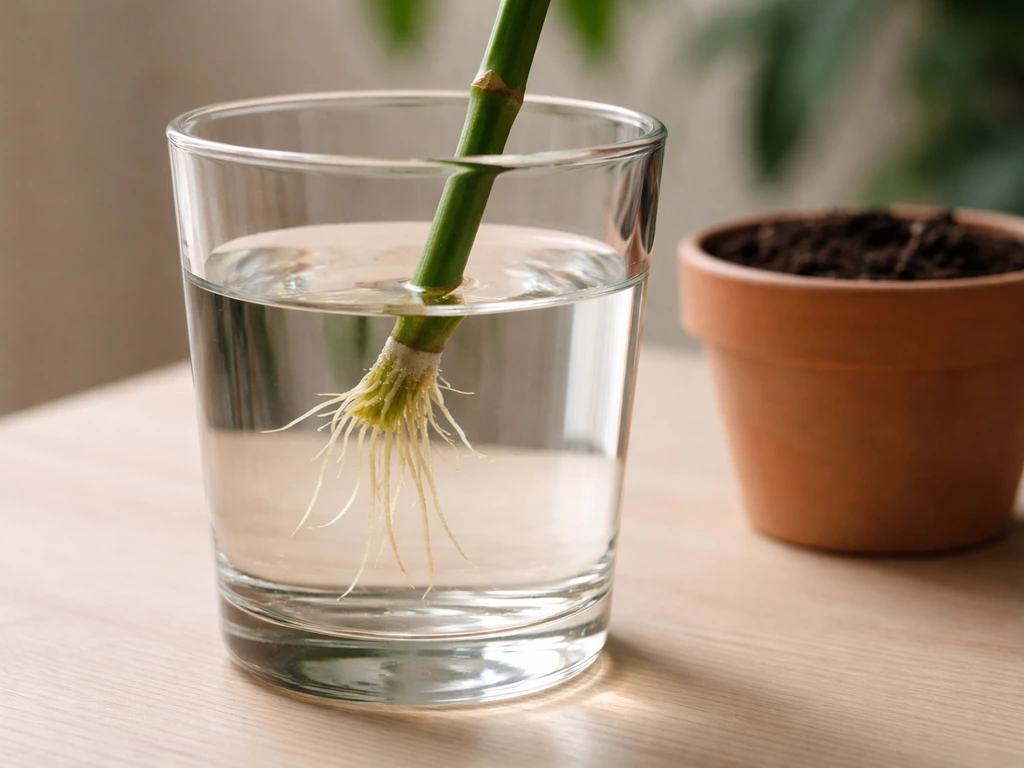
How to root in water (step by step)
- Fill a clean glass or jar with room-temperature water. Tap water is fine; let it sit for an hour if you're worried about chlorine.
- Submerge only the node (or nodes) in the water. No leaves should touch the water.
- Place the glass in a spot with bright, indirect light. Not direct sun, which heats the water and encourages algae.
- Change the water one to two times per week without fail. Never let the water level drop so far that developing roots are exposed to air — that can kill them quickly.
- Watch for white root nubs to appear at the node, usually within 1 to 3 weeks for easy-to-root plants.
- Once roots are at least half an inch to an inch long, the cutting is ready to transition to soil.
How to root in soil or perlite (step by step)
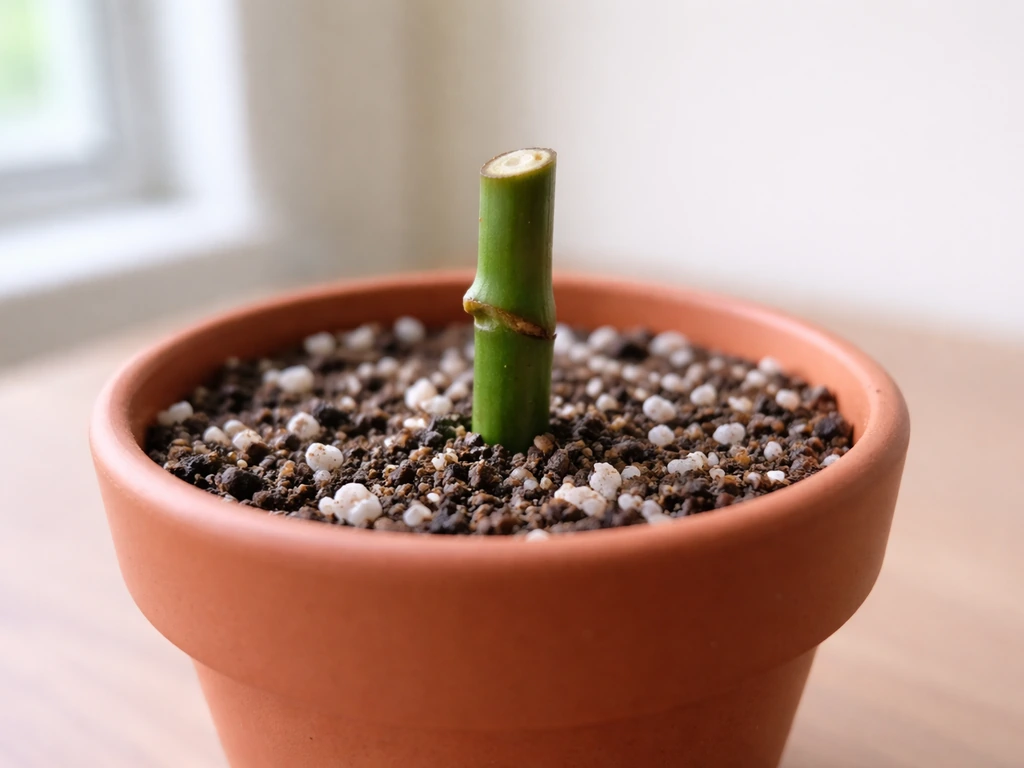
- Fill a small pot with a well-draining mix. Pure perlite, a 50/50 perlite-potting mix blend, or a seed-starting mix all work well. Avoid dense, water-retaining mixes.
- Moisten the mix until it's damp but not dripping. Squeeze a handful: if water streams out, it's too wet.
- Use a pencil or chopstick to poke a hole in the medium before inserting the cutting. This prevents the rooting hormone from wiping off and avoids damaging the stem base.
- Insert the cutting so at least one node is buried. Firm the medium gently around the stem.
- Cover loosely with a clear plastic bag or a plastic bottle with the bottom cut off to create a humidity dome. This keeps moisture around the cutting while roots haven't formed yet.
- Place in bright, indirect light. Check moisture every few days and mist lightly if the surface dries out.
- After 3 to 5 weeks, tug gently on the cutting. Resistance means roots have formed.
The conditions that actually make or break rooting
Light, temperature, and humidity are the three levers you're working with. Get them roughly right and most cuttings will root on their own. Get them wrong and even a perfect cutting won't do much.
Light: Cuttings need about 4 to 6 hours of bright, indirect light per day. Direct sun is too intense and will stress or dry out the cutting before it has roots to compensate. A spot near a north- or east-facing window, or a few feet back from a south- or west-facing one, is usually ideal.
Temperature: Aim for somewhere between 65°F and 80°F (18°C to 27°C). Warmer temperatures within that range tend to speed rooting. Avoid cold windowsills in winter (the glass can drop temperatures significantly at night) and spots near heating vents that dry things out fast.
Humidity: Higher humidity reduces moisture loss through the leaves while the cutting has no roots to draw water up. A plastic dome, a clear bag, or even a transparent cloche does the job. That said, don't seal the cutting in a completely airtight container for weeks. A little airflow matters because stagnant, saturated air is a recipe for mold and disease. Lift the dome for 15 to 30 minutes daily to let fresh air in.
What to expect: timelines and signs it's working
The first thing that forms at the cut end is usually a callus: a slightly thickened, pale, or brownish layer of wound-healing tissue. This is normal and not the same as roots. Think of it as the plant sealing up before it starts building new infrastructure. Callus formation can show up anywhere from 7 to 25 days depending on the plant species and temperature. Roots typically follow callus formation, often appearing 1 to 4 weeks after the callus forms.
In water, roots are obvious: white or cream-colored, thread-like structures growing from the node area. In soil or perlite, you'll feel resistance when you gently tug the stem. A cutting that pulls right out has no roots yet. One that holds firm has anchored itself. Don't yank hard; a light tug is enough information.
For soft-stemmed plants like pothos or coleus, expect visible roots within 1 to 3 weeks in water and 2 to 4 weeks in soil. Woodier plants or more stubborn species can take 6 to 10 weeks or longer. Patience is genuinely the skill here. The cutting is alive as long as the stem stays firm and any remaining leaves stay green.
Transplanting your rooted cutting without killing it

Once you have a decent root system (roots at least 1 inch long and branching, not just a few single threads), it's time to pot up. Resist the urge to go straight into a large pot. A small pot, 2 to 4 inches in diameter depending on cutting size, is the right move. Too much soil volume stays wet too long and that leads to rot.
If you rooted in water, there's an important transition step. Water roots and soil roots are structurally different. Water roots are often coarser and not as immediately efficient at pulling moisture from a solid medium. To reduce shock, pot into a light, well-draining mix and keep it consistently moist (not wet) for the first two weeks. You can also mix in extra perlite to keep things airy while the roots adjust. Some people do a gradual transition: add small amounts of soil to the water jar over several days before fully potting up. It sounds fussy but it does help.
For the first week after transplanting, keep the cutting out of direct sun and maintain the same humidity conditions you had during rooting. If the leaves droop slightly, that's normal. The root system is small and still adjusting. Once you see a new leaf unfurl or notice clear signs of new growth, the cutting has established itself. That's when you can start feeding with a diluted liquid fertilizer. Not before, because roots need to get comfortable in the medium first before you add fertilizer.
If you're planning to keep a reliable source of cuttings long-term, it's worth thinking about how to grow a mother plant for clones so you always have healthy, vigorous donor material ready to go.
Troubleshooting: when things go sideways
The stem is going mushy or black at the base
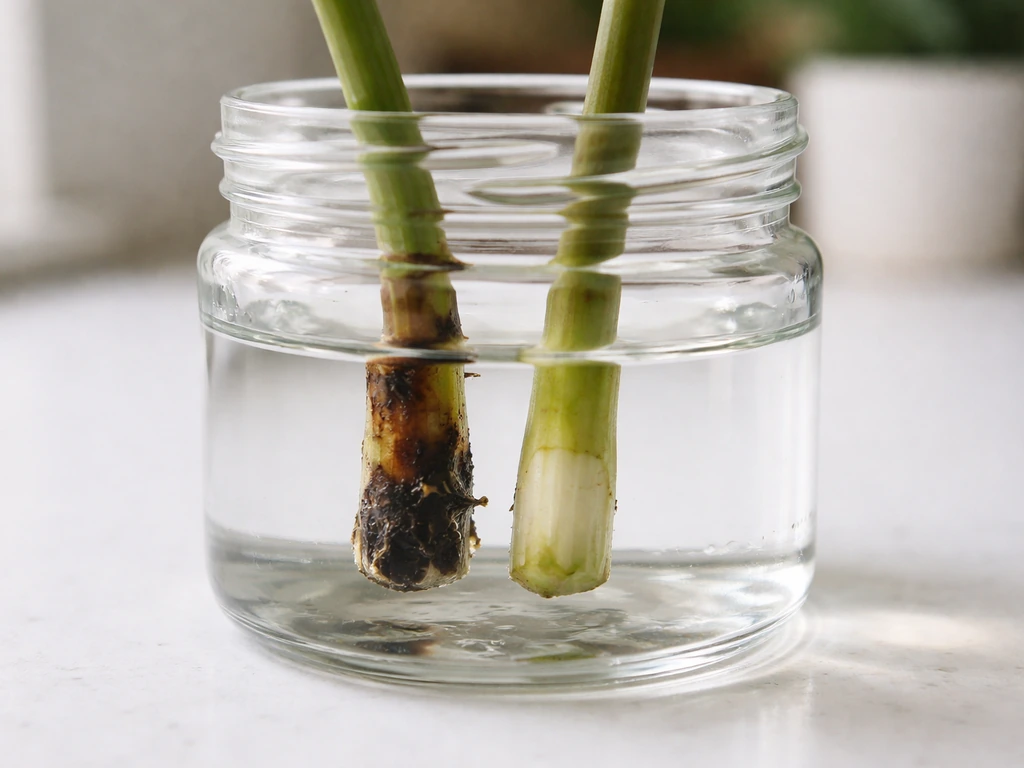
This is rot, and it's the most common failure mode. In water, it's almost always caused by leaving leaves submerged or not changing the water often enough. Remove the cutting, trim back to healthy tissue with a clean cut, and start fresh in clean water. In soil, rot usually means the medium is staying too wet. Let it dry out more between waterings, add perlite for drainage, and consider removing the humidity dome for longer periods each day.
No roots after 4 to 6 weeks
Check the basics first: is there enough warmth? Cold conditions slow rooting significantly. Is there enough light? A dark corner won't give the cutting enough energy to push roots. Did you take the cutting at the right point on the stem? If the cutting has no node at all, it physiologically cannot root. If everything looks right, try applying rooting hormone and re-cutting the base at a 45-degree angle to expose fresh tissue. Also look at the how to cut plants to grow more technique to make sure the original cut was made correctly.
Leaves are wilting badly
Some wilting is normal in the first few days because the cutting has no roots yet to supply water. If wilting is severe or doesn't improve, check that the stem isn't rotting, then boost humidity around the cutting. A loose plastic bag tent usually fixes mild wilting quickly. If leaves turn yellow and fall off but the stem stays firm, the cutting may just be shedding extra leaf mass to reduce water demand, which is actually a reasonable survival strategy.
Green algae in the water jar
Algae grow when light hits the water directly. Switch to an opaque container (a dark-colored cup, a mug, or a jar wrapped in paper) and change the water more frequently. Algae themselves won't directly kill the cutting, but they compete for oxygen in the water and can coat developing roots, which isn't ideal.
Mold on the soil surface or cutting
Surface mold is almost always an airflow and moisture problem. Remove the humidity dome more often, let the top of the medium dry slightly between mistings, and add a very gentle fan nearby if you have one. You can also dust the soil surface lightly with cinnamon, which has mild antifungal properties and won't harm the cutting.
Node propagation is just the beginning
Once you've rooted a few cuttings successfully, a whole world of plant propagation opens up. The node-cutting method is one of the most versatile techniques, but it's really just one branch of a much broader skill set. If you're ready to go deeper, how to grow a new plant from an existing plant covers the full range of propagation approaches beyond stem cuttings, including division, offsets, and layering.
The honest truth is that not every cutting will root, and that's not a reflection of your skills. Plant propagation has a learning curve that's built on repetition. Take more cuttings than you think you need, try both water and soil methods side by side on the same species, and pay attention to what works in your specific space. Your home's light levels, humidity, and temperature are unique, and figuring out how those interact with different plants is what turns a beginner into someone with an overflowing propagation station.
FAQ
Can I grow a plant from a node if the cutting has no leaves on it?
Yes, but success depends on the plant. A node can root on its own, yet leaves provide energy through photosynthesis during the rooting phase. If you remove all leaves, expect a slower, riskier process (especially in low light). Use the warm end of the temperature range, keep humidity high, and avoid letting the cutting dry out while roots are forming.
How long should the cutting be when I’m trying to root from a node?
A short cutting often roots fine if it includes at least one node, but extremely short pieces dry out faster. If you’re struggling, keep at least 3 to 5 inches of stem, so the cutting has stored energy and enough leaf area to prevent collapse before roots appear.
Do I need to bury the node in soil, or can it sit above the surface?
To encourage root formation, the node area should be positioned where it stays consistently moist and supported by the medium. If the node is above the soil line, you may get callus but fewer roots. In perlite, keep the node submerged in the rooting medium, not hovering at the surface.
What’s the best way to prevent rot in water rooting besides changing the water?
Keep leaves fully out of the water and rinse and restart if you see cloudiness or a smell. Also use a clean container and don’t crowd multiple cuttings together, since stagnant, oxygen-poor water increases rot risk. Consider using clear containers to monitor roots, but switch to an opaque or wrapped container to slow algae.
Should I remove the callus or leave it alone?
Leave it alone. Callus is a normal wound-healing layer that precedes root formation, so scraping it off usually damages the tissue that’s about to become roots. Instead, focus on stable warmth, bright indirect light, and proper moisture levels until roots show.
How do I know when roots are ready to transplant if I rooted in soil or perlite?
Use the gentle tug method, but do it carefully to avoid breaking fresh roots. Roots are likely ready when the cutting resists a light pull and feels anchored, and ideally when you can see a few tiny white tips at the bottom through drainage holes. If it pulls out easily, wait a bit longer rather than forcing it.
Is it better to root in water or in soil for beginners?
For most people, water is more forgiving for monitoring because you can see when roots form and detect rot early. Soil or perlite can reduce transition shock later, since roots are already adapted to a medium. If you often forget to check plants, soil or perlite may be easier because the cutting doesn’t rely on water quality every few days.
Can I propagate multiple nodes from one stem cutting?
Often yes, as long as each node you want to root has a portion of stem that can form roots and, ideally, has access to moisture and light. However, if you plant too many nodes in one pot, the cuttings can compete and make it harder to separate later. If you plan to separate, use individual pots or ensure each node has its own rooting space.
Should I use rooting hormone every time?
Not necessarily. It’s most helpful for harder-to-root plants, woodier stems, or when you’re working with less ideal conditions. For easy-to-root houseplants, many cuttings root without it. If you do use it, apply lightly and avoid coating the node excessively, since excess hormone can injure tissue and slow rooting.
How much light is too much during rooting?
Bright, indirect light is the target. Direct sun can scorch leaves and rapidly dry a cutting before roots can replace its water supply. If you notice wilting plus crispy leaf edges, move the cutting farther from the window or reduce intensity while keeping day-length consistent.
What humidity level should I aim for, and do I need a dome?
Higher humidity helps because the cutting loses less water while it has no roots. A dome or clear bag works, but provide daily airflow so you’re not trapping saturated, stagnant air. If you don’t want to use a dome, compensate with more consistent moisture in the medium and keep the cutting away from hot, dry air sources.
Why is my cutting wilting even though the stem is still firm?
Early wilting can be normal because the cutting temporarily can’t take up water. If the stem stays firm and green, focus on stabilizing humidity and avoiding direct sun. If wilting is severe or the stem turns soft, suspect rot and check that leaves are not in the rooting medium or water.
My cutting lost leaves, but it’s not rotting. Is that a problem?
Leaf drop alone is not automatically failure. Some plants shed older leaves to reduce water demand once rooting begins. The key sign is stem firmness and new growth or root anchoring. If new leaves do not appear and roots never form, then adjust light, warmth, and moisture.
Can I reuse rooting water after it’s been used once?
It’s usually safer not to. Rooting water can accumulate microbes and oxygen depletion products over time, especially if leaves were submerged or water wasn’t changed regularly. If you reuse, at minimum filter or strain and replace frequently, but starting fresh generally improves reliability.
What’s the safest first fertilizer schedule after transplanting?
Wait until you see clear evidence of establishment, such as new leaf growth or a noticeable uptick in vigor. Use diluted liquid fertilizer and avoid feeding immediately after potting if the plant is still adjusting, because weak, newly formed roots are easily damaged by concentrated nutrients.