You can grow a healthy plant by matching it to your light and space, giving it the right growing medium, and following a simple routine of watering, feeding, and checking for problems. That is the whole game. Everything else is just the details, and the details are easier than most people think. If you have killed plants before, you are not cursed. You were probably just handed the wrong plant for your conditions, or nobody told you what to actually watch for. Let's fix that.
How Can We Grow a Plant: Step-by-Step for Beginners

Marcus Holloway
7 Apr 2026

Choose the right plant for your space

Before you buy anything, figure out your light situation. This single step will save you more dead plants than anything else. Walk through your space at midday and look at where the sun actually hits. Researchers at UC Agriculture and Natural Resources break houseplant light into three practical categories: high light means 6 or more hours of direct or very bright indirect sun, medium light is 4 to 6 hours, and low light is 3 hours or fewer. Most apartments and north-facing rooms fall into that low-light category, and that is completely fine as long as you choose accordingly.
For low-light spots, snake plants and ZZ plants are genuinely hard to kill. Penn State Extension points out that low-light plants grow slower overall and need less water as a result, which is great news if you are a beginner or a forgetful waterer. For bright sunny windows or outdoor balconies, you have a lot more options. If you want to grow vegetables in containers, the University of Maryland Extension gives clear targets: warm-season crops like tomatoes, peppers, eggplant, and squash need 6 to 8 hours of direct sun, while cool-season crops like lettuce, spinach, and Asian greens can get by on 3 to 5 hours. University of Maryland Extension also points out that salad tables or containers can be positioned to get appropriate direct sun in spring and fall, and then moved during summer to avoid excessive heat and direct sun University of Maryland Extension gives clear targets. Match the plant to the light you actually have, not the light you wish you had.
Space matters too. A 4-inch pot is not going to grow a tomato. Think about how big the plant gets at maturity and whether your floor, shelf, or balcony can handle it. Small spaces are not a limitation, they just point you toward specific plants like herbs on a windowsill, trailing pothos on a bookshelf, or compact lettuce varieties in a window box.
Plant basics: light, water, soil, and temperature
Light
Light is plant food, full stop. Oregon State University Extension notes that matching a plant's light exposure to its actual needs not only supports health but also reduces the likelihood of insect and disease problems. A plant in the wrong light is a stressed plant, and stressed plants invite trouble. If your plant is stretching toward the window, leaning dramatically, or producing tiny pale leaves, it wants more light. Move it closer to a window or consider a simple grow light if you are growing indoors without a strong natural source.
Water
Overwatering kills far more houseplants than underwatering. The rule from the University of Minnesota Extension is straightforward: water if your plant is dry. Stick your finger an inch into the soil. If it is still damp, wait. For most houseplants, once a week is a reasonable starting point, but that is a default, not a rule. A ZZ plant, for example, wants the soil to dry out completely between waterings and only needs fertilizer about every 3 months during the growing season. A snake plant wants similar dry-out periods. Basil and lettuce, on the other hand, like to stay more evenly moist. If your plant is wilting but the soil is wet, that is a red flag for root rot, not a reason to water more.
Soil and growing medium
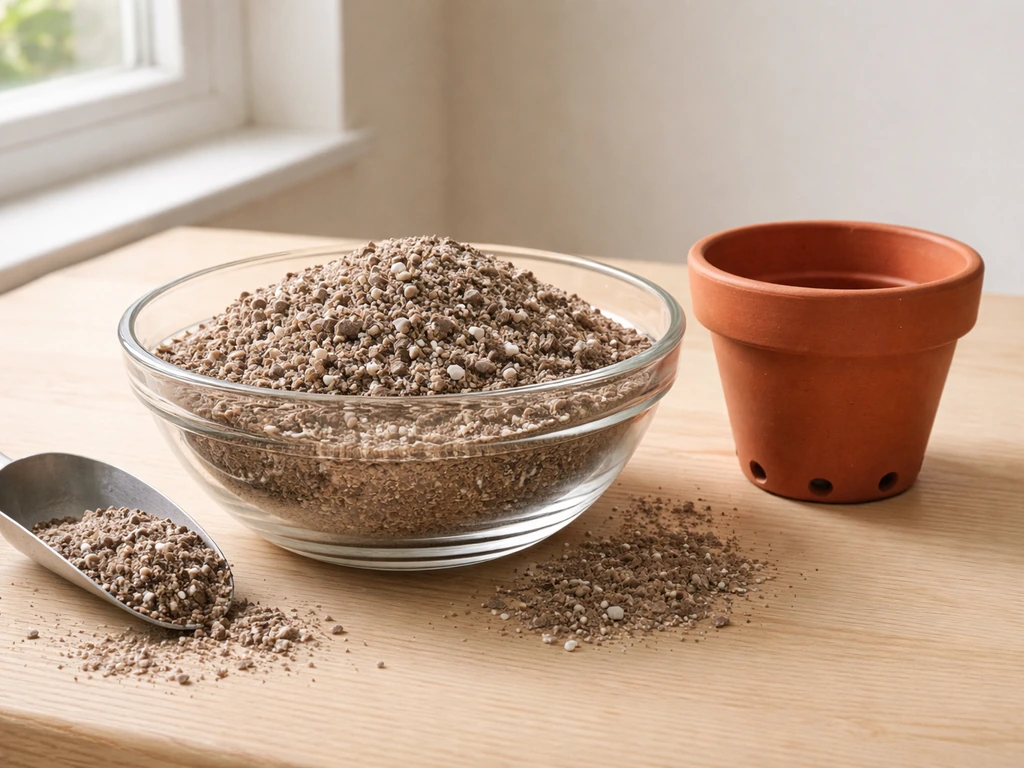
Most commercial potting mixes are soilless, which is intentional. Penn State Extension explains that soilless mixes avoid soilborne diseases and promote drainage. They typically combine peat moss or coir with perlite or vermiculite, plus some organic fertilizer. Perlite is what gives the mix those little white chunks, and those chunks matter: they create air pockets that keep roots from suffocating. If your mix is dense and heavy straight out of the bag, it is going to compact over time and cause drainage problems. A good mix feels light and slightly springy. Coir (made from coconut husks) is a sustainable peat alternative that does the same job of holding moisture while keeping things airy.
Temperature
Most houseplants and seedlings prefer ambient temperatures between 55°F and 70°F. If you are starting seeds, the University of Maine Cooperative Extension recommends keeping the ambient room in that range, with seedling heat mats used specifically to provide bottom warmth that helps trigger germination. Most tropical houseplants dislike cold drafts from windows or air conditioning vents, so keep them away from those spots in winter. Outdoor container gardeners should watch for frost dates, because a single cold night can undo weeks of growth.
How to start a plant: seeds, cuttings, and seedlings
Starting from seed
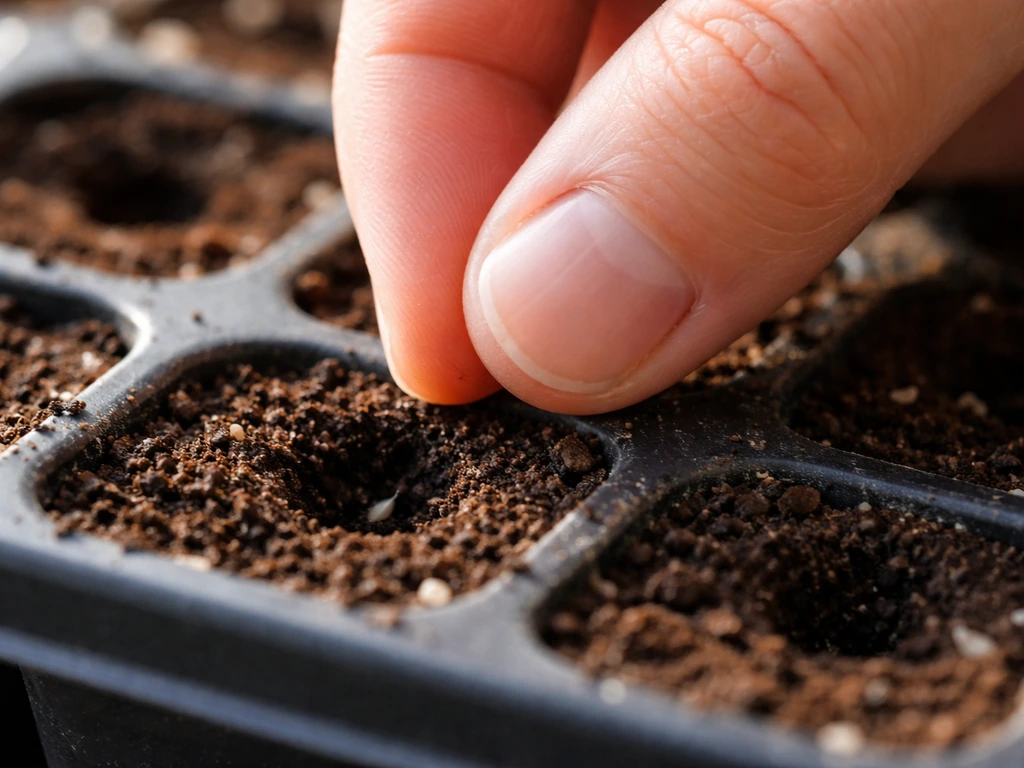
Seeds are the cheapest way in and give you the most variety to choose from. The depth rule is simple: if you are unsure, plant a seed about twice as deep as its width. A tiny basil seed goes barely under the surface; a large bean seed goes deeper. For basil specifically, the University of SARE seed-starting resources show a germination temperature of 70 to 85°F, a seeding depth of about 0.25 inches, and expect germination in 5 to 10 days with transplanting around 60 days in. Once seeds are in, water gently with a spray bottle so you do not wash the mix out of the container or displace tiny seeds. Keep the surface consistently moist but not soaked. Do not let it dry out completely at this stage.
If your seedlings are collapsing at the base right after sprouting, that is damping off, a fungal problem at the soil surface. A seedling heat mat can actually help prevent this by keeping the mix warm and discouraging the pathogens that cause it. Good air circulation helps too.
Starting from cuttings
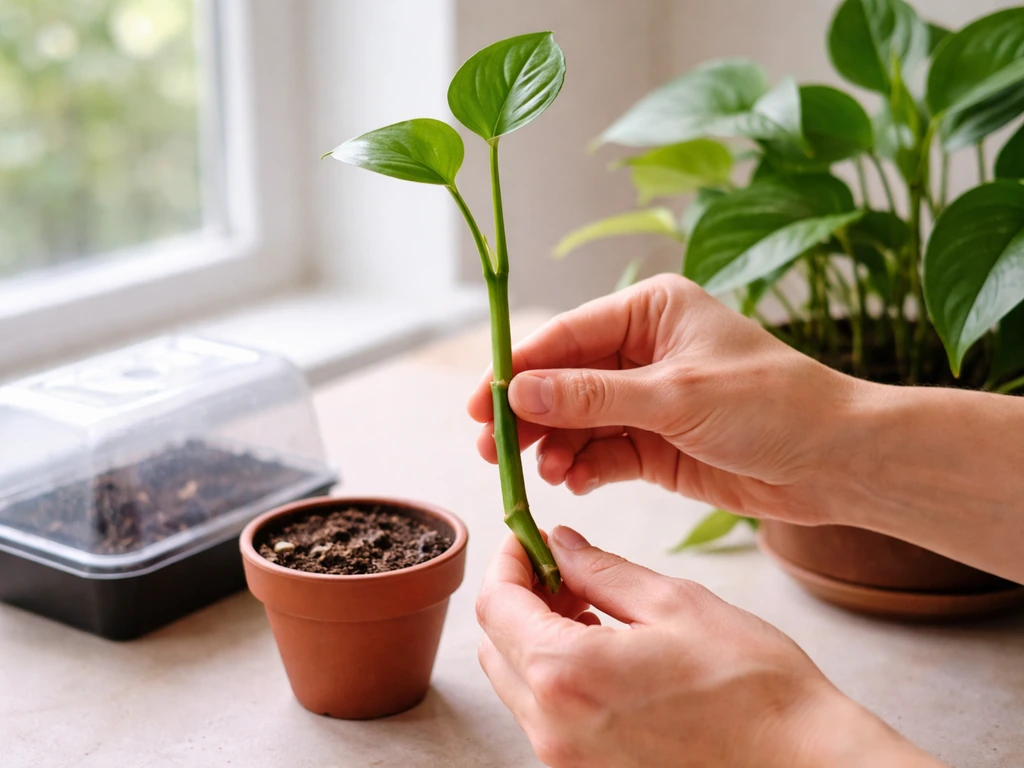
Cuttings are a great way to grow a new plant from one you already have or from a friend's plant. Take a stem cutting with at least one node (the little bump or joint where a leaf attaches), remove any leaves that would sit below the medium, and dip the cut end in rooting hormone if you have it. Then insert it into pre-moistened perlite, coarse sand, or vermiculite. Perlite is especially good for rooting. Place a clear plastic bag loosely over the cutting to hold humidity around it, since without roots it cannot pull water from the medium yet and will dry out fast. Keep it warm, because cuttings root faster in warm air and warm media.
One thing to be aware of: if you rooted a cutting in a glass of water (a very common method), do not expect a seamless transition when you pot it up into soil. Iowa State University Extension warns that water-rooted cuttings often show stress when moved to potting mix, including wilting, leaf drop, and tip dieback. That is normal acclimation, not failure. Keep the soil consistently moist during the transition and give the plant a few weeks to settle in before you judge it.
Starting from seedlings or transplants
Buying a seedling from a garden center is the fastest way to get started and a perfectly valid choice. When you transplant it, do so in the morning or on a cloudy day to reduce transplant shock from sun and heat. Plant it at the same depth it was growing in its original container, firm the mix gently around the roots, and water it in well. Never hold a seedling by its stem. Support it under the root ball or by the leaves if needed, because crushing the stem can cause damage that shows up days later as a mystery wilt.
How to transplant, space, and set up good roots
Getting roots off to a good start is the most important thing you can do in the first week. For seedlings moving up from small cell packs, transplant them into a container that is 1 to 2 inches wider in diameter than the pack. Do not jump straight to a giant pot thinking it will help the plant grow faster. Too much extra soil around a small root ball holds moisture the roots cannot use yet, and that lingering dampness is how root rot starts.
For established houseplants being repotted, Penn State Extension says to move up when roots are growing out of the drainage holes or the plant is visibly pot-bound. Position the root ball so its top sits about 1 inch below the lip of the new pot. That gap is where your water goes when you water, and it prevents overflow. Always use a container with a drainage hole. If you love a decorative pot without one, pot your plant into a plain nursery pot with drainage first, then set that inside the decorative pot as a sleeve, leaving space between the drainage hole and the bottom so water drains freely instead of pooling around the roots.
Delaying transplant for too long is a real mistake. Penn State Extension notes that seedlings left too long in crowded conditions become weak and spindly. Move them up when they are ready, not when it is convenient. If you are dealing with a plant that has been sitting in the same pot for years and needs more than just a size upgrade, reading up on how to repot a wick and grow plant can help you understand how self-watering systems factor into the repotting process.
Your ongoing care schedule
Watering
Check soil moisture before you water, not by the calendar. For most houseplants, weekly watering is a reasonable starting point, but adjust based on your plant type, pot size, light level, and season. Containers in full sun or exposed to wind dry out much faster than shaded ones. The University of Maryland Extension specifically notes that containers near overhangs or solid fences may not receive much rain at all, so outdoor containers are not always getting the water you think they are. Herbs like rosemary and thyme prefer to dry out more between waterings, while basil and lettuce need more consistent moisture. Learn your plant's preference and check in with your finger rather than guessing.
Feeding
Hold off on fertilizer until you see new growth: new leaves, new stems, new roots, or new buds. This is especially important for a plant that has just been transplanted or is recovering from stress. Fertilizing a stressed plant does not speed up recovery, it makes things worse. Once you do see growth, a balanced liquid fertilizer diluted to the recommended rate every few weeks during the growing season (spring and summer) is a solid approach. Slow-growing low-light plants like ZZ plants only need feeding roughly every 3 months during active growth. Watch out for burned leaf tips or a white crusty buildup on the soil surface, both of which Oregon State University Extension flags as signs of over-fertilizing.
Pruning and support
Pruning is not just for looks. Removing dead or yellowing leaves keeps the plant from spending energy on tissue that is done. Pinching back the growing tips of herbs like basil encourages bushier growth and delays flowering. For climbing or vining plants, adding a simple stake or trellis early is much easier than wrestling with a tangle later. Use soft ties or plant clips so you are not cutting into the stem.
Routine pest checks
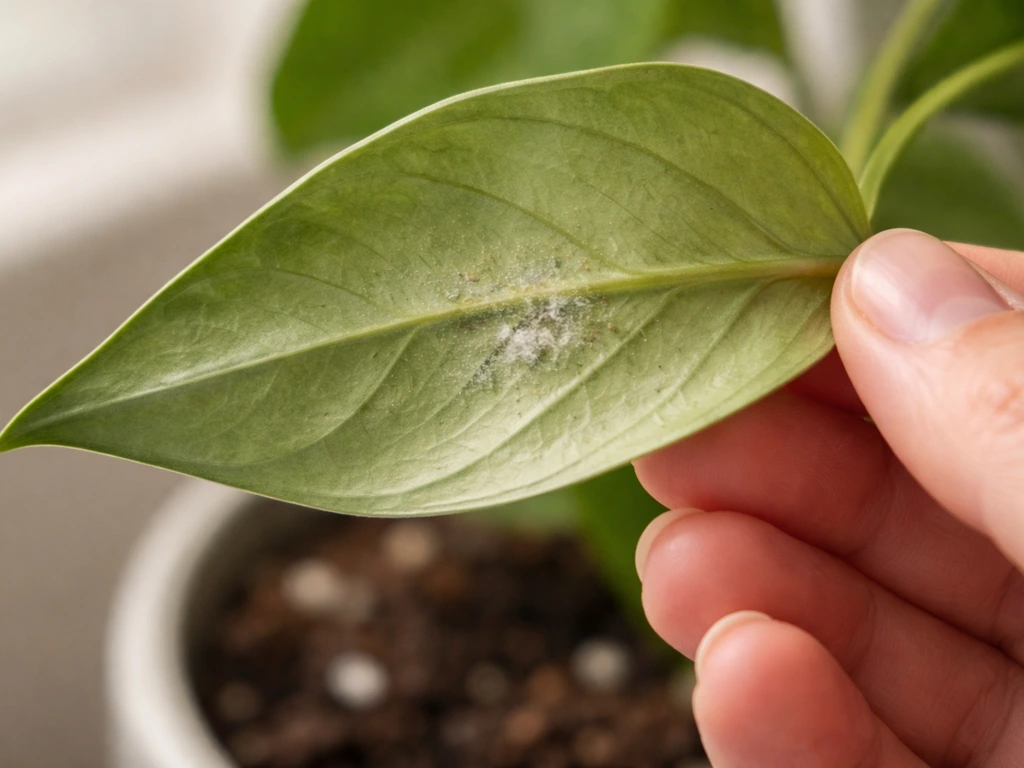
Make it a habit to flip a few leaves over when you water. The underside of leaves is where spider mites, mealybugs, and scale set up camp first. Catching a pest problem when it is two bugs is a lot easier than catching it at two hundred. Check the soil surface too, especially if you have been overwatering, since fungus gnats lay eggs in moist top soil.
Troubleshooting when things go wrong
When something looks off, resist the urge to immediately spray or repot. Start by checking the basics: light, soil moisture, and temperature. Oregon State University Extension makes the point that fixing the environment usually comes before escalating to pesticides or treatments. Most plant problems are caused by conditions, not pests or disease, and if you correct the conditions the plant often recovers on its own.
| Symptom | Most likely causes | What to check and do first |
|---|---|---|
| Yellow leaves (lower leaves first) | Overwatering, root rot, underwatering, low light, low fertility | Check soil moisture; look at roots for brown/mushy tissue; assess light level; hold fertilizer until stable |
| Wilting with moist soil | Root rot from too much water | Stop watering; check roots; unpot if needed and trim rotted roots; repot in fresh dry mix |
| Wilting with dry soil | Underwatering or heat stress | Water thoroughly; move out of direct harsh sun if outdoors |
| Stunted or pale new growth | Low light, low nutrients, or compacted roots | Move to brighter spot; check if root-bound; fertilize once new growth confirms stability |
| Leaf drop | Temperature shock, draft, or overwatering | Move away from vents, drafts, or cold windows; check soil moisture |
| White fuzzy patches on soil or stem base | Mold or fungus (overwatering + low airflow) | Reduce watering; improve airflow; scrape off mold; let soil surface dry between waterings |
| Tiny flies hovering around soil | Fungus gnats (eggs laid in wet topsoil) | Let topsoil dry more between waterings; use sticky yellow traps; consider neem oil drench |
| Sticky residue or cottony clusters on leaves | Mealybugs or scale | Wipe off with rubbing alcohol on a cotton swab; apply insecticidal soap or neem oil, covering undersides of leaves |
The University of Florida's plant diagnostics guidance draws a useful distinction: yellow leaves can come from disease, overwatering, or underwatering, and you need to figure out which before you treat. Brown, mushy roots mean the plant has been too wet. Dry, shriveled roots mean the opposite. When in doubt, check the roots. They tell the real story. The University of Georgia Extension adds that lower leaf yellowing and gradual defoliation is often caused by multiple overlapping stressors, so rule them out one at a time rather than changing everything at once.
For pest control, the University of Minnesota Extension recommends neem oil as a practical indoor option, applied with thorough coverage under leaves and used in a well-ventilated space. Colorado State University Extension provides a useful pest framework covering mealybugs, fungus gnats, spider mites, and scale, with insecticidal soap and neem oil as the main go-to treatments. These are low-toxicity options that work well for most common indoor pest problems without needing to reach for harsher chemicals.
Growing in different environments
The fundamentals of plant growth do not change depending on where you are growing. What changes is how you manage water, light, and nutrition in each setup. Here is how it plays out across the most common environments.
Containers and indoor growing
Containers give you total control over the growing medium, which is a real advantage. You pick the mix, you control drainage, and you can move things around to chase better light. The trade-off is that containers dry out faster and have limited nutrient reserves, so you need to water and fertilize more attentively than in-ground gardening. Good drainage is non-negotiable: every container should have a hole. Indoors, protect your surfaces with a saucer but empty it after watering so the pot does not sit in standing water.
Balcony and outdoor growing
Balcony growing is all about managing exposure. Full sun and wind accelerate drying dramatically, so you may need to water daily in hot weather. A container under an overhang might receive almost no rain even during a storm, so do not assume nature is doing the watering for you. Cool-season crops like lettuce and spinach are great balcony starters because they tolerate partial shade and stay compact. If you are new to outdoor container growing, understanding how do you grow a plant in an outdoor container context can help you think through positioning, wind protection, and seasonal timing in more depth.
Hydroponics
Hydroponics replaces soil entirely with a water-based nutrient solution. Plants grow in inert media like perlite, clay pellets, or rockwool, and their roots sit in or are regularly bathed in nutrient-rich water. The big upside is faster growth and no soil-borne pests or diseases. The downside is that you need to monitor nutrient levels and pH more actively, and there is less room for error on the watering side because roots are always near water. That said, simple hydroponic setups like a Kratky jar (a passive system with no pump) are genuinely beginner-friendly for herbs and lettuce.
Terrariums
Terrariums create a self-contained humid environment that works brilliantly for moisture-loving tropical plants like ferns, mosses, and small fittonia. The closed or semi-closed environment holds humidity and recycles water, so you water much less frequently than with a standard pot. The key rules: do not put succulents or cacti in a closed terrarium (they hate humidity), and make sure the base layer includes drainage material like pebbles or activated charcoal so excess water does not pool at the roots.
Water growing
Growing plants directly in water (without soil) works well for certain species: pothos, philodendron, lucky bamboo, and many herbs root and grow happily in a jar of water on a windowsill. Change the water every one to two weeks to prevent stagnation and add a few drops of liquid fertilizer periodically since there are no nutrients in plain water. Keep in mind the water-to-soil transition challenge mentioned earlier: if you ever want to move a water-grown plant to soil, do it gradually and expect a period of adjustment.
When and how to harvest or keep things going long term
Harvesting edible plants
For herbs, harvest regularly and do not wait for the plant to look ready in the way a fruit does. Pinching off stems just above a leaf node encourages branching and keeps the plant producing. Basil should be harvested before it flowers; once it bolts the leaves turn bitter. For vegetables like tomatoes and peppers, harvest as soon as fruit reaches full color and size. Regular harvesting actually encourages more production. Lettuce and leafy greens can be harvested outer-leaf-first, letting the center continue growing, or cut the whole plant an inch above the soil for a cut-and-come-again approach.
Long-term care for ornamentals and houseplants
For houseplants and ornamentals, long-term success is mostly about building a rhythm and staying observant. Week to week, you are looking for new growth (a sign things are going well), changes in leaf color or texture (an early warning), and soil moisture before you water. Seasonally, expect plants to slow down or go semi-dormant in winter, at which point you water less, skip fertilizer, and avoid repotting until spring. Every year or two, check if the plant needs a slightly bigger home. Some plants, like certain ferns and prayer plants, benefit from being divided as they get large, which also gives you new plants to share. Caring for community-rooted organizations like how to grow a church plant mirrors this idea: consistent tending, watching for signs of stress, and giving things room to expand are the same principles whether you are managing roots or relationships.
The week-by-week reality of growing plants is less dramatic than people expect. Most of the time you are just checking in, adjusting watering, and watching new leaves unfurl. The problems that do show up, like a few yellowing leaves or a cluster of gnats, are almost always fixable if you catch them early. The longer you grow, the better you get at reading what a plant is telling you before it becomes a crisis. Give yourself permission to learn by doing, and do not let one dead plant stop you from trying again.
FAQ
After watering, should I leave water sitting in the saucer?
Use a saucer and empty it. If the pot sits in runoff for hours, roots can suffocate and rot even if you watered correctly. After watering, wait a few minutes, check the saucer, then pour off any excess.
My plant is wilting but the soil is still wet. What should I do next?
Stop guessing, do a quick “root check.” If a plant has yellowing or wilting but the soil is wet, remove the plant and look for dark, mushy roots (too much water) versus pale, firm roots (not). That determines whether you should drain, repot, or adjust light.
When is the best time to prune after repotting or moving my plant?
Don’t prune right after a stressful event like repotting, moving, or transplanting. Wait until you see fresh growth, then remove only dead or clearly damaged leaves. Cutting back too early can delay recovery.
Can I use a heat mat for seedlings if I also tend to overwater?
Yes, but only if the plant is warm enough and the medium stays just barely moist, not soggy. Most seedlings and cuttings root better with warmth, but if you combine heat with overwatering you increase damping off and rot risk.
My seedlings are stretching and getting weak. Should I fertilize?
If seedlings are leggy, it is almost always a light problem (insufficient intensity or distance), not a fertilizer problem. Increase light by moving closer to the window or using a grow light, and start gentle feeding only after you see sturdy new growth.
Can I move a plant outdoors immediately after buying it?
Many herbs, especially basil, are sensitive to cold and stress. If temperatures drop below the plant’s comfort range, growth stalls and leaves can turn unhappy. Acclimate outdoor plants gradually over several days and protect from wind and night cold.
How do I choose the right pot size when repotting?
Use the smallest pot that gives the roots room to work. If you have too much extra soil, it stays wet longer, which raises root rot risk. A good rule is about 1 to 2 inches wider than the previous container when repotting.
I watered less because it rained. How can I tell if my outdoor container actually got enough?
For container plants, do not assume rain equals watering. Lift the pot and check weight, or do a finger test at root depth. If the top looks dry but deeper soil stays moist, skip watering to avoid fungus gnats and rot.
What should I do if fertilizer is causing white crust on the soil or burned leaf tips?
Start with fewer nutrients, then adjust. If you see crusty buildup or burned tips, flush the pot with water (so excess salt drains out) and pause fertilizer. Resume at a lower dilution only when new growth appears.
How often should I check for pests, and what is the earliest sign to look for?
Inspect at least once a week. The earliest signs are often tiny stippling on leaves (spider mites) or cottony clusters in leaf joints (mealybugs). Catching these early usually means using neem or insecticidal soap only once or twice, not repeatedly for months.
Should I treat pests immediately, or diagnose first?
If the issue is environmental, treatment can be wasted or harmful. Prioritize light level, watering frequency, temperature, and airflow first. Only after you confirm a specific pest or disease should you apply neem, insecticidal soap, or other products.
What is the safest way to increase sunlight for an indoor plant?
Yes, but acclimate gradually. Keep the plant on the same side of the window, increase direct sun exposure slowly over days, and watch for leaf bleaching. A sudden switch often causes tip dieback or leaf drop even if the plant is otherwise healthy.
How do I help a cutting transition from water to soil without losing leaves?
For water-rooted cuttings, expect a short adjustment period. Keep soil evenly moist during the first 2 to 3 weeks, avoid full sun, and don’t fertilize immediately. Once you see new leaf growth, you can return to your normal routine.
Do self-watering systems change the rules for preventing overwatering?
A self-watering setup still needs monitoring. Check that the reservoir does not run empty or get algae growth, and periodically inspect roots for smell or browning. If the plant sits too wet, you still get root rot.
When I transplant, how deep should the plant sit compared to the soil line?
Use the root-ball depth from the original plant, but also ensure the new pot has proper drainage. Planting too deep can trap moisture around the stem, especially in dense mixes. If you notice the plant wobbling or the stem feels buried, adjust before the first major soak.