Here is the short answer: pick your method (seed, cutting, or division), give your new plant warm roots, consistent moisture, and enough light, and you will see your first signs of growth within a week or two. That is the whole game. Everything else is just understanding why those things matter so you can fix problems when they show up. Let's break it down step by step so you can get started this week.
How to Grow a New Plant: Step-by-Step From Seed or Propagation

Marcus Holloway
18 Apr 2026

How new plants grow (the basics you need to know)
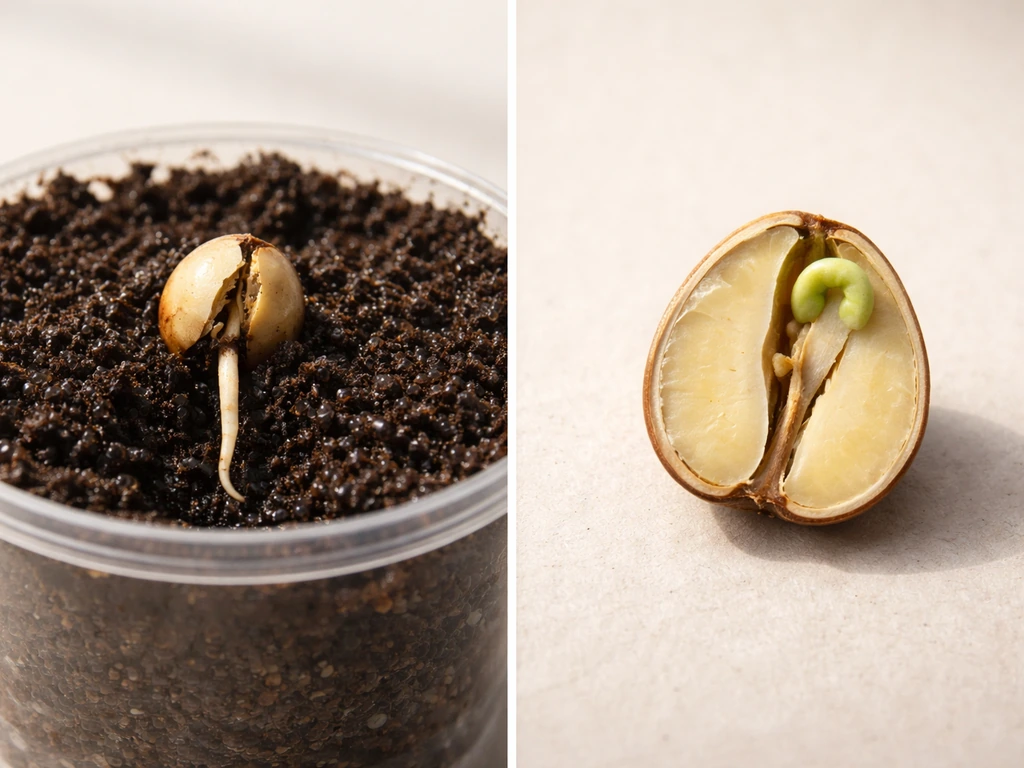
Before you touch a seed packet or snip a cutting, it helps to know what is actually happening inside the plant. When a seed germinates, it is not just getting wet. It absorbs water through its seed coat in a process called imbibition, which triggers the embryo to wake up and start drawing on the food stored in its cotyledons (the seed leaves) or endosperm. The very first thing to emerge is the radicle, which is the primary embryonic root. That radicle is the plant's first lifeline for water uptake, and everything above-ground growth depends on it getting established.
Seeds rely entirely on their stored reserves until they can photosynthesize. Think of it like a battery: the seed is fully charged at the start, but it runs down fast. That is why getting conditions right in the first week matters so much. If temperature, moisture, oxygen, or light (for species that need it) are off, the battery drains before the plant can power itself. Once leaves are open and catching light, the plant switches to running on photosynthesis and the stored reserves become less critical.
For cuttings, offsets, and divisions, there are no stored seed reserves to fall back on. The cutting has to generate brand-new roots from existing stem or leaf tissue, which means it is working against the clock while losing water through its leaves. This is exactly why humidity and warmth are so critical during propagation: they slow that water loss and speed up root formation.
Choose your method: seed vs cuttings vs division/offsets
There are three main ways to grow a new plant, and your choice depends on what you have available and how much patience you have. If you want a deeper look at what is going on biologically as you pick your path, how do you grow a plant covers the full process from the ground up and is worth bookmarking alongside this guide.
Starting from seed
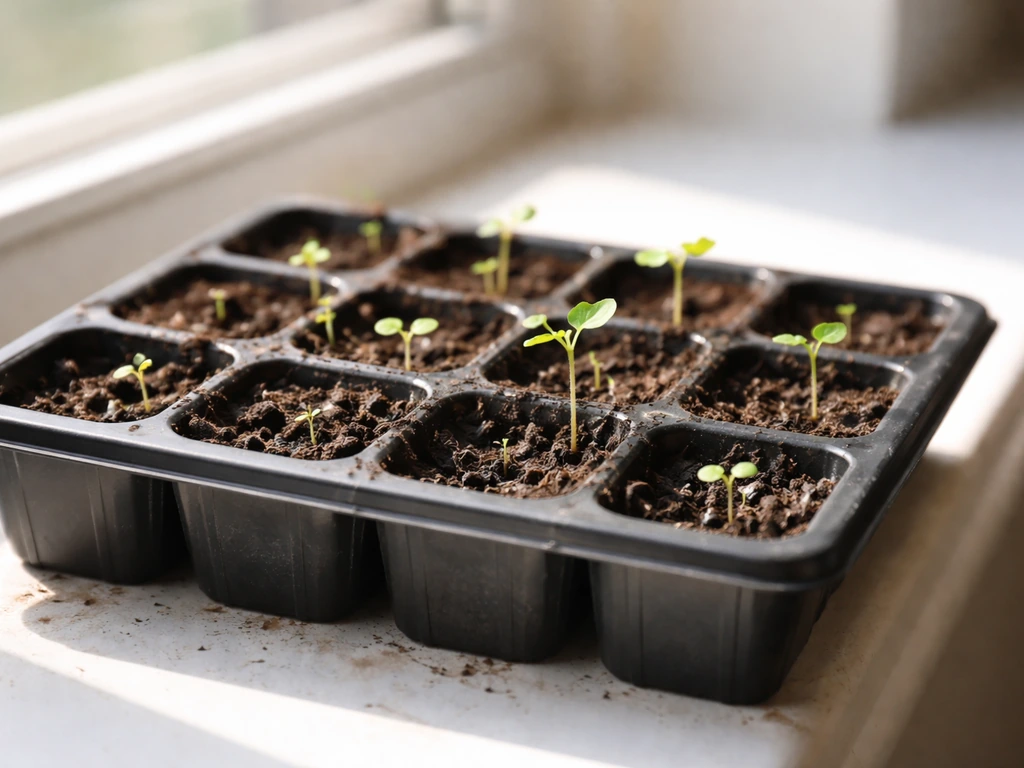
Seeds are cheap, widely available, and satisfying, but they take longer. Most common houseplants and vegetables germinate within 7 to 21 days under the right conditions. Sow seeds at the depth recommended on the packet. A common mistake is burying them too deep. Some seeds actually need light to trigger germination and will not sprout if they are buried more than a few millimeters. As a rule: tiny seeds go on the surface or barely covered, larger seeds get buried to about twice their diameter.
Taking cuttings
Cuttings are the fastest route to a new plant that looks like its parent. Stem cuttings work for most houseplants: pothos, monsteras, herbs, succulents. Take a 4 to 6 inch section just below a node (the bump where leaves attach), remove the lower leaves, and place it in your rooting medium. Leaf cuttings work for succulents and some begonias. The key is a clean cut with a sharp, clean blade. A ragged cut slows rooting and invites rot.
Division and offsets
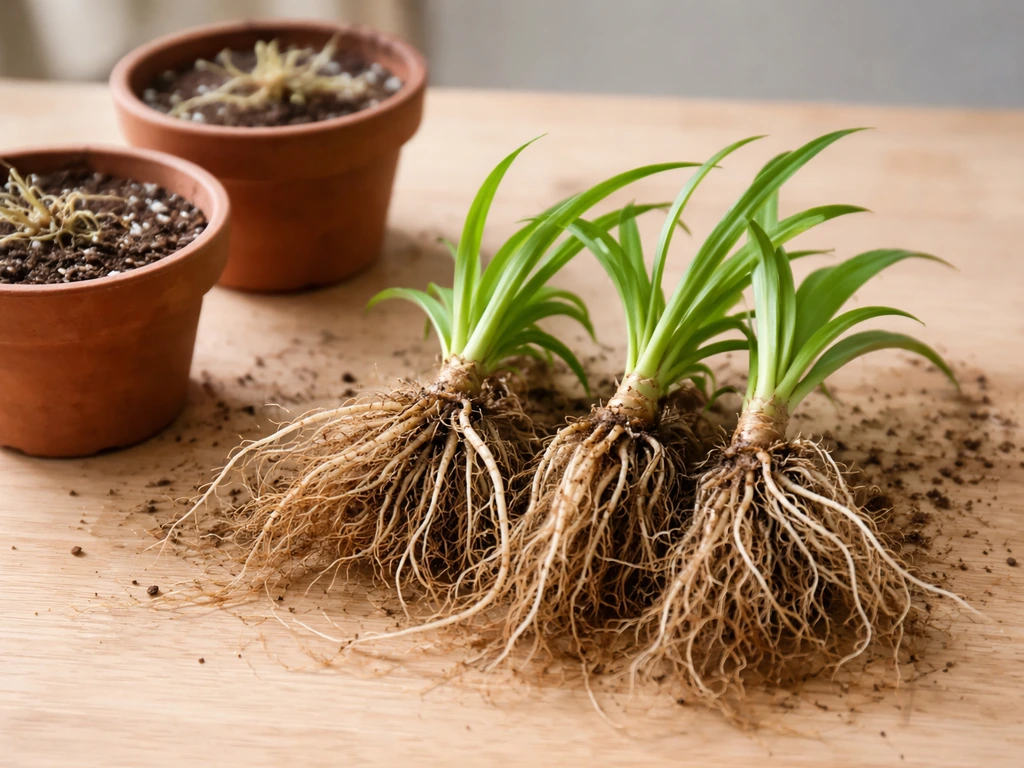
Division is the easiest method of all. You are splitting an existing root system into two or more pieces, each with its own leaves and roots already in place. Spider plants, peace lilies, hostas, and many grasses respond well to this. Offsets (sometimes called pups or runners) are baby plants a parent plant produces naturally. Aloe vera, bromeliads, and snake plants all produce offsets you can simply separate and pot up. These babies already have a head start, so they establish quickly.
Getting the environment right (light, temperature, airflow)
Light, temperature, and airflow form the triangle that determines whether a new plant thrives or stalls. Get any one of these wrong and you will see slow growth, leggy stems, or seedling collapse, even if everything else looks fine.
Light
Seedlings need bright, indirect light as soon as they sprout. A south or east-facing windowsill is usually enough for most common plants. If you are starting seeds indoors in spring and natural light is limited, a basic grow light set 4 to 6 inches above the seedling tray for 14 to 16 hours a day will reliably replace sunlight. For cuttings in water or a rooting medium, bright indirect light is fine; direct sun can heat the medium and stress the cutting before it has roots to manage hydration.
Temperature
Warmth is not optional. For seed germination, most common houseplants and vegetables want soil temperatures between 65°F and 75°F. For specific vegetables, OSU Extension also provides a temperature table for seed germination ranges and optimums in °F, such as the ranges listed for asparagus and parsnip soil temperatures between 65°F and 75°F. For cuttings, the rooting medium should ideally be between 75°F and 80°F for optimum root development. If your home runs cool, a seedling heat mat placed under the tray makes a dramatic difference. You can test soil temperature with a cheap cooking thermometer. If the soil feels cool to your wrist (below about 68°F), root growth will be sluggish no matter how perfect everything else is.
Airflow
Gentle airflow prevents damping off (a fungal collapse that kills seedlings at the soil line) and helps stems develop strength. The Royal Horticultural Society notes that damping-off is caused by fungi or fungus-like organisms and is more likely in high humidity conditions, leading to seedlings collapsing or decaying at the soil line [Gentle airflow prevents damping off (a fungal collapse that kills seedlings at the soil line)](https://www. rhs. org.
uk/disease/damping-off). If you are using a humidity dome or plastic bag over cuttings, vent it for an hour or two each day. A small fan on low setting nearby achieves the same thing for open trays. Do not skip this step.
Stagnant, humid air is the number one environment for fungal problems in new plants.
Water + nutrients through the early stages
Watering a new plant is where most beginners go wrong in both directions: too wet and roots rot, too dry and the plant stalls. The rule during germination and rooting is to keep the medium consistently moist but never waterlogged. Think of the texture of a wrung-out sponge: damp throughout, but no water pooling at the bottom. Do not let the propagation medium dry out at any point during active rooting. A dry spell at this stage can be fatal, because the emerging roots or radicle has no tolerance for desiccation.
For seeds, mist the surface gently with a spray bottle rather than pouring water, which can displace seeds or compact the medium. For cuttings, bottom watering (setting the tray in a shallow dish of water and letting it absorb upward) keeps the medium evenly moist without disturbing the cutting.
Hold off on fertilizing seeds until they have their first set of true leaves (not just the seed leaves). Before that point, the seedling is not ready to process nutrients and you risk burning the roots. For cuttings, do not fertilize at all until you see new leaf growth, which confirms roots have formed. A diluted, balanced liquid fertilizer at half strength is a safe first feed for both.
Soil vs water vs hydroponics vs terrariums (how to adapt care)
The method you use to root and grow your new plant changes the specifics of your routine, but the core needs stay the same. Here is how to adapt.
| Growing medium | Best for | Key care difference | Watch out for |
|---|---|---|---|
| Soil/potting mix | Seeds, most cuttings, divisions | Keep evenly moist; allow slight drying between waterings once established | Overwatering and root rot |
| Water (propagation) | Stem cuttings of pothos, monstera, herbs | Change water every 5–7 days; keep in bright indirect light | Algae growth; roots may resist transition to soil |
| Hydroponics | Fast growth; leafy plants, herbs, some vegetables | pH of nutrient solution matters (5.5–6.5 for most plants) | Pump/oxygenation failure; nutrient imbalances |
| Terrarium | Humidity-loving plants: ferns, mosses, small tropicals | Minimal watering needed if sealed; vent to prevent rot | Overwatering and mold in closed systems |
If you are propagating in water, one thing to know is that water-rooted cuttings sometimes struggle when you move them to soil because the roots that form in water are structurally different from soil roots. To ease the transition, mix a small amount of potting mix into the water for the last few days before transplanting, or pot up as soon as roots reach about an inch long. If you are curious about a specific setup like wick watering within a grow system, how to repot a wick and grow plant walks through that process in detail.
For terrariums, the enclosed environment does a lot of the humidity work for you, which makes them excellent for cuttings of moisture-loving plants. The trap is overwatering. In a sealed terrarium, water cycles within the glass and soil rarely dries out. Add water only when condensation disappears from the glass walls completely.
Hydroponics gives you the fastest root development of any method because roots have direct access to oxygenated, nutrient-rich water. If you are scaling up or want consistent results with herbs and leafy greens, it is worth exploring. Just keep in mind that starting new plants hydroponically from seed requires a clean inert medium (rockwool or coco coir plugs work well) and pH-balanced water from day one.
Rooting, transplanting, and hardening off
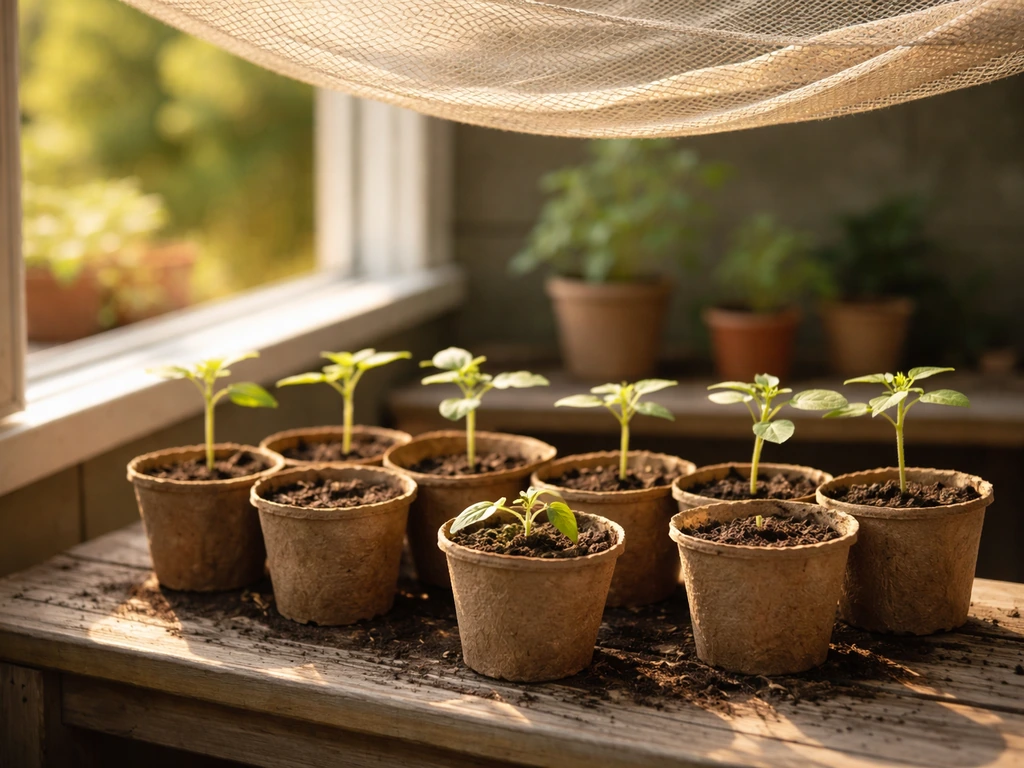
Knowing when to transplant is one of the trickier calls you will make. For seedlings, transplant when they have at least two sets of true leaves and the roots are beginning to circle the bottom of the cell or tray. For cuttings rooted in water, transplant when roots are 1 to 2 inches long. For cuttings in a solid medium, give a gentle tug on the cutting: if it resists, roots have formed. If it pulls free easily, give it more time.
The transplanting moment is when many plants hit their first real crisis. The transition from high-humidity, moist rooting conditions to the lower humidity and somewhat drier conditions of a normal pot is stressful. To make it smoother, water the new pot before transplanting (not after), minimize root disturbance, and keep the plant out of direct sun for the first 3 to 5 days. Wilting the day after transplant is normal and usually recovers overnight. If it does not recover, mist the leaves and cover loosely with a clear bag for 24 hours to boost humidity temporarily.
Hardening off applies mainly to plants that started indoors and are going outside, or seedlings moving from a humidity dome to open air. Do it gradually over 7 to 10 days: start with 1 to 2 hours of outdoor exposure in shade, then increase time and sun exposure each day. Skipping this step causes sunscald (white or brown patches on leaves) and transplant shock that can set a plant back by weeks. If you want a full breakdown of the replanting process, how can we grow a plant covers every stage from propagation through establishment.
Troubleshooting when growth stalls (fix the most common issues)
If your plant is not doing what you expected, it is almost always one of a short list of problems. Run through this checklist before you panic or throw the plant out.
- Seeds not germinating after 3 weeks: Check soil temperature first. If it is below 65°F, add a heat mat. Also check planting depth. Light-dependent seeds sown too deep will not sprout. Try scratching the surface of a few seeds to see if there is any softening happening inside.
- Seedlings are leggy and flopping over: Not enough light. Move closer to the window or lower the grow light to 4 inches above the canopy. A small fan on low will also help stems develop strength.
- Cuttings wilting or going mushy: Two separate problems. Wilting means too little humidity around the leaves. Cover with a clear bag or dome. Mushy stems mean rot, usually from too much moisture at the cut end. Trim the rotted section back to clean tissue, let it air dry for an hour, and reinsert into fresh medium.
- Yellowing leaves on new seedlings: Could be overwatering (check if the soil is staying soggy) or the first true nutrient need. If soil is moist but draining well, try a half-strength liquid fertilizer.
- Roots not forming on cuttings after 4 weeks: The medium temperature is probably too low. Aim for 75°F to 80°F at root level. Also check that the medium has not dried out at any point since you took the cutting.
- Mold or white fuzz on the soil surface: Stagnant humid air. Increase ventilation and reduce surface moisture. Remove the affected layer of soil and dust with a light sprinkle of cinnamon, which has mild antifungal properties.
- Plant looks fine but is not growing: This is normal in the first 2 to 4 weeks. The plant is putting all its energy into roots you cannot see yet. As long as leaves are green and firm, it is working. Growth above soil will follow root establishment.
One thing worth remembering: failed plants are not a sign you have a black thumb. They are data. Every plant that does not make it tells you something about what to adjust, whether that is temperature, watering frequency, or timing. Even experienced growers lose cuttings and have germination failures.
The goal is to understand why so you do not repeat the same mistake twice. And if you ever find yourself wondering whether your situation has unique community parallels, it is worth noting that the same principles of nurturing, environment, and patience that apply to plants are sometimes used as metaphors in other contexts, like when people talk about how to grow a church plant, though the focus here is very much on the literal, soil-and-roots kind.
What to do this week to see your first signs of growth
Here is your practical action plan for the next seven days. Pick your method, set up your conditions, and then be patient. Most new plants give you clear feedback within a week if you are paying attention.
- Day 1: Choose your method (seed, cutting, or division) and gather your supplies: a clean pot or tray, fresh potting mix or propagation medium, and a spray bottle.
- Day 1: Set up your light source. If your windowsill is under 6 hours of bright indirect light per day, get a basic grow light in place before you start.
- Day 1: Check and adjust temperature. Use a thermometer to confirm your growing spot stays between 68°F and 80°F. Add a heat mat under the tray if it is running cool.
- Day 2: Plant your seeds or take your cuttings. Keep the medium moist but not waterlogged. Cover with a humidity dome or clear plastic if you are propagating cuttings.
- Days 3–7: Check moisture daily. Mist lightly if the surface is drying out. Vent the dome for 1 to 2 hours each day. Do not fertilize yet.
- Day 7: Look for signs of life. Seeds should show a cracked surface or emerging shoot. Cuttings should still look firm and green (slight wilt is okay). If something looks off, run through the troubleshooting list above and make one change at a time.
Once you see roots or the first true leaves, you are through the hardest part. From here, it is about gradually stepping down humidity, stepping up light, and introducing nutrients at half strength. The plant will tell you what it needs if you know what to look for, and now you do.
FAQ
Can I grow a new plant that looks exactly like the parent plant?
Yes, but only for certain plants. If you want the new plant to look like the parent, use propagation methods that preserve genetics (cuttings, division, or separating offsets). Seed-grown plants can be variable, even when you start with the same species, because seedlings are genetically different.
How do I prevent root rot when I am growing a new plant?
Start with a drainage-first setup. Use a mix that holds moisture but still has air spaces (perlite or coarse material mixed into potting mix helps), and keep containers from pooling water. For seeds, avoid soaking trays, and for cuttings, don’t leave the base submerged unless you are intentionally rooting in water.
What watering pattern should I use, and how do I know the medium is too wet or too dry?
The medium choice changes the “how often” question. For seeds, keep the surface evenly damp, misting rather than pouring, and never let the seed zone dry out. For cuttings in solid media, water only enough to keep the medium damp throughout, then allow the top layer to slightly lighten before watering again (if it stays constantly soggy, oxygen drops and rot risk rises).
My new plant is not growing yet, what are the most common reasons?
It is usually heat. Aim for target temperatures for the germination or rooting stage, and verify with a thermometer rather than guessing. Also confirm that seeds are not buried too deep (tiny seeds often need light) and that you are providing enough light once they sprout, otherwise seedlings can stall even when water seems correct.
Why are my seedlings getting tall and leggy (and how do I fix it fast)?
Yes. Many seedlings will “stretch” and become weak if light is too dim. The fix is stronger light closer to the seedlings, or a longer light period under a grow light, and consistent rotation of flats so growth does not lean toward the brightest side.
How can I tell whether my cutting has rooted, and should I fertilize yet?
For most cuttings, new roots are not guaranteed just because a cutting looks green. Give it time and use the tug test only when it is in solid medium. If there is no new leaf growth, do not fertilize yet, because you may be feeding tissue that has not formed roots and cannot take nutrients.
When should I move a water-rooted cutting into soil, and what reduces transplant shock?
Move it based on root readiness, not calendar time. Water-rooted cuttings can struggle in soil because their water roots do not fully match soil root function, so transplant when roots are about 1 to 2 inches long, or gradually adapt by mixing a small amount of potting mix into the water for the final days before transplanting.
What should I do if my seedlings collapse or I see mold at the soil surface?
If you see mold at the soil line or a sudden collapse at the base, reduce humidity and improve airflow. Avoid overwatering, vent any humidity cover daily, and remove affected seedlings promptly to stop spread. Also check that the seedling area has warmth, since cool, wet conditions strongly favor fungal issues.
When is the right time to fertilize a new plant from seed or cuttings?
Choose the right “first feed” time. Feed seeds only after true leaves appear, and start cuttings only after you see new leaf growth, which indicates root formation. Use half-strength fertilizer first to avoid burning delicate new roots and leaves.
How do I reduce shock after transplanting a rooted seedling or cutting?
Yes, and it depends on the plant stage. When transplanting from a high-humidity rooting environment, water the new pot before transplanting, keep it out of direct sun for several days, and expect mild wilting the next day. If it does not recover, increase humidity briefly (for example, by loosely covering for a day) and keep light moderate.
Do I need to harden off my seedlings, and what is the risk if I skip it?
Hardening off is most important for anything moved from indoors to outdoors or from a sealed humidity dome to open air. Do it gradually over about a week, starting in shade for short sessions, then increasing time and sun exposure. Skipping it increases sunscald risk and can set back growth for weeks.
What is the fastest way to troubleshoot a failed propagation attempt without guessing?
Do a quick troubleshooting check in this order: temperature first, then light intensity, then airflow, then moisture level. Many “mystery failures” come from one of these being slightly off, even when you think the rest is correct. Keep notes on conditions for each batch so you can adjust one variable at a time next round.