Yes, you can absolutely repot a plant that uses a wick-based self-watering system, and you can keep the wick system working through the whole process. The trick is rebuilding the wick path correctly in the new pot so water keeps moving from the reservoir up into the soil. If you skip that step, or rush it, the plant sits in dry mix while the reservoir stays full and nothing connects them. This guide walks you through every part of that process so you get it right the first time.
How to Repot a Wick and Grow Plants Successfully

Marcus Holloway
12 Apr 2026
What a wick actually does (and why it matters for your plant)
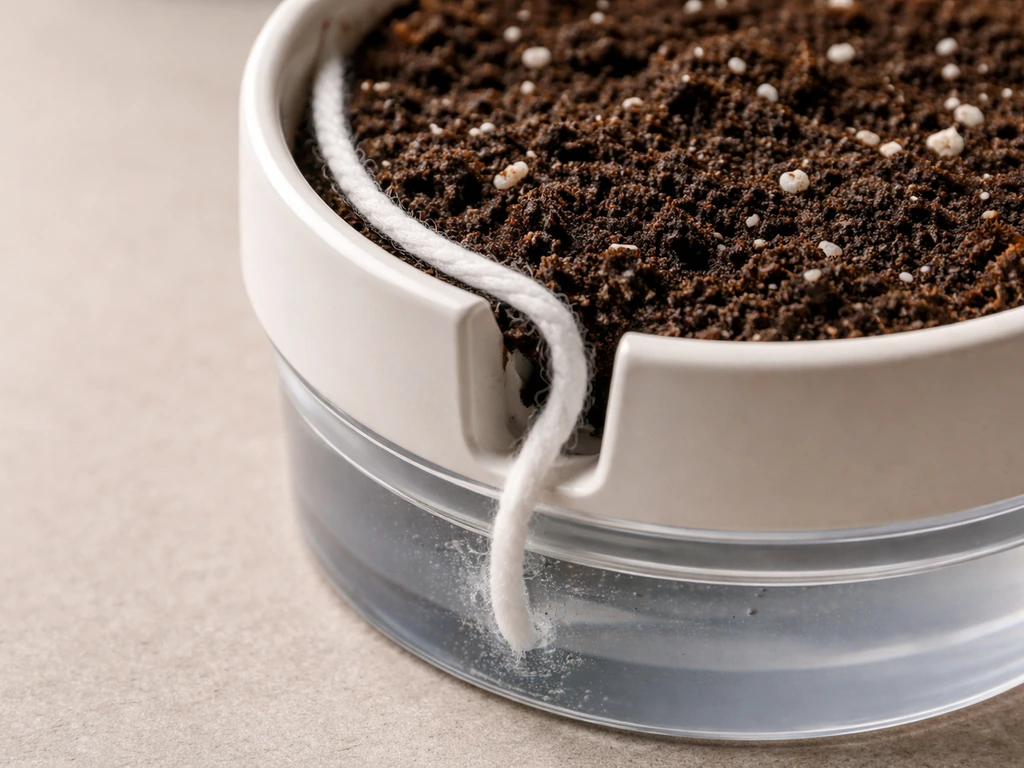
A wick in plant growing is a piece of porous or fibrous material, usually cotton twine, nylon rope, or a strip of fabric, that runs between a water reservoir and your potting mix. It uses capillary action to move water upward: the same physical process where liquid travels through narrow spaces because it sticks to the material around it. Think of how a paper towel absorbs water the moment one corner touches a wet surface. The wick does that continuously, pulling water from the reservoir and releasing it gradually into the soil around the roots.
This matters because it turns your pot into a passive self-watering system. The plant draws moisture as it needs it rather than getting hit with a big drench every few days. For busy growers, travelers, or anyone in a small apartment without a consistent watering schedule, a wick system is genuinely useful. It also reduces the risk of both underwatering and overwatering if it's set up correctly. If you're still working out how do you grow a plant in a more controlled, low-maintenance way, a wick setup is one of the best answers.
Some setups use a physical wick cord. Others rely on the capillary properties of the growing medium itself. LECA (lightweight expanded clay aggregate), for example, naturally wicks moisture upward through the clay column when the bottom layer sits in water. Some semi-hydroponic kits include an actual wick string in addition to the LECA so the nutrient water gets pulled up faster and more reliably. Both approaches run on the same science, just with different materials doing the heavy lifting.
Can you repot and keep the wick system going?
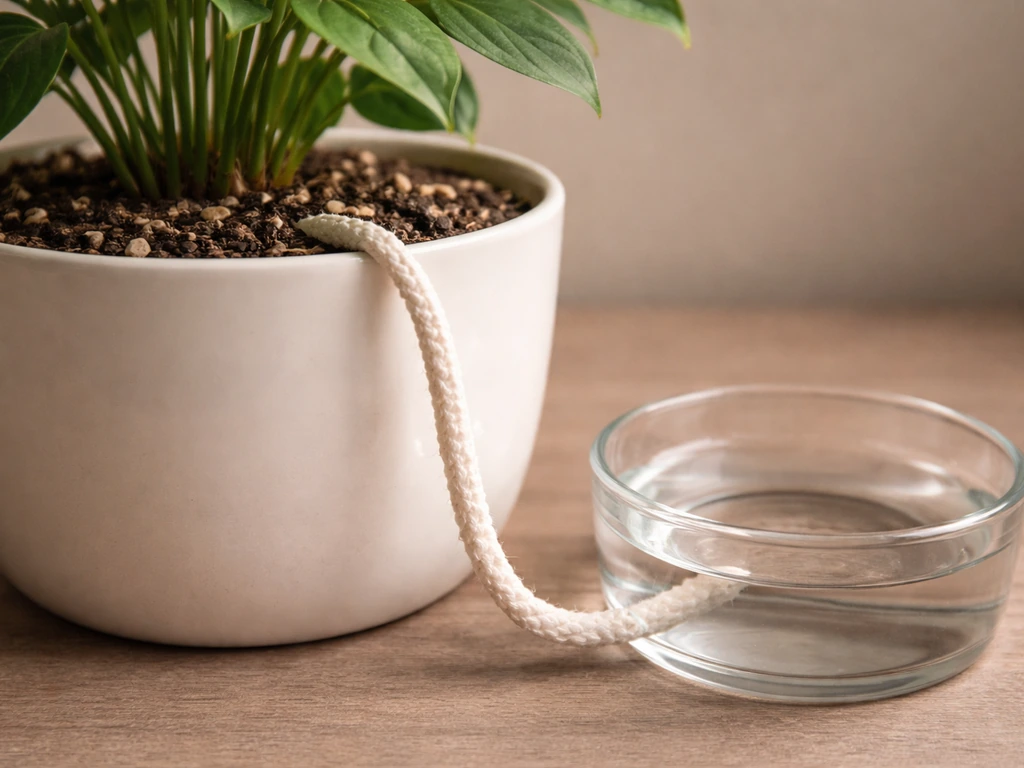
Short answer: yes, and it's not complicated. Repotting a wicked plant is basically the same as any other repot, with one extra step: you rebuild the wick connection in the new pot before you finish planting. The wick path gets interrupted during a repot, so you have to re-thread it or replace it entirely. The plant doesn't care whether it's in the old pot or the new one as long as the water keeps arriving at the roots.
What you do need to watch for: First, make sure the new pot has a drainage hole or a built-in separation between the root zone and the reservoir. Self-watering containers typically include a reservoir that feeds water upward while improving drainage/overflow pathways so excess water can move away rather than remaining stagnant in the root zone (University of Maryland Extension) [drainage hole or a built-in separation between the root zone and the reservoir](https://www. extension. umd.
edu/resource/self-watering-containers). Without drainage or a clear air gap, you risk waterlogging the roots directly. Second, check that your new wick is long enough to reach from the reservoir base all the way up through the potting mix to the mid-root zone. A wick that's too short just sits in the water and never delivers moisture where it's needed.
Third, don't saturate the potting mix on the day of the repot. Wet mix plus a working wick in a fresh pot is a fast path to root rot while the plant is already under transplant stress.
What you need before you start
The pot
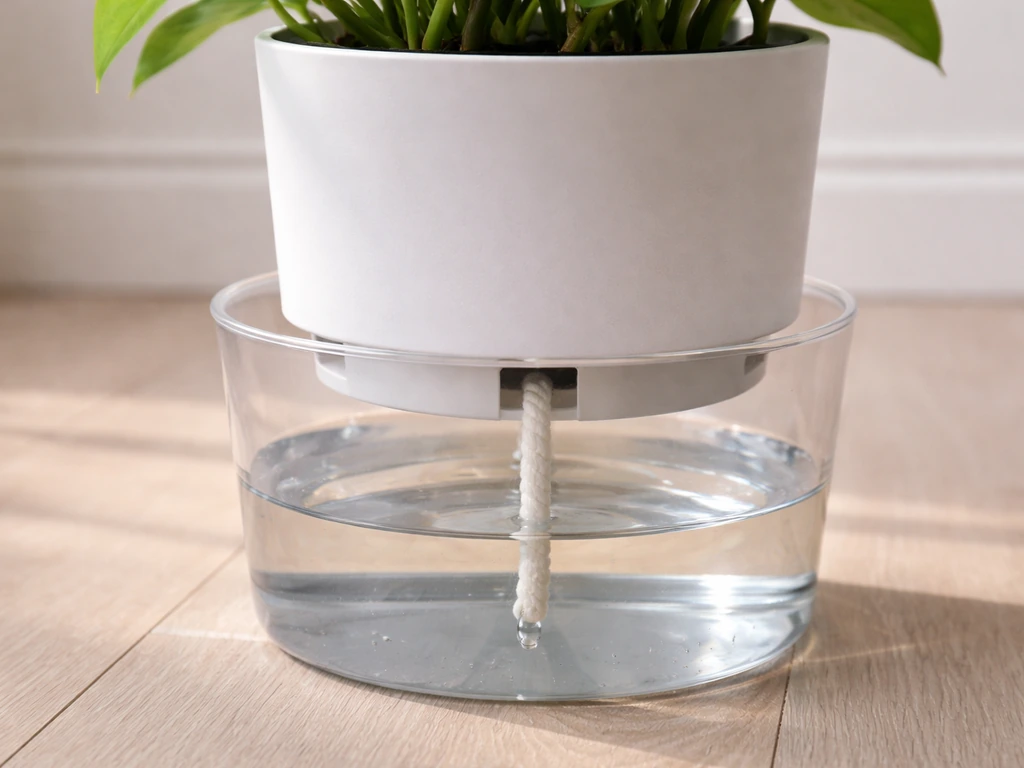
You need a pot with a drainage hole at the bottom, or a two-part self-watering pot where the inner planter sits above a reservoir. If you're building a DIY version, a simple setup uses two containers: a smaller inner pot with a drainage hole nested inside or above a slightly larger outer container that holds the water. The wick threads through the drainage hole of the inner pot and hangs down into the reservoir below. Terracotta, plastic, and ceramic all work. Terracotta breathes more, which can dry the mix faster and put more demand on the wick, so plastic is more forgiving if you're new to this.
The wick material
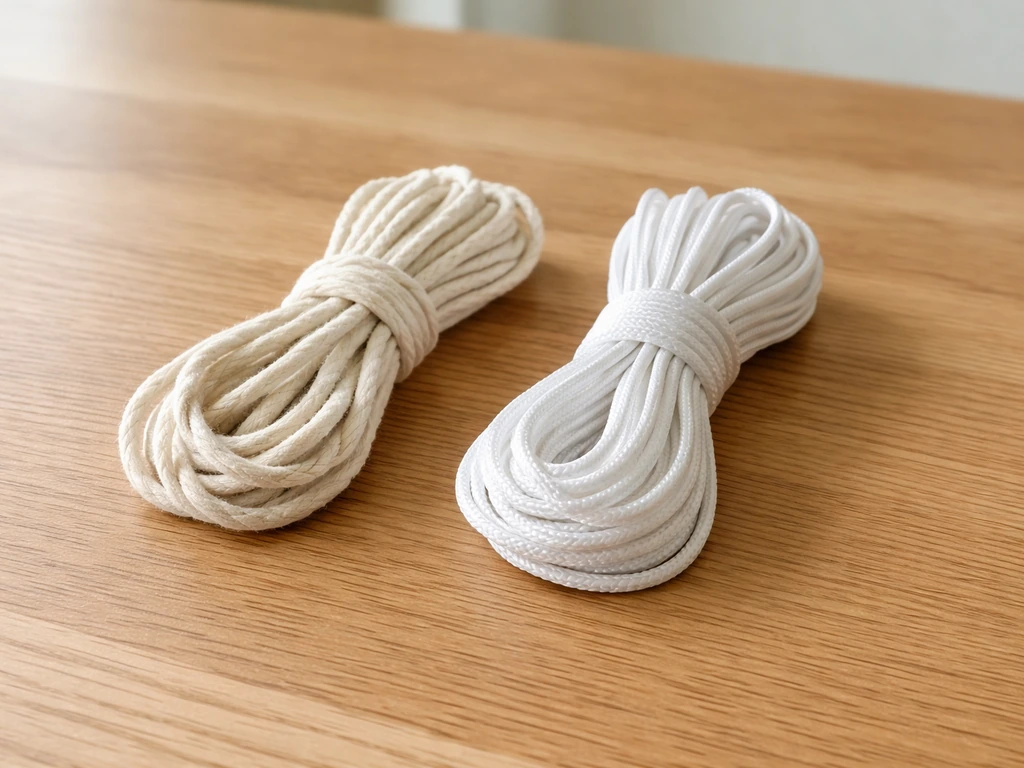
Cotton twine is the most common choice and works well for most houseplants. It absorbs water readily and moves it efficiently. The downside is that cotton degrades over time, especially in a perpetually moist environment, so you may need to replace it every six to twelve months. Nylon rope or polyester cord lasts longer and doesn't rot, but it's slightly less absorbent than cotton. For a thirstier plant or a larger pot, use a thicker wick or multiple wicks. A single strand of kitchen cotton twine is fine for a 4-inch pot. A 6-inch or 8-inch pot benefits from two strands or a braided cotton cord.
The reservoir
The reservoir just needs to hold water and allow the wick to reach it. In a DIY two-container setup, the outer pot is the reservoir. In a purpose-built self-watering pot, it's a built-in chamber at the base. Fill the reservoir with plain water or a diluted liquid fertilizer. Keep it at roughly half to three-quarters full during normal use. If you let it run completely dry for extended periods, the wick can dry out and lose its ability to draw water. A quick tip: drop a small piece of the wick material into water for 30 seconds before setup to pre-saturate it and get capillary action started faster.
The potting mix
Use a well-draining mix. A standard peat or coco coir-based potting mix works, but add perlite at about 20 to 30 percent by volume to improve aeration and drainage. Heavy, compacted mixes slow the wick's delivery and hold too much moisture at the root zone. If you want to try a soilless approach, LECA is an excellent alternative because the clay balls wick moisture upward through the column by capillary action, reducing reliance on a separate wick cord entirely. Learning how can we grow a plant in non-traditional media like LECA often starts with exactly this kind of wick-based passive watering setup.
Step-by-step: repotting without breaking the wick path
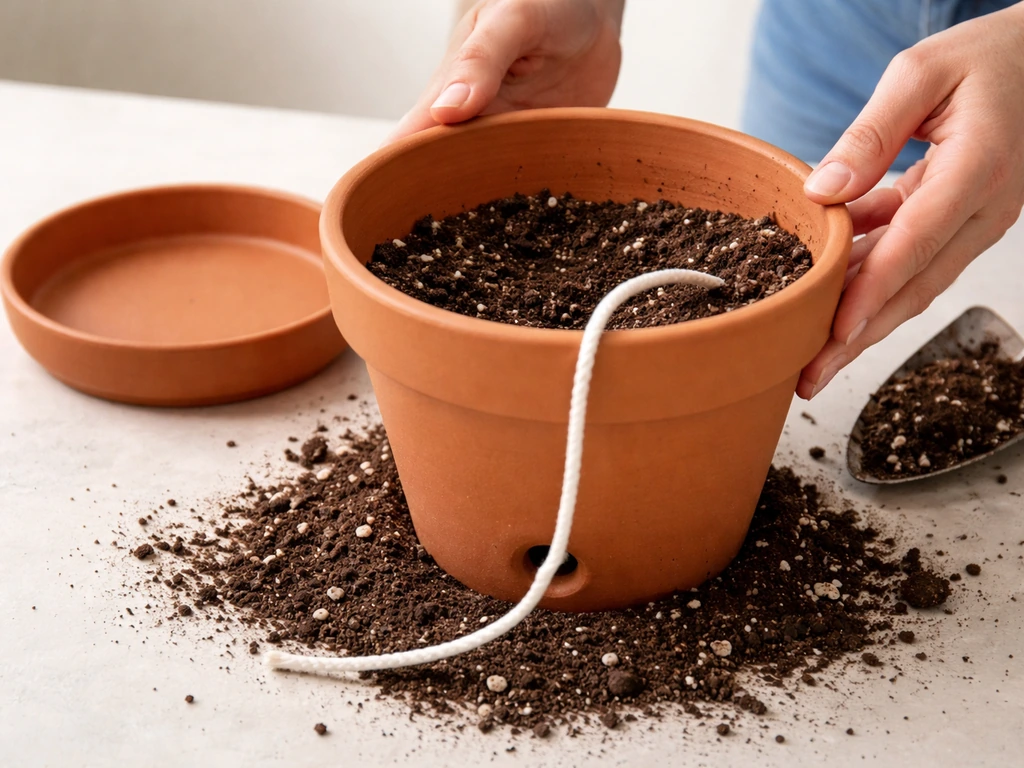
- Cut your wick material to the right length. Measure from the bottom of the reservoir to about two-thirds of the way up through the potting mix in the new pot. Add two inches on each end as slack. Err on the side of too long rather than too short.
- Pre-soak the wick. Submerge it in water for a minute or two so it's already saturated when you plant. This jumpstarts capillary action.
- Thread the wick through the drainage hole of the inner pot before adding any soil. Pull enough through the hole that two to three inches of wick hang below the pot bottom. The rest will coil or rest inside the pot.
- Add a thin layer of potting mix to the bottom of the pot (about one inch). Coil the wick inside this layer so it sits roughly centered in the pot base.
- Remove the plant from its old pot gently. Loosen compacted roots with your fingers. If the old wick is still attached to the root ball, remove it carefully. Old wicks that are degraded, slimy, or discolored should be discarded and replaced with fresh material.
- Set the plant in the new pot at the right height so the crown (where the stem meets the roots) sits just below the pot rim. Fill in around the root ball with fresh potting mix, pressing gently to remove large air pockets but not compacting heavily.
- Make sure the wick inside the pot is distributed through the soil rather than bunched in one corner. Use a pencil or chopstick to nudge it into position if needed.
- Set the inner pot into or above the reservoir. The dangling wick section should reach down into the water. If using a two-container DIY setup, add water to the outer reservoir until the wick tip is submerged by at least one inch.
- Do not water the top of the potting mix heavily on repot day. Just moisten it very lightly to reduce transplant shock. Let the wick do the work from below over the next few days.
- Check the reservoir level after 24 and 48 hours. If the water level has dropped slightly, the wick is working. If it hasn't moved at all, see the troubleshooting section below.
The first few weeks: keeping the plant happy post-repot
The first week is the adjustment period. Roots are disturbed, the new mix isn't colonized yet, and the plant may look a little sad regardless of how carefully you repotted it. That's normal. Slight drooping or a few yellowing lower leaves in the first week is just transplant stress, not a sign the wick system failed.
Light: Place the plant in bright indirect light, not direct sun. Stressed roots mean the plant can't move water efficiently through its stems and leaves. Direct sun during this period increases transpiration demand and makes things worse. Give it a few weeks in gentler light before moving it to its permanent spot.
Water management: Keep the reservoir at a consistent level for the first two weeks so the wick never dries out. After the plant settles in, you can let the reservoir drop lower between refills to mimic a more natural wet-dry cycle. Most houseplants prefer this over constant saturation. Refill the reservoir when it reaches about one-quarter full, not when it's bone dry.
Drainage check: Tip the inner pot slightly every few days and look at the wick. If it's damp to the touch and the mix around it feels moist but not soggy, the system is working. If the mix feels wet all the way to the surface and stays that way, you may have too much water in contact with the root zone. Lower the water level in the reservoir by an inch or two and see if the surface dries out a bit within 24 hours.
Fertilizing: Hold off on feeding for the first two to four weeks. The roots need time to recover from the repot before they can handle the additional salts in fertilizer. Once the plant shows new growth, that's your green light to add diluted liquid fertilizer to the reservoir at half the recommended strength.
When things go wrong: fixing common wick system problems
The wick isn't pulling water up
If the reservoir level isn't dropping after 48 hours, the wick may have an air gap, be too short, or have dried out. Pull the inner pot out and check that the wick tip is actually submerged in water (not just resting near it). Re-soak the wick in water to reactivate capillary action, then reposition it. If the wick material looks degraded, replace it entirely with a fresh pre-soaked piece.
Overwatering and waterlogging
This usually happens when the reservoir is too high and the water wicks up faster than the roots can use it. Signs are heavy, soggy soil, a sour smell from the mix, and yellowing leaves. Lower the water level by emptying some of the reservoir and let the mix dry slightly before refilling. Also check that there's an air gap between the bottom of the inner pot and the water surface. The roots should never be sitting directly in water unless you're intentionally doing hydroponics.
Root rot
Root rot is the big fear with any self-watering system, and it's a real risk if the mix stays too wet for too long. University of Illinois Extension also highlights that well-designed self-watering pots move water from a bottom reservoir into the soil without keeping it overly wet, which helps limit root-rot risk [Root rot is the big fear with any self-watering system, and it's a real risk if the mix stays too wet for too long. ](https://extension. illinois.
edu/container-gardens/container-drainage-options). If you notice a musty smell, black or brown mushy roots, or persistent wilting that doesn't respond to water, pull the plant out and inspect the roots. Healthy roots are white or light tan and firm. Rotted roots are brown, black, or gray and feel soft or slimy.
Trim all the rotted sections with clean scissors, let the roots air for 20 to 30 minutes, and repot into fresh dry mix. Rebuild the wick, but keep the reservoir at a lower level going forward.
Wilting after repotting
Wilting in the first few days is usually transplant shock, not a wick failure. Check that the wick is delivering moisture to the mid-root zone and that the top of the mix is slightly moist. If the wick is working fine and the plant is still wilting after a week, check for root damage during the repot. If several roots were broken, the plant simply can't move water efficiently yet. Keep it in low light, mist the leaves lightly once a day, and give it time.
Fungus gnats
Wick systems keep the top layer of soil drier than traditional watering from above, which actually helps with fungus gnats since those larvae need a moist surface to thrive. If you're still seeing gnats, the surface is staying too wet. Lower the reservoir level so the wick delivers less water per day, and let the top inch of soil dry out completely between refills. Adding a thin layer of coarse sand or perlite on the soil surface also deters gnats without affecting the wick below.
Wick clogging over time
Mineral buildup from tap water can clog the wick after several months, slowing or stopping water delivery. If you're using tap water and notice the wick seems less effective over time, switch to filtered or rainwater. When you next repot, replace the wick entirely. This is a normal maintenance step, not a system failure.
Quick checklist and when to ditch the wick
Here's a fast reference you can run through before, during, and after the repot to make sure everything is on track.
- Wick is pre-soaked before planting
- Wick threads through the drainage hole and reaches mid-pot level inside
- Wick tip is submerged at least one inch into the reservoir
- Potting mix is well-draining (add perlite if in doubt)
- No heavy top-watering on repot day
- Reservoir is at half to three-quarters full, not brimming
- Air gap exists between inner pot base and water surface
- Plant is in bright indirect light for the first two weeks
- Reservoir level checked every 24 to 48 hours in week one
- Fertilizing held off until new growth appears
As for when to abandon the wick system: some plants genuinely don't thrive with constant passive moisture delivery. Cacti, succulents, and most drought-tolerant plants prefer to dry out completely between waterings, and a wick system can keep their roots too moist. If your plant keeps showing root rot despite lowering the reservoir and improving drainage, switch to conventional hand-watering and skip the wick. No system works for every plant.
On the other hand, if the wick system is working well, the natural next step is expanding what you grow in it. Understanding how to grow a new plant from cuttings or propagation is a great way to fill more wick pots without spending money, since propagated cuttings establish roots beautifully in a passive self-watering environment.
Wick systems also scale well. If you started with one plant and want to expand to a larger indoor setup, a good foundation in passive watering techniques makes managing multiple plants much more realistic. Even something as unconventional as how to grow a church plant community garden or shared growing space benefits from low-maintenance self-watering setups where multiple people need to care for the same plants without constant oversight.
Comparing wick materials: which one should you use?
| Wick Material | Water Flow | Durability | Cost | Best For |
|---|---|---|---|---|
| Cotton twine | High | 6 to 12 months before degrading | Very low | Most houseplants, beginner setups |
| Nylon/polyester cord | Moderate | 2 to 3 years | Low | Longer-term setups, humid environments |
| Braided cotton cord | Very high | 6 to 12 months | Low | Thirsty plants, larger pots |
| LECA (medium itself) | Moderate via capillary column | Indefinite | Moderate upfront | Semi-hydroponics, full soilless growing |
| Acrylic yarn | Moderate | 1 to 2 years | Very low | Budget DIY setups, small pots |
For most people starting out, cotton twine is the clear recommendation. It's cheap, easy to find, and works well enough to learn the system before you optimize. Once you're comfortable and want a longer-lasting setup, braided polyester cord is the upgrade worth making.
The bottom line: repotting a wicked plant is a straightforward process once you understand that the wick path just needs to be rebuilt in the new pot. Get the wick pre-soaked, thread it correctly, keep the reservoir at a moderate level, and give the plant a low-stress week or two to settle. The system then handles watering for you, which is the whole point.
FAQ
Can I repot a wick system plant without disconnecting the wick or fully removing the old potting mix?
It’s possible, but risky. The wick path is usually interrupted during a repot, and the most common failure happens when the wick no longer reaches the correct mid-root zone. If you must keep part of the old mix, remove enough to ensure you can rebuild the wick through the drainage opening (or reservoir air gap) and confirm the wick tip is submerged when the reservoir is filled.
What wick material should I use if I’m not sure whether my plant is sitting in a true wick-reservoir setup or a capillary-only setup?
If your setup has a separate reservoir and a cord visible, use a cord material (cotton twine, braided polyester, or nylon rope). If the system relies only on a wicking medium column (like LECA in water), adding a cord is optional and may even change delivery rate. The safest approach is to identify whether water contacts the wick tip directly after repotting, then choose a wick accordingly.
How do I know the wick length is right when repotting?
After assembly, the wick should be long enough that the wick tip sits below the reservoir water line but the upper end reaches into the potting mix near the mid-root zone. A quick check is to run water through the reservoir once, wait 15 to 30 minutes, then feel the wick between the pot and reservoir, it should feel cool and damp along most of its length, not only at the bottom.
Should I fully replace the wick every time I repot?
Not always, but replace it when it looks stiff, glazed, frayed, or noticeably thinner. Even if it still pulls water, old cotton can degrade and reduce capillary flow. If you used tap water and notice slower delivery after several months, replacing the wick during the repot helps prevent mineral clogs from continuing.
What reservoir water level is safest during the first week after repotting?
Keep the reservoir in a moderate range (not full). If the reservoir is too high, water can flood the bottom of the mix faster than roots can take it up, increasing root-rot risk. If you see the surface staying wet, reduce the reservoir level by an inch or two rather than waiting for weeks.
My reservoir level isn’t dropping after 48 hours, what should I check first?
First confirm the wick tip is actually submerged when the inner pot is seated correctly. Next check for an air gap between the reservoir water and the wick tip (even a small gap can stop capillary flow). Then re-check wick pre-soaking, if it was dry, re-soak it and reposition it so the wick sits in the water, not just beside it.
How can I prevent root rot if I accidentally overfill or the soil stays soggy?
Lower the reservoir immediately and allow the top portion of the mix to dry slightly. Remove the plant sooner if you notice musty odor, persistent wilting, or soft roots, and repot into fresh dry mix. Also make sure the inner pot drains freely and the roots are not sitting directly in reservoir water.
Will wick watering cause more fungus gnats in my house?
Not necessarily, wick systems often keep the surface drier which can reduce gnats. If you still see gnats, the surface is staying too wet, so lower the reservoir level and let the top inch dry between refills. A practical add-on is mixing coarse perlite or sand into the top layer so the surface dries faster without blocking wicking below.
Can I fertilize through the reservoir right after repotting?
Usually wait longer than you think. During the early adjustment period, delay feeding for about two to four weeks so disturbed roots can regrow before handling fertilizer salts. When you do start, use diluted solution in the reservoir, and if you see buildup or slowed delivery later, plan to rinse and refresh the wick at the next maintenance cycle.
What plants should I avoid wick systems for, and how do I decide if I should switch?
Avoid wick-based passive watering for plants that require complete drying cycles, like many succulents and drought-tolerant varieties. If you repeatedly get root-rot symptoms even after lowering reservoir level and improving drainage, switch to conventional watering where you can fully dry the mix between waterings.
Is it okay to leave a wick system plant unattended while traveling?
Often yes, but only if the system is tested before you go. Do a dry run by filling the reservoir to your planned level, then observe for the next 24 hours that water delivery is consistent and the top of the mix isn’t staying wet. If your wick could dry out, refill to the safe moderate level beforehand and confirm the wick doesn’t rely on a perfectly full reservoir.