You can grow more plants from one plant using four main methods: cuttings (stem or leaf), division (splitting the root ball), layering (letting a stem root while still attached), or saving and sowing seeds from the parent. Which one to use depends on what kind of plant you have, how healthy it is, and how much time and space you're working with. Most houseplant and garden enthusiasts will get the fastest results from stem cuttings or division, but all four methods are genuinely learnable at home with basic tools. Extension material from the University of Nevada, Reno describes these common houseplant propagation methods, including stem cuttings, leaf cuttings, division, layering, and airlayering blank" rel="noopener noreferrer">stem cuttings, division, layering, and air layering.
How to Grow More Plants From One Plant: A Step by Step Guide

Pick the right propagation method for your plant
Before you cut anything, look at your plant. The structure of the plant tells you almost everything about which method will work. A plant with one central trunk and no obvious clumps or offsets is a candidate for stem cuttings or air layering. A plant that comes up in a cluster of multiple crowns, like a snake plant, bird of paradise, or hosta, can be physically divided. A vining or trailing plant, like a pothos or spider plant, often roots so easily from cuttings or natural layering that you barely need to try. And if your plant produces seeds and you know it's not a sterile hybrid, seed saving is an option worth considering.
The health of the parent plant matters just as much as the type. Always propagate from a plant that looks vigorous, not one that's stressed, overwatered, root-bound to the point of decline, or actively fighting pests. A struggling parent produces struggling cuttings. Think of it like this: you're asking the cutting to do extra work (grow roots from scratch), so it needs plenty of stored energy to pull that off. Choose stems or leaves that are firm, healthy in color, and free of damage.
| Method | Best for | Skill level | Time to roots/new plant |
|---|---|---|---|
| Stem cuttings | Most houseplants, herbs, vines, soft-stemmed plants | Beginner | 2–6 weeks |
| Leaf cuttings | Succulents, African violets, peperomia, ZZ plant | Beginner | 4–10 weeks |
| Division | Clump-forming plants: snake plant, orchids, bromeliads | Beginner | Immediate (already rooted) |
| Layering (ground/container) | Vines, trailing plants, flexible-stemmed shrubs | Beginner–Intermediate | 4–8 weeks |
| Air layering | Rubber tree, dieffenbachia, croton, woody houseplants | Intermediate | 3–5 months |
| Seed saving | Self-pollinating plants: tomatoes, peppers, beans, some perennials | Intermediate | Weeks to months |
Stem and leaf cuttings: how to do it (soil vs water)
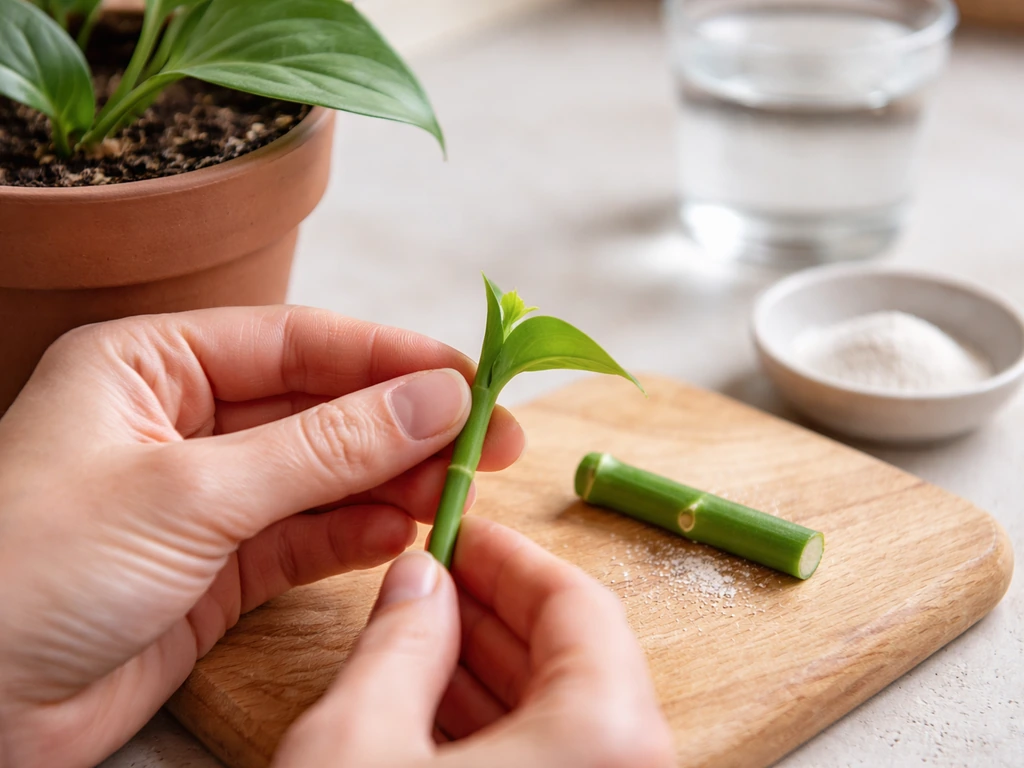
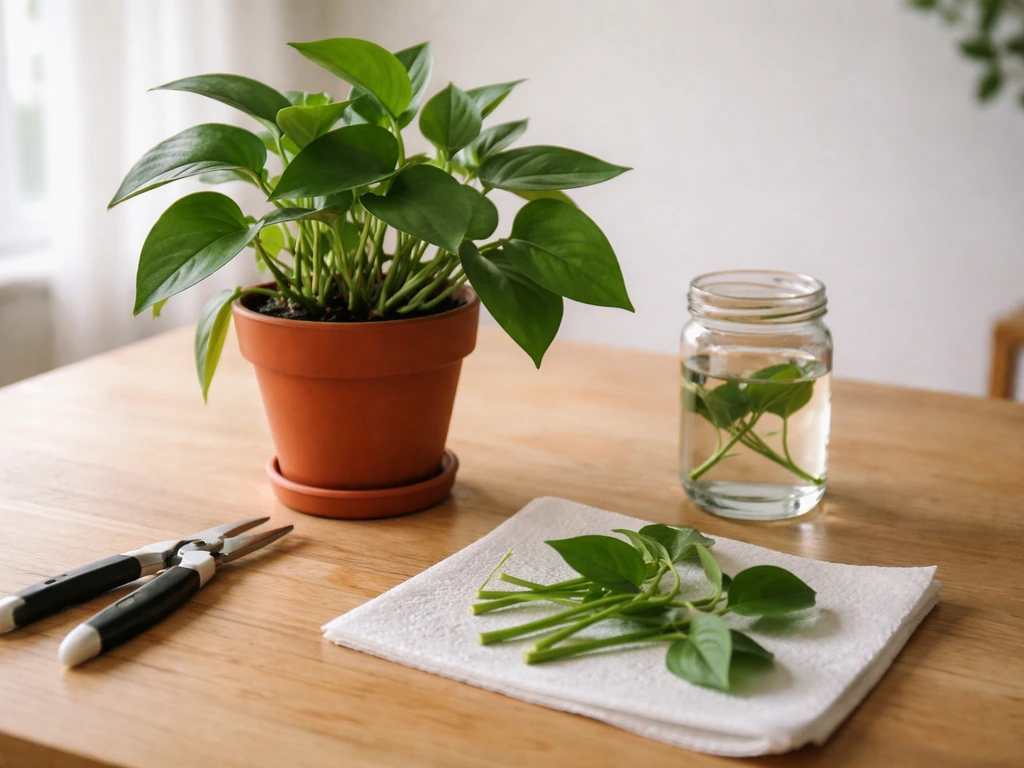
Stem cuttings are the workhorse of home propagation. Take a 3 to 4 inch piece (up to 8 inches for larger plants) from the tip of a healthy, non-flowering stem. Cut just below a node, which is the little bump or joint where a leaf or bud attaches. That node is where roots will form, so it needs to be on the cutting, not left behind on the parent. Use a sharp, clean knife or pair of shears, and sterilize the blade with rubbing alcohol between cuts. Remove any leaves from the bottom half of the cutting so they don't rot once buried or submerged.
Rooting hormone is optional but helpful, especially for slower-rooting plants. Lightly dust the cut end with powdered rooting hormone before planting. The hormone contains auxins, which are essentially the plant's own chemical signal for root growth, just concentrated at the cut site to speed things up. It makes a real difference for woody or stubborn plants, but fast rooters like pothos and basil honestly don't need it.
Rooting in water
Place the cutting in a jar of room-temperature water, submerging at least one node but keeping the leaves above the waterline. Set it in bright, indirect light. Change the water every few days to keep it fresh and prevent algae and bacterial buildup. You'll usually see roots within 2 to 4 weeks for easy plants. The downside of water rooting is that water roots are structurally different from soil roots, so the transition to soil can cause a brief setback. To minimize that, pot up as soon as roots are about an inch long rather than waiting until they're long and tangled.
Rooting in soil or a propagation mix
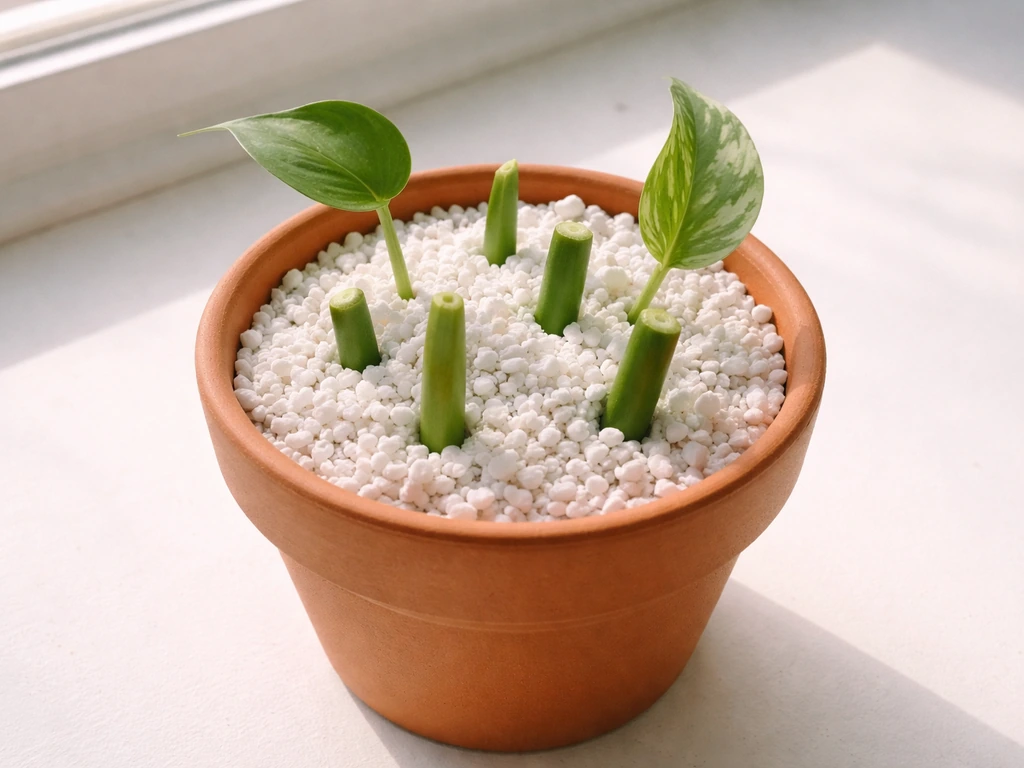
For soil propagation, skip potting mix and use a light, airy medium instead. Perlite alone works very well because it holds just enough moisture while letting air reach the developing roots. A 50/50 mix of perlite and vermiculite is another reliable option, and it's the standard recommendation for African violets and similar delicate leaf cuttings. Make a small hole in the medium with a pencil or chopstick before inserting the cutting so you don't scrape off the rooting hormone or damage the cut end. Water lightly, then cover the cutting with a clear plastic bag or dome to hold humidity. Keep it out of direct sun but in bright light. A heat mat set to 65 to 75°F underneath the pot genuinely speeds up rooting, though it's not essential.
Leaf cuttings
For plants like African violets, peperomia, and ZZ plants, you can propagate using just a leaf and its petiole (the short stem connecting leaf to plant). Cut the leaf with about an inch of petiole attached, let the cut end dry for an hour or so, then insert it into moist propagation mix at roughly a 45-degree angle. The petiole, not the leaf blade, is what produces new plantlets, so make sure it's buried in the medium. A 50/50 vermiculite and coarse sand mix works great here. Keep it moist and humid, and expect to see tiny new plants emerging at the base of the petiole over several weeks.
Division and splitting: when and how to separate plants safely
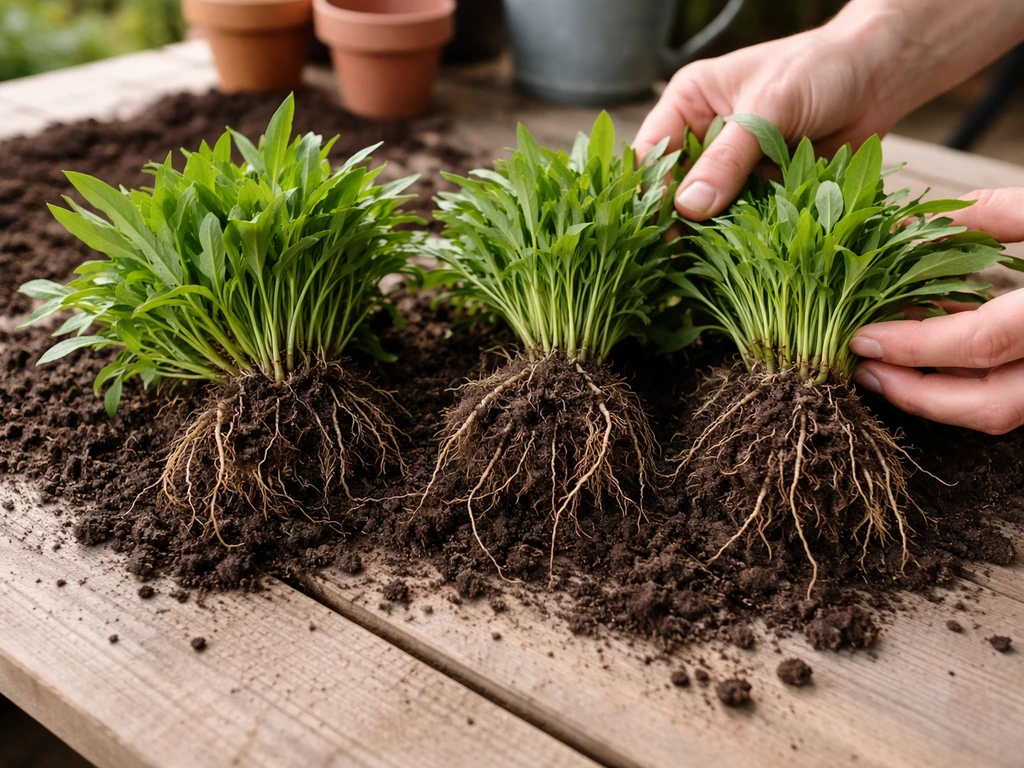
Division is the most immediately satisfying propagation method because you end up with fully rooted plants right away. It works on any plant that grows in clumps or produces multiple crowns: snake plants, peace lilies, hostas, orchids with multiple pseudobulbs, bromeliads that have produced offsets (called pups), and clumping succulents. The best time to divide is in spring or early summer when the plant is actively growing, though for houseplants it's fairly forgiving year-round.
- Water the parent plant the day before to reduce stress and make the root ball easier to work with.
- Tip the plant out of its pot and gently shake or brush off excess soil so you can see what you're working with.
- Look for natural separation points: clusters of stems that each have their own roots. If it's a rhizome-based plant (like a snake plant), look for sections with at least one leaf and a piece of healthy rhizome attached.
- Pull sections apart by hand if they separate easily, or use a clean sharp knife to cut through tightly packed roots. Don't saw back and forth; one clean cut is less damaging.
- Dust cut surfaces with a little powdered cinnamon (a natural antifungal) or allow them to air dry for an hour before potting.
- Pot each division into fresh, appropriately sized containers and water in well. Keep them in slightly lower light for a week or two while they settle.
For orchids, division means separating pseudobulbs, keeping at least three per division so the new plant has enough stored energy to rebloom. For bromeliads, the pups can be detached once they're about one-third the size of the mother plant. For hens-and-chicks type succulents, the offsets often just pop off by hand and can be potted immediately.
Layering options: ground/container and air layering basics
Layering is the method for plants that are tricky to root from cuttings, or when you want to reduce risk because the stem stays connected to the parent plant the whole time. The parent keeps feeding the new plant with water and nutrients while it grows its own roots. Think of it as a safety net: the new plant gets to develop without the life-or-death pressure of being on its own.
Ground and container layering
This works with vining or trailing plants, and with any plant that has long, flexible stems that can be bent to the ground or into a neighboring pot. Spider plants do this naturally, sending out runners with plantlets that root wherever they touch soil. Strawberry begonias behave the same way. For plants that don't do it naturally, bend a healthy stem down until a section (ideally a node) touches a pot of moist propagation mix, secure it with a bent wire or a small stone, and wait. Once you can see new growth or feel resistance when you tug gently, the layer has rooted. Cut it free from the parent and treat it as its own plant. The stem must be flexible enough to bend without snapping, so this method is limited to plants with pliant stems.
Air layering
Air layering is the go-to for tall, woody houseplants like rubber trees, dieffenbachia, and crotons, especially when they've gotten leggy and you want to propagate the top while also renovating the parent plant. You'll need a sharp knife, powdered rooting hormone, sphagnum moss, clear plastic wrap, and twist ties or tape.
- Choose a healthy section of stem about 12 to 18 inches below the tip. Make a shallow upward-angled cut about one-third through the stem, or remove a ring of bark about an inch wide (called girdling) to interrupt the flow of nutrients and signal root production.
- Dust the wounded area with powdered rooting hormone.
- Soak a large handful of sphagnum moss in water, then squeeze it out until it's moist but not dripping.
- Pack the moss tightly around the wounded area so there are no air pockets. Roots need consistent moisture contact, and air gaps stop that.
- Wrap the moss ball firmly with clear plastic wrap, sealing both ends tightly with twist ties or electrical tape so moisture can't escape.
- Check every few weeks by looking through the clear plastic. In three to five months, you should see pale, fleshy roots pressing against the plastic.
- Once roots are visible and well-developed, cut the stem just below the root ball, unwrap carefully, and pot the new plant into fresh mix. Keep it humid and shaded for a week or two as it adjusts.
Seed from one plant: saving and growing if it's fertile
If your plant produces seeds and is not a hybrid variety, seed saving is a legitimate way to multiply it, though it takes more patience than the vegetative methods above. The most important thing to know upfront: seed from self-pollinating plants (tomatoes, peppers, beans, peas, lettuce, broccoli) will produce plants very close to the parent. Seed from plants that cross-pollinate freely with neighbors (like squash or brassicas) might produce something quite different. Check whether your plant is a hybrid before saving; hybrid seeds often won't grow true to the parent at all.
To save seeds properly, let them fully mature on the plant before collecting. For fleshy fruits like tomatoes, separate seeds from the pulp and spread them on wax paper or a paper towel to air-dry for several days at room temperature. Test seed viability with a simple float test: drop seeds in water and let them sit for a few minutes. Seeds that sink tend to be viable; floaters are often hollow and unlikely to germinate. Store dried seeds in a cool, dry place in a sealed container. Viability drops over time, and humidity is the biggest killer of stored seeds, so a sealed jar in a cool cupboard beats a paper envelope on a warm windowsill.
When you're ready to sow, remember that planting depth affects germination significantly. Shallow is generally safer than too deep. Some perennial seeds also need cold stratification to germinate: a couple of weeks in the refrigerator at around 40°F after a brief hot water soak can break dormancy for seeds that normally overwinter in the ground. Run a simple germination test before committing to a whole flat: place 10 seeds on a damp paper towel, fold it over, seal in a plastic bag, and check after the expected germination window. If 7 or more sprout, your seeds are worth planting.
Rooting care and transplanting for success
The rooting phase is where most people lose propagations, not because the method was wrong but because the environment wasn't right. Roots initiate best with consistent warmth (65 to 75°F is the sweet spot for most houseplants), high humidity around the cutting, and indirect bright light rather than direct sun. Direct sun scorches leafy cuttings that have no root system yet to replace the water they lose. A clear plastic bag or a humidity dome over your cuttings isn't optional, it's the difference between success and failure for a lot of plants.
Check for roots by tugging very gently on the cutting after 3 to 4 weeks. If there's resistance, roots have formed. For water-rooted cuttings, you can see them directly. Don't rush transplanting, but don't wait too long either. Pot up when roots are about an inch long for water rooters, or when you feel solid resistance for soil rooters. Use a small pot at first, roughly the size of a solo cup, because cuttings in oversized pots are prone to root rot from excess moisture in all that soil.
After transplanting, keep the new plant in a slightly lower-light spot for one to two weeks and mist the leaves occasionally to reduce moisture loss while the root system establishes. This period is called acclimation, and it reduces transplant shock significantly. Some wilting is normal in the first few days; it doesn't mean the plant is dying. As long as the soil isn't soggy and the plant isn't mushy at the base, give it a week before worrying.
Troubleshooting: rot, no roots, mold, and slow growth
Even experienced growers lose cuttings. Here's how to read what's going wrong and fix it.
| Problem | Likely cause | What to do |
|---|---|---|
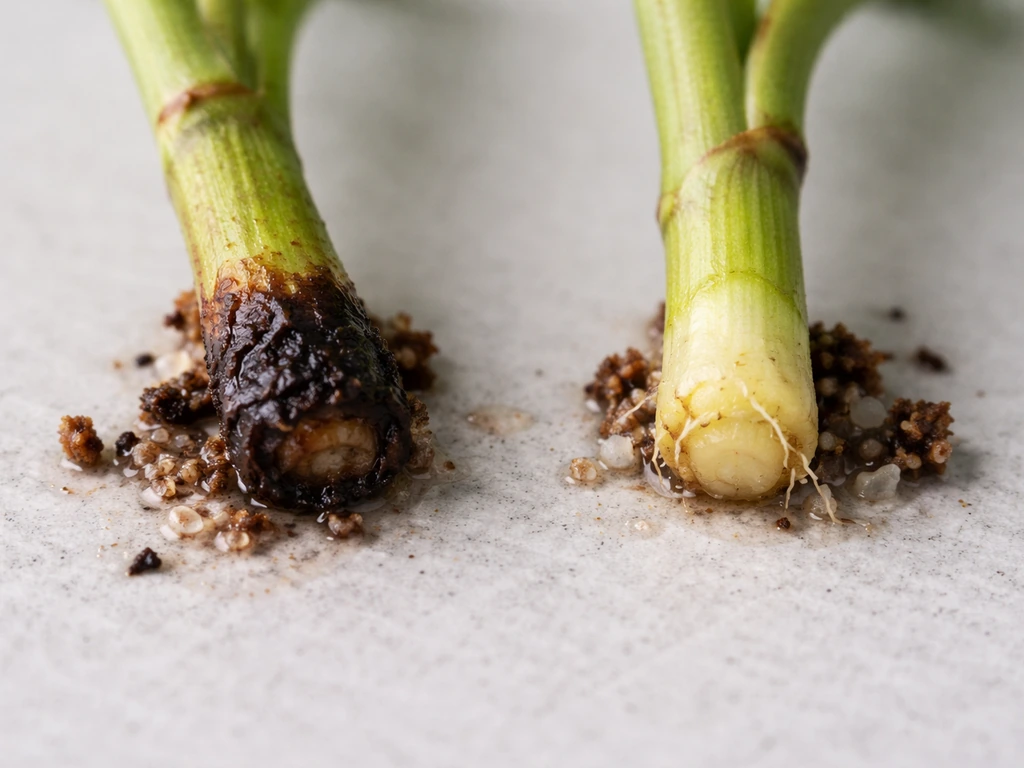
| Cutting base turns black or mushy | Rot from overwatering or contaminated tools/medium | Remove the cutting, cut back to healthy tissue, let it dry for a few hours, re-dip in rooting hormone, and re-insert in fresh dry medium. Sterilize tools next time. |
| No roots after 6+ weeks | Wrong conditions: too cold, too dry, wrong medium, or no node on cutting | Check that a node is buried, add bottom heat, increase humidity with a bag or dome, and consider rooting hormone. |
| White fuzzy mold on soil surface | High humidity + low airflow | Remove the mold physically, add a small fan on low nearby, and vent the humidity dome briefly each day. |
| Green algae in water propagation jar | Light hitting water directly | Switch to an opaque container or wrap the jar, and change the water more frequently. |
| Leaves yellowing or dropping | Normal stress response during rooting, OR too much water | Don't overwater; misting is enough. Some leaf drop is normal. If the stem base is still firm and green, wait it out. |
| Very slow root growth | Temperature too low or light too dim | Move to a warmer spot (above 65°F) and increase indirect light. A heat mat can help significantly. |
| Transplant shock (wilting after potting) | Root disturbance + moisture loss through leaves | Mist leaves, reduce light intensity for 1–2 weeks, and avoid fertilizing until new growth appears. |
The single most common cause of propagation failure is contamination: dirty tools, non-sterile growing medium, or old water sitting too long. Clean scissors and fresh perlite cost almost nothing and solve a huge percentage of problems before they start. If you've struggled before, start there.
How to scale from one plant to many
Start with one method and one plant before expanding. If your snake plant has three crowns, divide it into three and get three plants. If your pothos is vining, take four stem cuttings and root them in water on the same windowsill. Once you've had one success, you have the confidence (and the extra plants) to experiment further. From there, you can start trading with other plant people, filling shelves in a small apartment, or scaling up a balcony garden without spending much at all.
The best propagation plan for your situation depends entirely on the specific plant you're starting with. If you're working from a single unusual plant and trying to figure out the best route, the general decision tree is: Does it form clumps? Divide it. Does it have long, rooting-capable stems? Try cuttings or layering. Does it produce seeds that aren't hybrid? Save and sow them. Does it have a single upright stem that's gotten too tall? Air layer it. You can always combine methods too: divide the base while air layering the top of the same overgrown plant. Once you pick the right method, you can learn how to grow new plants from old plants at home with the same parent plant care basics. You'll end up with more new plants than you started expecting, which is honestly one of the best parts of learning to propagate. If you're imagining a plant that could survive off Earth, you'll also need a plan for how to grow it from another planet, starting with the right conditions and containment how to grow a plant from another planet.
FAQ
Can I grow new plants from just one leaf, even if the plant normally grows from stems?
Yes, but only for species that naturally form new plantlets from the petiole (leaf-stem), not the leaf blade alone. For plants where the leaf blade rots instead of sprouting, you need stem cuttings or another method, and you should include at least about 1 inch of petiole when taking the leaf.
What’s the fastest way to get more plants from one plant at home?
Division and certain stem cuttings are usually the quickest. Division gives you fully rooted plants immediately, while water-rooted cuttings can show roots in 2 to 4 weeks, then you pot up once roots are around an inch long to reduce the soil transition setback.
Should I remove all leaves from a cutting, or can some stay on?
Keep leaves only if they are staying above the rooting medium and not submerged. For stem cuttings, removing the bottom-half foliage helps prevent rot, especially in water where trapped leaves can decay. If many leaves must remain for energy, ensure airflow and that only nodes, not leaf tissue, are in the rooting environment.
Why do my cuttings rot instead of rooting?
Rot usually comes from contamination or tissue staying too wet without oxygen. Use fresh, light medium (for example perlite-based), sterilize tools between cuts, avoid water stagnation, and remove any leaves that would sit under water or buried soil. Also check that you are not using an oversized pot for small cuttings.
How often should I water or mist during propagation without drowning the cutting?
For soil or mix propagation under a dome, mist just enough to keep the medium evenly moist, not saturated. Overly wet media and no airflow lead to rot, so if condensation is constant and pooling, crack the dome briefly for ventilation.
Is rooting hormone necessary for every plant I’m trying to multiply?
No. It’s most useful for slower-rooting or woody plants, while fast rooters often root without it. If you do use it, apply lightly to the cut surface and avoid contaminating the bottle by dipping repeatedly with tools or cuttings.
When should I move a water-rooted cutting from water to soil?
Don’t wait for long, tangled roots. Pot up when roots are about an inch long, then keep the new plant in bright but not harsh light and slightly lower light for 1 to 2 weeks to handle the root-form difference between water and soil.
Can I propagate a leggy plant by taking multiple cuttings at once?
You can, but be intentional about the cuts. Take tip cuttings that include nodes and remove lower leaves so nodes are the rooting points. If you’re also planning an air layer on the top, don’t over-cut the same stem section, because it can reduce the parent’s ability to recover.
How do I know if a division will succeed and won’t damage the parent?
Choose clumps that naturally have separated crowns and some root structure. Wait until the parent is actively growing (spring or early summer) when possible, and keep enough roots attached to each division so the new plant has stored energy to establish.
What’s the difference between “layering” and “air layering,” and when should I use each?
Layering keeps the stem attached while a section roots in a nearby pot, so it works best with flexible stems and low risk. Air layering removes part of the stem’s outer tissue and roots it while it is still on the plant, which is better for tall, woody plants where bending down isn’t practical.
My layering stem keeps failing, how can I improve rooting success?
Use a pliable stem that can be bent without snapping, and secure the section so the node stays firmly in contact with moist mix. You want consistent moisture at the node area, and you should wait until you can see new growth or feel resistance when tugging gently before cutting it free.
How long should I wait before checking for roots, and what’s the safest way to check?
Most setups are worth checking around 3 to 4 weeks. Instead of yanking, gently tug to feel resistance, or inspect through clear covers when using water rooting. If there’s no resistance yet, give it more time rather than repeatedly disturbing the cutting.
When saving seeds, how can I tell if seeds are viable beyond the float test?
The float test helps, but you still want a germination check before committing to a full planting. Run a small test using about 10 seeds on a damp paper towel, seal in a bag, and sow only if most sprout in the expected window.
Can I save seeds from any plant hybrid, and will they grow true to the parent?
Only non-hybrid or self-pollinating plants are reliable for producing offspring very close to the parent. For hybrids, seed saving is a gamble, resulting plants may vary in flower, fruit, or growth traits.
Why are seedlings weak or failing after germination?
Often it’s the transition and early care. Keep seedlings at appropriate temperatures and avoid letting the surface dry out completely, then gradually increase light after sprouting. Also watch for soggy conditions, which can cause damping-off, especially in dense, wet media.