Bare-root plants are one of the best deals in gardening, but they also come with a short window where you can easily lose them if you don't know what you're doing. The good news: the process is straightforward once you understand what the plant actually needs. This guide walks you through every step, from opening the box on delivery day to watching your first leaves unfurl.
How to Grow Bare Root Plants Step by Step Guide

Marcus Holloway
4 Apr 2026
What bare-root plants actually are (and when to buy them)
A bare-root plant is exactly what it sounds like: a plant that has been dug out of a growing field while dormant, had its soil shaken off, and is shipped or sold with the roots exposed. The technique works because dormant plants aren't actively drawing up water or nutrients, so they can tolerate having no soil around their roots for a limited time without dying. Once they hit your garden and conditions warm up, they re-acclimate to new soil faster than a container-grown plant would, often resulting in stronger establishment.
Timing is everything here. Bare-root stock is a dormant-season product, typically available from mid-November through mid-March in most parts of the U.S., when the ground isn't frozen solid. In colder states like Minnesota, packaged dormant plants (including bare-root) often show up on retail shelves six to eight weeks before the true planting season begins, which means the ground outside might still be frozen when you bring them home. That's not a problem as long as you know how to store them temporarily. Buying in winter or very early spring gives you the widest selection and the lowest prices compared to container stock.
How to pick healthy stock and check if it's still viable
Not every bare-root plant on the shelf or in a delivery box is worth planting. Checking viability before you invest time in a planting hole will save you a lot of frustration. The two things to examine are the buds and the roots.
For the buds, do a scratch test: use your thumbnail to gently scrape a small patch of bark on a stem. If the tissue underneath is green and slightly moist, that stem is alive. If it's brown and dry, that section is dead. Move to another branch and try again. A few dead tips aren't necessarily a dealbreaker, but if the majority of buds show brown or black tissue all the way through, the plant won't recover. The USDA Forest Service uses exactly this kind of tissue inspection to evaluate bare-root seedling quality, and it works just as well for home gardeners.
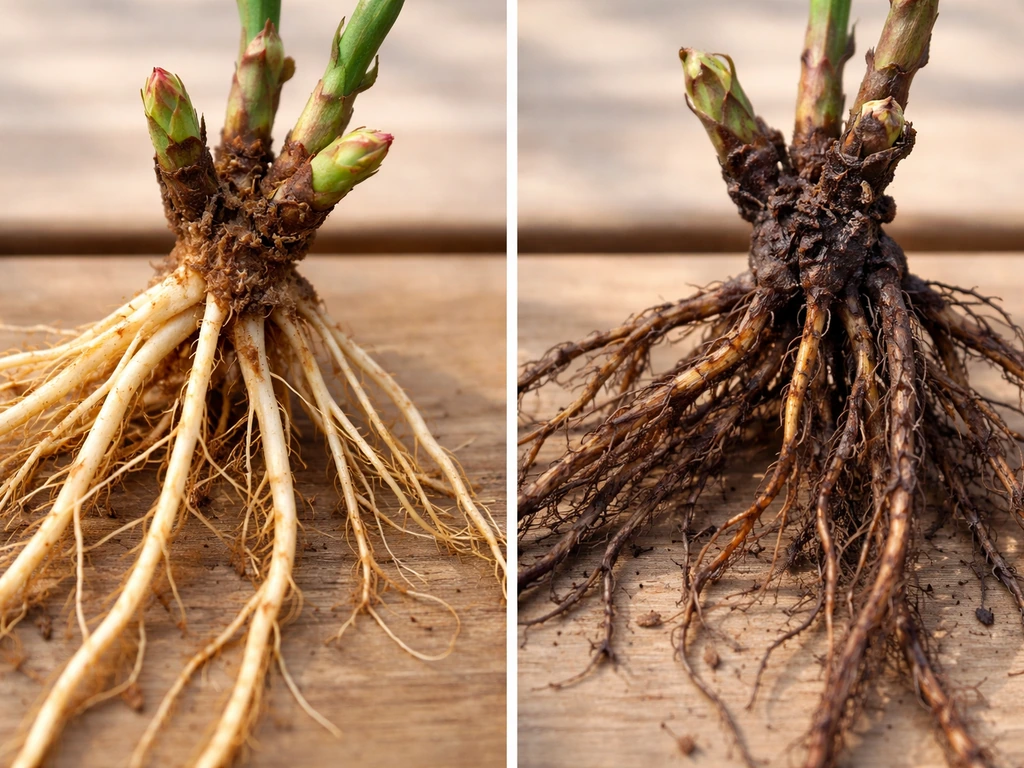
For the roots, look for fibrous, pliable roots that are white to tan in color. Roots that are slimy, mushy, or jet black are rotting and should be trimmed back to healthy tissue. A few dead root tips near the cut ends are normal and not cause for alarm, but if the majority of the root system is dead beyond small fractions, the plant is unlikely to establish. When in doubt about a plant you've already purchased, understanding whether you can grow a plant from just roots can help you decide whether it's even worth attempting with minimal viable root material.
What you need before you plant
You don't need a lot of specialized gear, but having the right things on hand before planting day makes the process much smoother.
- A bucket large enough to submerge the roots for soaking
- Clean, sharp pruners or garden scissors for trimming damaged roots
- A garden spade or digging fork for opening the planting hole
- Compost or aged organic matter to amend backfill soil
- Mulch (wood chips, straw, or shredded bark)
- A watering can or hose with a gentle setting
- Row cover fabric or old bed sheets for frost protection
- Stakes and soft ties if you're planting trees in a windy location
On site selection: choose a spot with good drainage above all else. Heavy clay soil or low areas that collect standing water are a fast track to crown and root rot, which is one of the most common ways bare-root plants fail. If you're working with a container instead of planting in-ground, pick one with drainage holes and use a mix that drains freely. Either way, loosen the soil well and work in compost to give those new roots something they can actually grow through.
Soaking, trimming, and planting correctly
What to do the moment your plants arrive
As soon as bare-root plants arrive by mail, get the roots into water or at least keep them moist. If you can plant within a day or two, place the roots in a bucket of water immediately. If you need more time, you can "heel in" by digging a shallow trench, laying the roots in it, and covering them with soil or damp straw until you're ready to plant permanently.
OSU Extension recommends that if you cannot plant immediately, you can “heel in” mail-order bare-root roots by digging a shallow trench, laying the roots in it, and covering them with soil or damp straw until permanent planting heel in by digging a shallow trench, laying the roots in it, and covering them with soil or damp straw. This temporary method works well for up to a few weeks and is much better than leaving roots exposed to air.
Soaking before planting
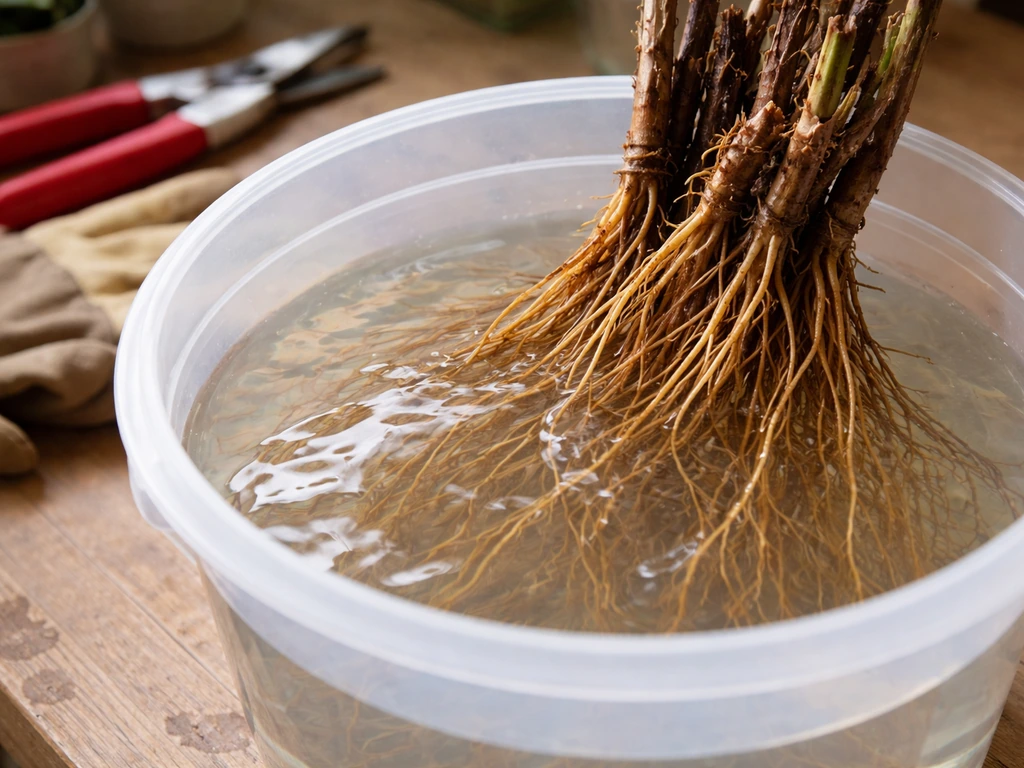
Before planting, soak the roots in plain water for one to six hours. This rehydrates the root tissue after the drying stress of shipping and storage. Don't soak longer than overnight: roots need oxygen, and sitting in water too long will actually start to suffocate them, which defeats the whole purpose. One to four hours is the sweet spot for most bare-root stock. Room temperature water is fine.
Trimming damaged roots
After soaking, take a look at each root. Use clean, sharp pruners to cut off any roots that are clearly dead (dark, mushy, or dry and brittle), cutting back to where the tissue looks healthy and light-colored. Also trim any roots that are broken, kinked severely, or circling on themselves. Clean cuts heal better than ragged ones. Don't be afraid to trim: a smaller, healthy root system outperforms a larger damaged one every time. To better understand what you're aiming for, it helps to know how plant roots actually grow, since they spread outward and downward from healthy tissue.
Digging the hole and setting the plant
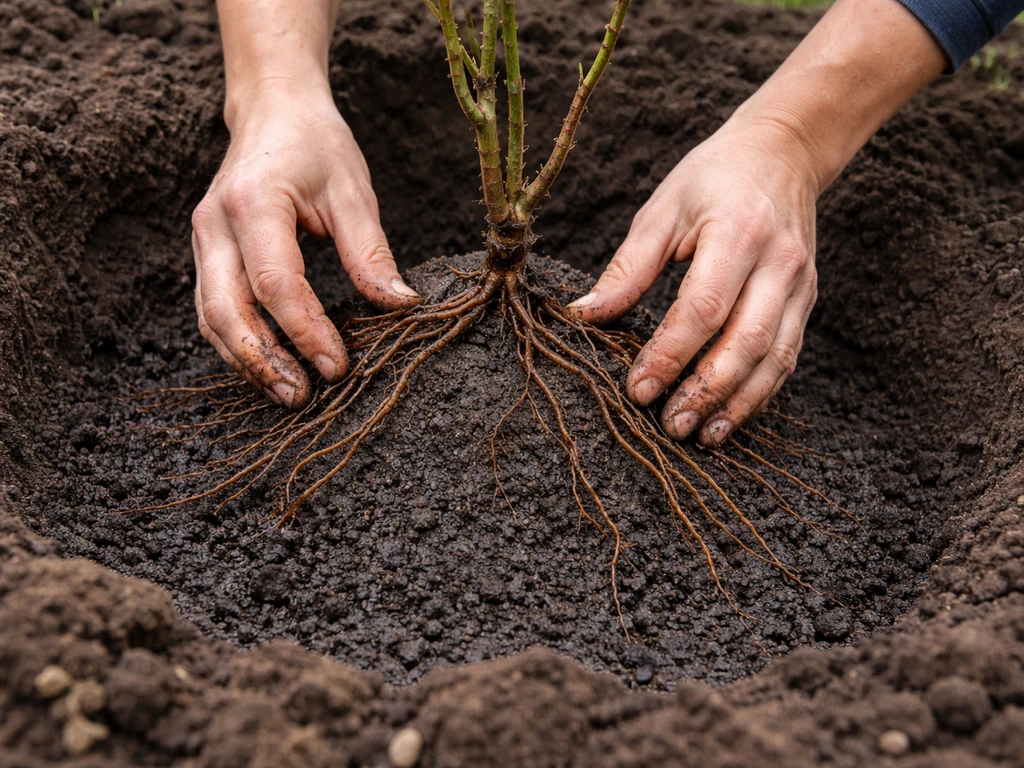
Dig the hole wide and shallow rather than deep and narrow. Most tree and shrub roots grow horizontally, not straight down, so a wide hole with sloping sides encourages outward spread. The hole should be at least two to three times wider than the root spread, but only deep enough so the root collar (the point where the stem meets the roots, often marked by a slight flare or color change) sits at or just above the finished soil surface. Planting too deep is one of the most common and damaging mistakes with bare-root trees. If you can't see a visible root flare above the soil after backfilling, you've gone too deep.
To set the plant at the right depth, build a small cone or mound of soil in the center of the hole. Rest the plant over this mound so the roots drape naturally over and down the sides, and the root collar sits at the right height. Then backfill gradually, firming the soil gently as you go to eliminate large air pockets. If roots are very long and won't fit without kinking, widen the hole or dig a short trench extending from the main hole rather than bending the roots to fit.
After-plant care: water, mulch, and protection
Watering schedule
Water thoroughly right after planting to settle the soil and make first contact between roots and soil particles. After that, the goal is consistent moisture without waterlogging. A practical schedule for newly planted bare-root trees and shrubs: water deeply once a week for the first three months, then drop to once a month for the following six months, unless you get more than an inch of rain in a given week. For perennials, check soil moisture at the root zone with a finger and water when the top inch is dry. Erratic watering, both drought and flooding, causes more bare-root failures than almost anything else.
Mulching
Mulch is your best tool for keeping soil moisture stable and roots insulated. Apply about 2 inches of wood chips, straw, or shredded bark in a ring 3 to 4 feet wide around newly planted trees and shrubs. Keep the mulch pulled back a few inches from the base of the stem: mulch piled against the bark traps moisture and encourages rot right at the crown, which is the last place you want it.
Protecting from frost and wind
Since bare-root planting happens in late winter and early spring, late frosts are a real risk, especially for perennials that start pushing tender new growth first. Row cover fabric draped loosely over plants on cold nights provides a few degrees of frost protection and supports faster establishment by keeping the microclimate around leaves and roots a bit warmer. Remove the cover during warm days so you're not trapping heat or blocking pollinators once flowers appear. For trees in exposed spots, staking during the first growing season helps prevent root movement from wind, which can break fragile new root connections before they've anchored properly.
Troubleshooting the most common problems
Roots dried out before planting
If roots feel dry or papery when you unwrap them, don't panic. Soak them for the full four to six hours, and check tissue color after soaking. If the roots rehydrate and the buds pass the scratch test, the plant is likely still viable. If they remain brittle after a good soak, those roots are too far gone to recover.
Transplant shock and slow leafing out
Bare-root plants often take longer to leaf out than container-grown plants because they're spending energy rebuilding root connections before pushing top growth. It's not unusual for a bare-root tree to sit looking dead for four to six weeks after planting. Resist the urge to dig it up and check. Keep watering on schedule and do the scratch test on the stem: if the tissue underneath is green, the plant is alive and working on it. If you find yourself wondering why your plant still won't grow after several weeks, check watering consistency, soil drainage, and planting depth first, because those three factors account for the vast majority of failures.
Rot and mold
If you see mold on the roots or the base of the stem, or if the plant collapses at the soil line, excess moisture is usually the culprit. Root rot sets in when roots sit in waterlogged, oxygen-poor soil. The fix starts with soil drainage: if water pools in the planting area after rain, you'll need to either move the plant to raised ground or improve drainage before replanting. Remove any visibly rotten roots back to healthy tissue, let the wound dry briefly in open air, then replant in a better location. Avoid overcompensating with heavy watering afterward.
No signs of growth after weeks
If a plant still shows no green growth after six to eight weeks and the scratch test reveals brown tissue throughout, the plant has likely failed to establish. This happens most often from planting too deep, from roots that were too damaged or dry before planting, or from severe drainage problems. Before assuming total loss, try the scratch test at multiple points on the plant. Sometimes one branch or cane is alive even when others are not. Learning how to encourage root growth on a struggling plant can give you extra techniques to try before giving up on it entirely.
Timing and care differences by plant type
Bare-root isn't one-size-fits-all. Here's how timing and handling differ depending on what you bought:
| Plant Type | Best Planting Window | Soak Time | Key Aftercare Notes |
|---|---|---|---|
| Trees (deciduous) | Late winter to early spring while fully dormant | 2–6 hours | Stake in windy sites; mulch wide ring; water weekly for 3 months |
| Shrubs | Late winter to early spring; some in fall | 1–4 hours | Prune dead tips before planting; keep root flare exposed; mulch well |
| Perennials | Early spring as ground thaws; some in fall | 1–2 hours | Protect from late frost with row cover; water when top inch dries |
| Dormant seedlings | As early as ground can be worked in spring | 30 min–1 hour | Heel in if ground isn't ready; plant at same depth as nursery mark |
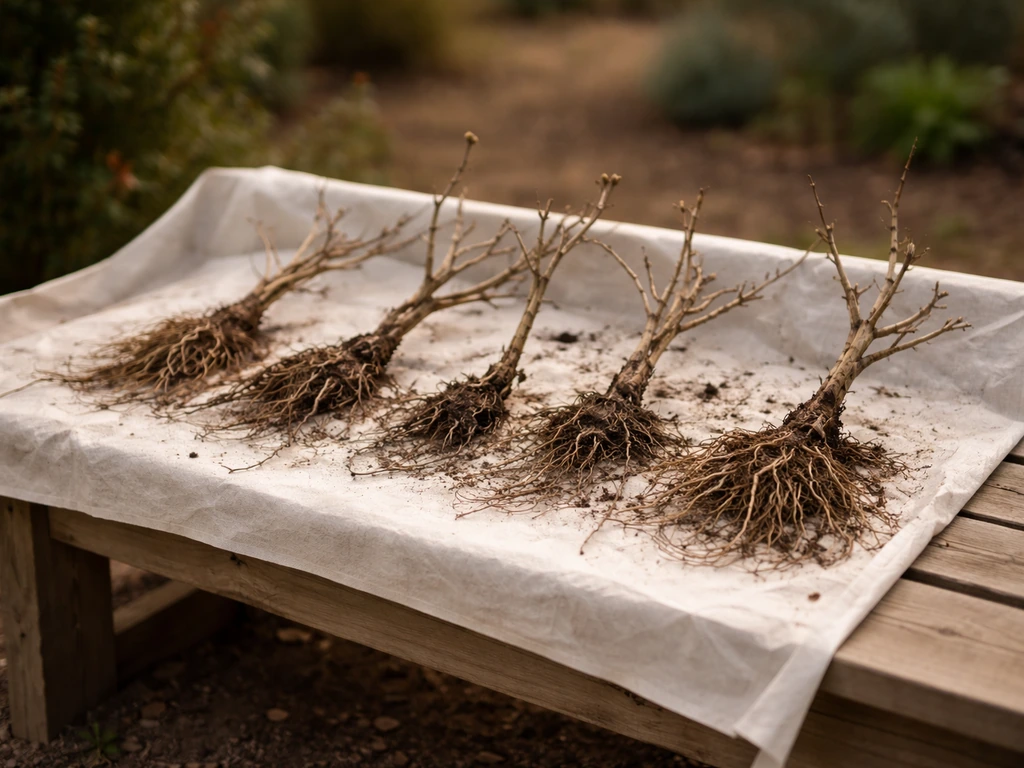
Bare-root trees and shrubs are the most forgiving in terms of timing as long as they're dormant, but they're the least forgiving when planted too deep. Perennials are trickier because some varieties push new growth quickly once temperatures warm, which means you have a shorter window before the plant breaks dormancy in your hands. Dormant seedlings often look like a bundle of sticks with roots, and that's perfectly normal: they don't need to look impressive before planting. The key difference with seedlings versus larger transplants is that seedlings can be heeled in much more densely (closely together in a temporary trench) since they're smaller, making short-term storage easier.
Success with bare-root plants really does come down to three things: keeping roots moist from the moment you get them, planting at the right depth, and not overwatering once they're in the ground. Everything else, the soaking, the trimming, the mulching, supports those three core outcomes. Get those right and bare-root planting is genuinely one of the most reliable and rewarding ways to establish new trees, shrubs, and perennials in your garden.
FAQ
If I trim a lot of dead roots, should I also prune the top to match?
Yes, but it must be done carefully. Only cut off the dead portions, then plant with the root collar at or just above the soil surface. If you remove a lot of roots, consider reducing the top growth too (lightly), so the plant is not trying to support more leaves than it can right now.
Should I fertilize bare-root plants right after planting?
Apply fertilizer sparingly at planting. In most cases, wait until you see real leaf growth before using a balanced feed, because bare-root plants are focused on re-establishing roots first. If you use compost at planting, skip additional fertilizer for a few weeks to avoid stimulating tender growth too early.
What should I do if the ground is still frozen when my bare-root plants arrive?
For most bare-root stock, plant as soon as the ground is workable and temperatures are not extreme. If the soil is frozen solid or water is pooling (poor drainage), postpone planting and use heeling-in instead. Planting into frozen ground often leads to roots staying cold too long, delaying establishment.
How can I tell if I’m watering too much versus too little?
It depends on timing and plant type. For trees and shrubs, the soil should be settled and evenly moist, not soggy, and you should stick to a deep but infrequent schedule. For perennials, use the finger test at the root zone and water only when the top inch is dry, because they are more sensitive to alternating drought and flooding.
Can dried bare-root roots be saved?
If the root system dries out before planting, you can often recover by rehydrating and planting quickly. Soak in plain water for the recommended short window (typically 1 to 4 hours for most stock), then proceed with planting and mulching. If roots are brittle even after soaking, treat the plant as likely non-viable.
Is mold or a white coating on bare-root roots always a bad sign?
A white coating can be normal, especially on fibrous roots after storage. The red flags are slimy texture, dark mushy areas, or a base that collapses, which suggests rot rather than simple drying. If you’re unsure, trim back to light, firm tissue and recheck the scratch test on buds after soaking.
How far from the stem should mulch be, and can too much mulch hurt?
Mulch thickness matters. About 2 inches is ideal, and you must keep mulch a few inches away from the stem to prevent trapping moisture against the bark at the crown. In heavy, wet soils, thinner mulch or using a wider dry ring can reduce the risk of crown rot.
My bare-root plant isn’t leafing out yet, what should I check first besides waiting?
Start with the most common error: planting too deep. Verify the root collar height against finished soil level, then check drainage. If the plant is in a container or raised bed, remove any circling roots and ensure the mix drains freely. If depth and drainage check out, focus on consistent moisture rather than repeated rewatering or replanting.
Can I leave row cover on continuously for frost protection?
Row cover can be used, but it should be loose enough that air can move around the leaves and it should come off on warm days to avoid overheating. Do not cover all the time during sunny weather, and remove it once flowers appear so pollinators can access blooms.
Can I plant bare-root plants in pots if I can’t put them in the ground right away?
Some plants can be planted in containers as a temporary holding step, especially if you cannot get them into the ground immediately. Use a container with drainage holes and a fast-draining mix, keep the root collar at the correct height, and treat watering carefully to avoid waterlogging. The shorter the temporary period, the less stress you add.
If only part of the plant seems alive, is it still worth planting?
A quick viability check is the scratch test on buds after rehydration, and firmness and color on roots after trimming dead sections. If only a few branches are alive, the plant may still survive but may look sparse initially. If the majority of buds are brown throughout, it is usually not worth extended troubleshooting.