Growing roots on a plant is absolutely something you can do at home, even if you've never tried it before. The short answer: take a healthy cutting, prep it properly, place it in water or a light rooting medium, give it warm temperatures and indirect light, and wait. Roots usually appear within one to four weeks depending on the plant. But the details matter a lot, and skipping a few steps is exactly what trips most people up. This guide walks you through everything from start to transplant.
How to Grow Roots on a Plant: Step-by-Step Rooting Guide

Marcus Holloway
6 Apr 2026
What "growing roots on a plant" actually means
People search this phrase for a few different reasons, so it's worth getting clear on which situation you're actually dealing with. The most common one is rooting a cutting: you've snipped a stem or leaf from a plant and you want it to grow its own root system so it becomes an independent plant. That's propagation, and it's what most of this guide covers.
The second situation is root division, where you're splitting an existing plant (think hostas, snake plants, or pothos) into multiple pieces, each with some roots already attached. In that case you're not starting from zero, you're just encouraging the divided sections to re-establish. The third situation is a plant that already has a root system but it's struggling or damaged. Maybe the roots rotted, or you're working with a bare-root plant that was shipped without soil.
If you're curious about that last scenario, how to grow bare root plants covers that specific situation in detail. For most readers, though, the goal is getting a fresh cutting to sprout roots from scratch, and that's where we'll spend most of our time.
Water vs. soil vs. other mediums: which should you use?
There's no single best method. Each approach has real strengths and real drawbacks, and the right choice depends on the plant you're working with. Here's an honest breakdown.
| Method | Best For | Pros | Cons |
|---|---|---|---|
| Water rooting | Houseplants, herbs, pothos, coleus, impatiens | Easy to monitor root progress, no medium to buy, low setup cost | Roots formed in water can struggle when transplanted to soil; risk of rot if water goes stagnant |
| Soil rooting | Most cuttings, shrubs, semi-hardwood stems | Roots develop adapted to soil from day one, easier transplant | Can't see root progress, easy to overwater and rot the cutting |
| Perlite or vermiculite | Succulents, cacti, any rot-prone cuttings | Excellent drainage, light and porous, reduces rot risk significantly | Little to no nutrients; needs transplanting once roots establish |
| Peat or coco coir mix | Softwood cuttings, fast-rooting houseplants | Retains some moisture without waterlogging, lightweight | Can compact over time; watch for mold in high humidity |
| Sphagnum moss (air layering) | Woody stems, ficuses, hard-to-cut plants | Roots form while the stem is still attached to the parent plant | Slower process; requires more setup and attention |
My personal default for beginner-friendly houseplants and herbs is water rooting, because you can see exactly what's happening. But if you're working with a succulent or anything prone to rot, skip the water entirely and go straight to perlite or a very light porous mix. The general rule from propagation research backs this up: a light, porous rooting medium dramatically reduces the risk of rot and gives roots the air pockets they need to develop.
Step-by-step: taking and preparing a cutting
This is where most people either set themselves up for success or accidentally sabotage their cutting before it even gets started. Follow these steps in order.
- Choose healthy growth. Pick a stem that looks vigorous, with no yellowing, spots, or signs of pest damage. A weak stem will struggle to root even under perfect conditions.
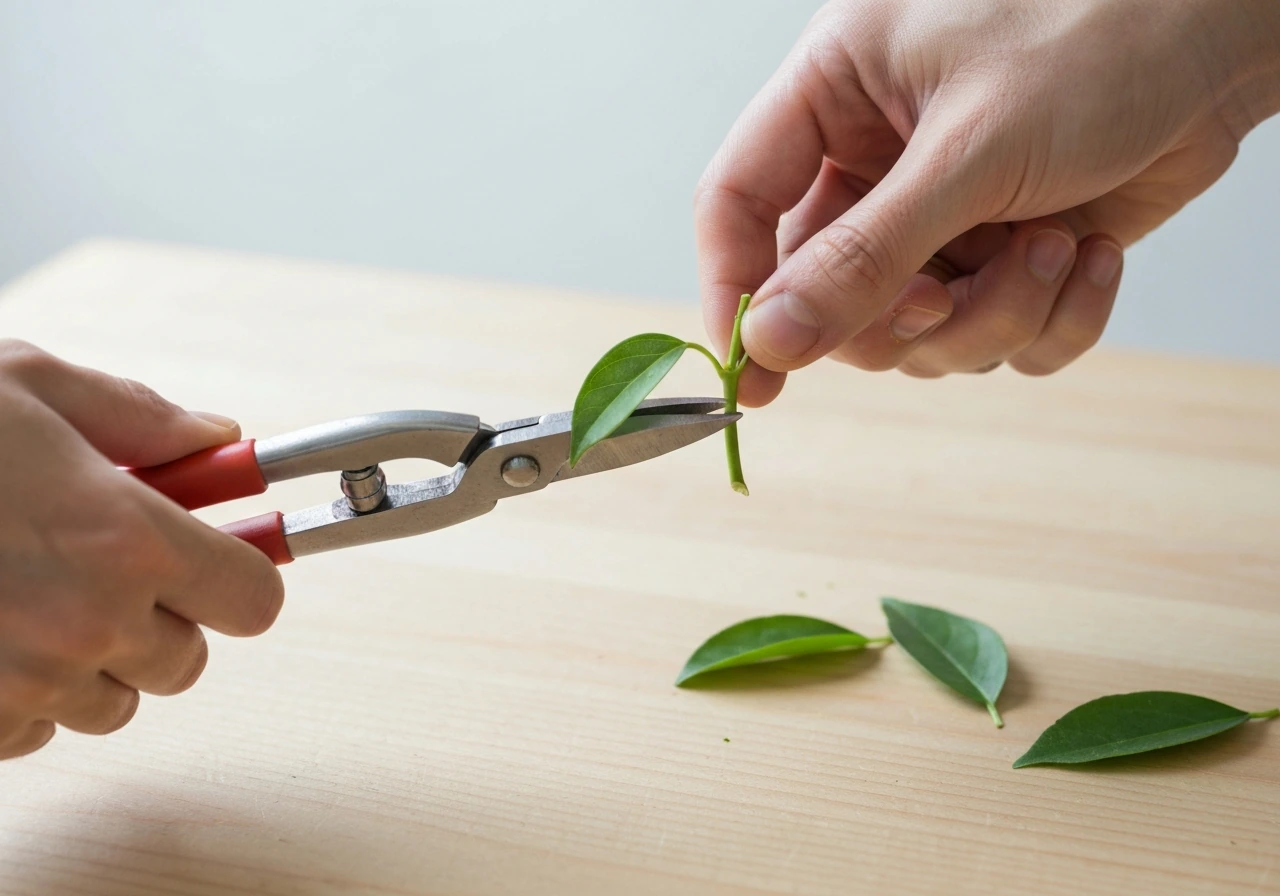
- Cut at the right length and angle. Aim for a cutting that's 3 to 6 inches long (about 7 to 15 cm). Use clean, sharp scissors or pruning shears. A clean cut matters because a ragged edge creates more surface area for rot to start. Cut just below a node (the bump or joint where leaves attach) since that's where roots will emerge.
- Remove lower leaves. Strip off any leaves that would sit in water or below the soil surface. Submerged leaves rot quickly, and rotting plant material is the fastest way to lose your cutting.
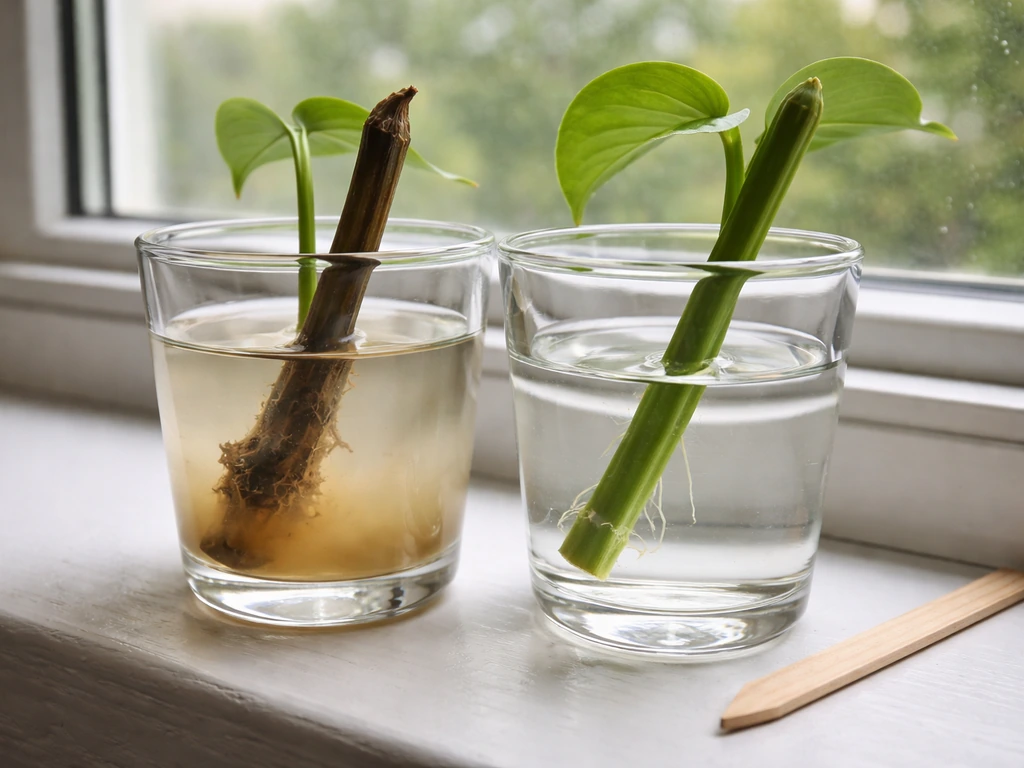
- Let it callus if needed. Succulents and cacti are the main exception here: after cutting, set them aside in a dry spot for 24 to 48 hours before placing them in any medium. That cut end needs to form a dry callus layer, otherwise it just rots on contact with moisture. Other plants generally go straight into their rooting medium.
- Optional: apply rooting hormone. Dip the cut end in rooting hormone powder or gel. Tap off any excess powder. Rooting hormone contains synthetic auxins that mimic the plant's own signaling process for root initiation, and it genuinely speeds things up for slower-rooting plants. It's not magic but it's worth using.
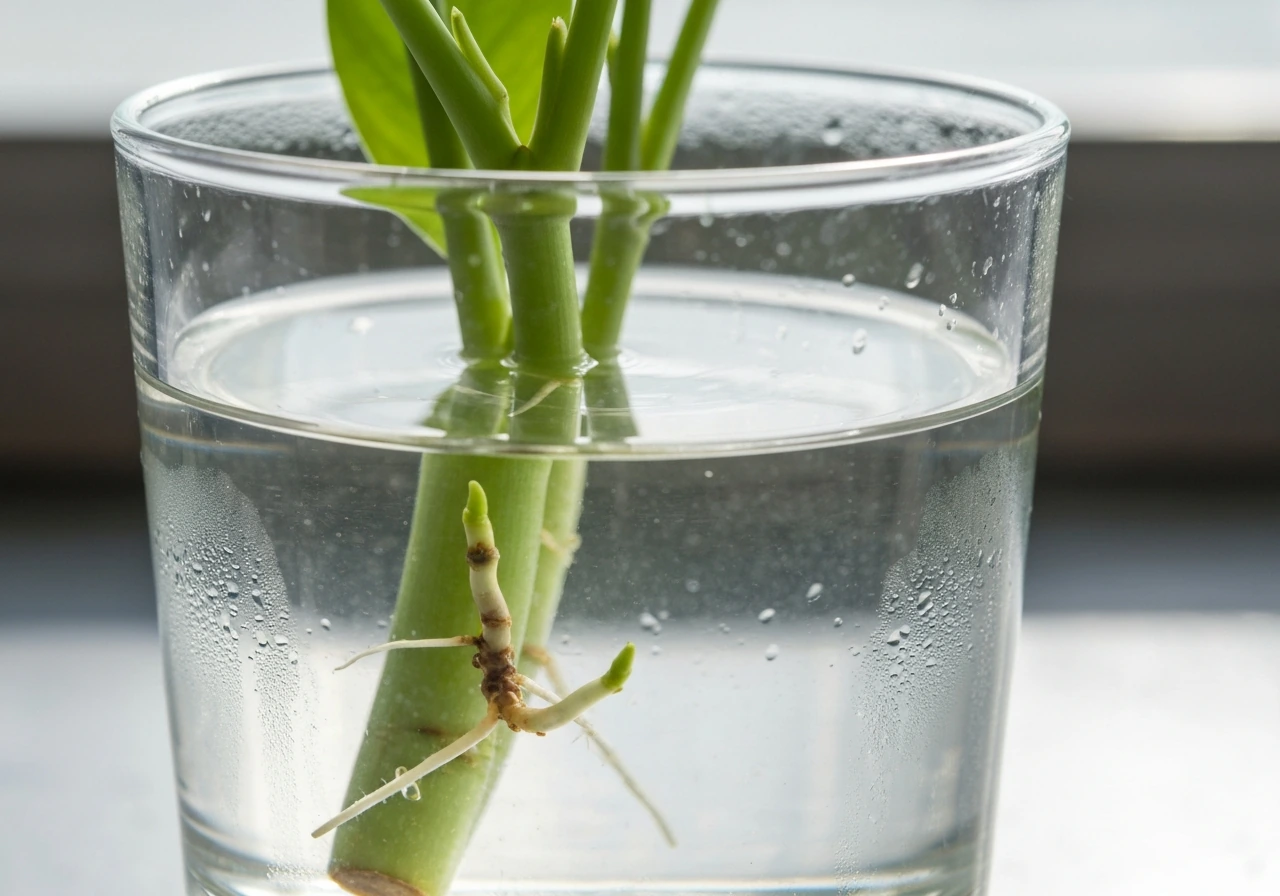
- Place in your chosen medium. Set the cutting in water (change water every 2 to 3 days), poke a hole in your rooting mix and nestle the stem in, or wrap the end in damp sphagnum moss for air layering. Don't cram it in because you can damage the stem tip where roots need to emerge.
The conditions that actually drive root growth
This is where I see even experienced gardeners go wrong. Getting a cutting to root isn't just about the medium. The environment around it does most of the heavy lifting, and four variables matter most: temperature, humidity, light, and airflow.
Temperature: warm roots, cool air

Root initiation is driven by temperature at the root zone, not the air around the leaves. The ideal root-zone temperature for most cuttings is between 70°F and 80°F (21°C to 27°C). If your home is cool, set your cuttings on top of a heat mat or on top of the refrigerator where there's gentle ambient warmth coming up. Research from MSU Extension is clear on this: delivering heat specifically to the propagation zone (the medium and root area) has a much bigger effect on rooting success than warming the air around the cutting.
Humidity: enough but not too much
Cuttings don't have roots yet, so they lose water through their leaves with nothing to replace it. High humidity around the cutting slows that moisture loss and keeps the cutting from wilting before roots form. A simple trick: place a clear plastic bag loosely over the cutting and its container, or use a plastic bottle with the bottom cut off as a mini dome.
But here's the catch: too much moisture is actually one of the most common causes of propagation failure. Waterlogged media, constant heavy misting, and sealed humid environments without any air exchange encourage botrytis (gray mold) and rot. Aim for high humidity, but lift the dome for 10 to 15 minutes each day to let stale, wet air out.
Light: bright but indirect
Cuttings need light to photosynthesize and fuel root growth, but direct sun will overheat them and dry out the cutting faster than roots can compensate. A bright windowsill out of direct midday sun is ideal. North or east-facing windows tend to work well. If you're working indoors in winter or in a space with limited light, a simple grow light set to 14 to 16 hours per day works perfectly. Understanding how plant roots grow at a biological level can help you appreciate why this light-energy connection matters so much: without photosynthate being pushed down to the cut end, root initiation stalls.
Airflow: the underrated factor
Good airflow prevents the fungal buildup that leads to mold and rot. Cinnamon has been reviewed in the scientific literature for its antifungal potential in controlling plant diseases, including studies of antifungal activity using cinnamon forms cinnamon’s antifungal potential for plant disease control. This doesn't mean blasting your cuttings with a fan, but it does mean not leaving them in a completely sealed container indefinitely. Crack the bag or dome daily. If you're using a tray setup, space cuttings out so air can circulate between them.
When things go wrong: common problems and how to fix them
Rooting doesn't always go smoothly, and that's completely normal. Here's what's likely happening when you run into the most common problems, and what to actually do about it.
- No roots after 4+ weeks: First, check temperature. A cold root zone slows rooting dramatically. Also confirm you're cutting just below a node. If the stem end is hard and callused but not rooting, try scraping the bottom inch of the stem lightly with a knife to expose more green tissue, reapply rooting hormone, and replant.
- Rotting stem: The medium is too wet, the temperature is too low, or you left too many leaves on. Remove the cutting, trim off any rotted tissue with a clean cut, let it air dry for a few hours, dust with a tiny amount of cinnamon (a natural antifungal), and try again in fresh dry medium.
- Mold on the surface of the medium: Usually botrytis from too much moisture and too little airflow. Remove the moldy top layer, increase ventilation by cracking the humidity dome more often, and back off on any misting.
- Leggy, stretching growth but no roots: The cutting is getting too much warmth with not enough light, so it's putting energy into stem extension instead of roots. Move it to a brighter spot.
- Slow rooting (roots forming but very slowly): Often a temperature issue. Also consider the time of year: plants root fastest during their natural growing season. A plant you're trying to root in winter may just need more time.
- Callus forming but no roots: A callus (the pale, lumpy tissue that forms at the cut end) is a good sign, it means the cutting is alive and responding. But roots can stall if humidity is too low or the medium is too dry. Keep the environment consistently moist (not wet) and give it more time.
If you're dealing with a broader situation where a plant simply isn't growing or thriving at all, it might be worth reading about why a plant won't grow to rule out other underlying causes before you assume it's a rooting problem.
What to do once roots appear
Seeing those first white threads of root emerge is genuinely exciting, but this transition phase is when a lot of cuttings are accidentally lost. Don't rush it.
Knowing when roots are ready
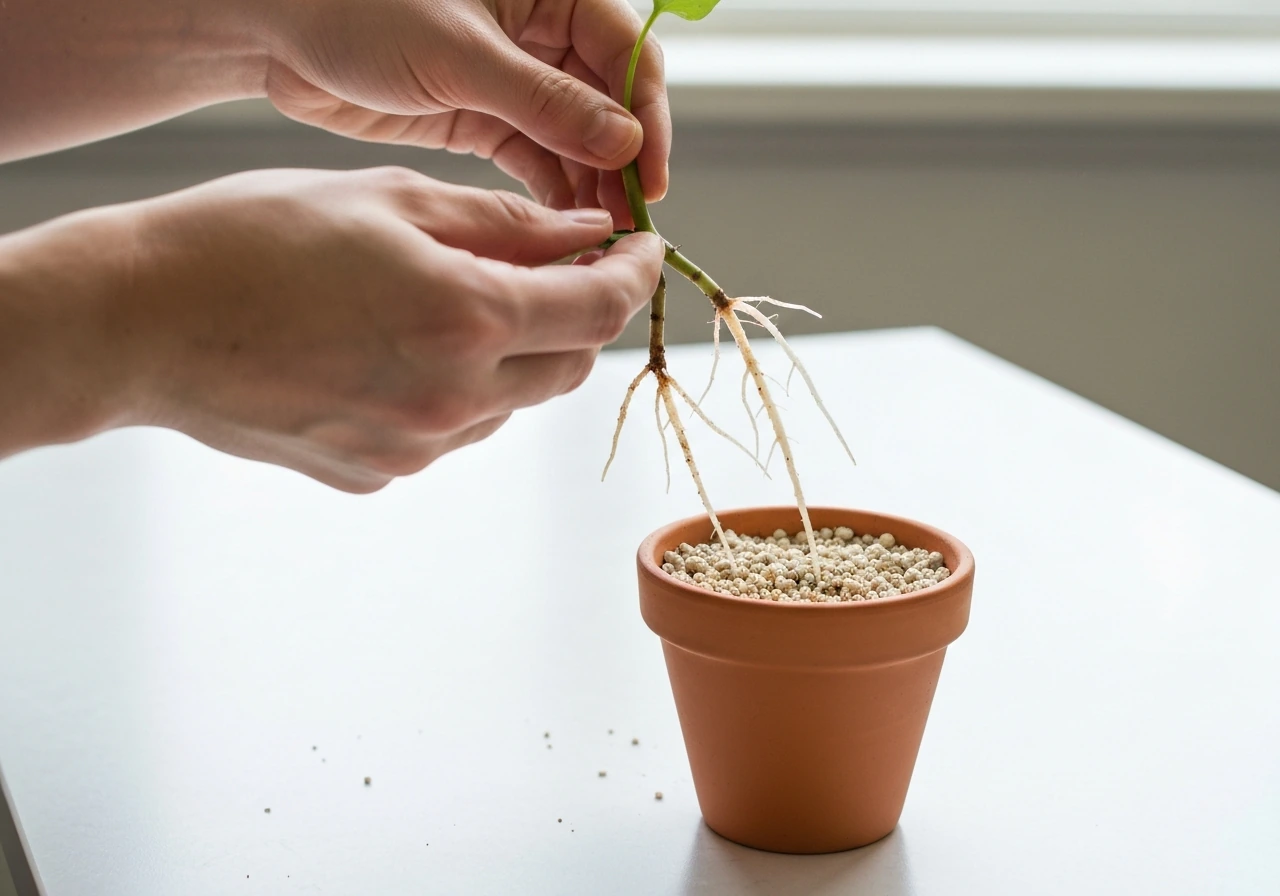
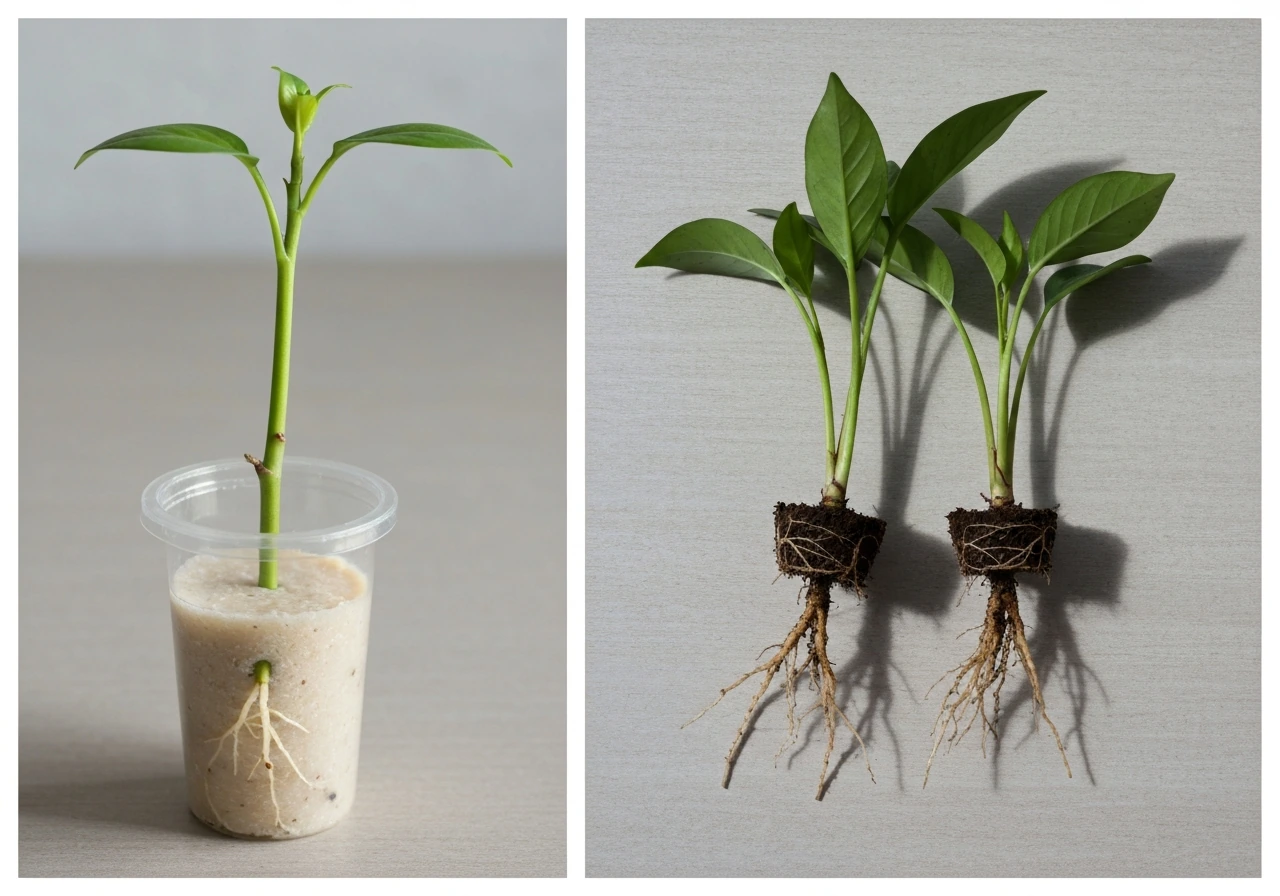
For water-rooted cuttings, wait until you have at least a few roots that are 1 to 2 inches long (2 to 5 cm) before moving to soil. Tiny hair-like roots aren't ready yet. For medium-rooted cuttings, you'll know roots have formed when the cutting starts showing new leaf growth (a sign the root system is functional) or when you feel gentle resistance if you very lightly tug the stem.
Potting mix and transplanting
Use a light, well-draining potting mix. A good all-purpose formula for most new cuttings is two parts standard potting soil to one part perlite. Don't use dense garden soil because it compacts around tender new roots and holds too much moisture. Make a hole in the mix with a pencil or finger before planting so you're not snapping the fragile new roots by pushing the cutting through compacted soil. Water lightly after transplanting, enough to settle the mix around the roots but not to soak it.
Hardening off and early care
This step is skipped constantly and it's the reason transplanted cuttings suddenly wilt or die. The cutting has been living in a humid, stable environment. The open air of your home (or garden) is drier and more variable. Over the course of about a week, gradually expose the new plant to normal conditions: start by removing the humidity dome for longer periods each day, then leave it off entirely. Don't move it into direct sun immediately. Keep it in the same bright indirect light it was in during rooting for at least the first two weeks. Water when the top inch of soil feels dry, not on a fixed schedule.
Matching your method to your plant
Not every plant roots the same way. Here's a practical breakdown of which approach works best for the most common categories.
Soft-stemmed houseplants and herbs
Plants like pothos, philodendron, basil, mint, coleus, and impatiens fall into the softwood cutting category. These are the easiest to root and are a great place to start if you're new to this. Softwood cuttings, taken from new actively-growing stems during the growing season, typically root in one to three weeks in water or a light medium. No rooting hormone is strictly necessary, though it can speed things up. Water rooting is perfectly fine for this group and gives you easy visibility into root progress. Iowa State Extension also cautions that using too much rooting hormone can sometimes slow root development rather than speed it up rooting hormone concentration.
Succulents and cacti
These are drought-adapted plants with high rot risk. Always let the cut end callus for 24 to 48 hours before planting. Use a dry or barely-moist perlite or gritty succulent mix as your medium. Never water-root succulents. Mist lightly once a week at most. Rooting is slow, often four to eight weeks, and some leaves will look a little sad while waiting. That's normal. Resist watering more.
Semi-hardwood and hardwood shrubs
Shrubs like roses, hydrangeas, and lavender root best from semi-hardwood cuttings taken in late summer when the new growth has started to firm up but isn't fully woody yet. Hardwood cuttings (fully dormant, woody stems) are taken after the growing season ends in fall or early winter. Both benefit significantly from rooting hormone, and both need bottom heat to root well. Rooting takes longer: four to twelve weeks depending on the species. A propagation tray with a heat mat and a clear humidity dome is the ideal setup here.
Plants you want to grow from root divisions or just roots
Some plants (like snake plants, hostas, and certain ferns) can be propagated differently: by dividing the root mass or even planting root sections directly. If you're curious whether that's an option for your plant, the article on whether you can grow a plant from just roots breaks down exactly which plants work this way and how to do it.
A quick reference for getting started today
- Pick a healthy stem from your plant and cut 3 to 6 inches below a node with clean, sharp scissors.
- Remove all leaves from the bottom half of the cutting.
- If it's a succulent, let the end dry for 24 to 48 hours. For other plants, move straight to the next step.
- Dip the cut end in rooting hormone powder or gel (optional but helpful).
- Place in water, perlite, or a light soil mix depending on your plant type.
- Set in bright indirect light at a warm temperature, ideally 70 to 80°F at the root zone.
- Keep humidity high with a loose plastic covering, but vent it daily.
- Change water every 2 to 3 days if water-rooting. Keep medium barely moist if using soil or perlite.
- Watch for roots (1 to 2 inches long for water-rooted cuttings) before transplanting.
- Transplant into a light, well-draining mix and harden off over one week before returning to normal conditions.
That's really the whole process. It sounds like a lot of steps but most of them take under five minutes. The hardest part is the waiting, and the second hardest part is resisting the urge to overwater. Get those two things right and most cuttings will reward you with roots right on schedule.
FAQ
How do I know my cutting is healthy enough to grow roots?
A good cutting should be turgid (not limp), have firm stems, and show live tissue at the cut end (no mushiness or blackening). If the leaf or stem feels hollow, watery, or smells sour, discard it and take a fresh cutting, ideally from new growth rather than stressed, older stems.
Should I remove leaves before rooting to help it grow roots faster?
Often, yes. For stem cuttings, remove leaves on the bottom half so they do not sit under water or the medium. Leaving fewer leaves reduces water loss before roots form, and it also helps keep the rooting area cleaner and less prone to mold.
Is it better to root in water or in perlite if I do not know what plant I have?
If you are uncertain and the plant is not clearly rot-prone, start with water so you can see root development and catch issues early (cloudy water, slimy cut end, no root initiation). If the cutting browns or turns soft, switch to a light porous medium like perlite quickly rather than continuing in water.
Can I keep changing the water while water rooting?
You can, but do it carefully. Refresh water when it becomes cloudy, and keep the water level covering the same portion of the stem. Avoid frequent full dumps on a tight schedule, because temperature and oxygen changes can stress the cutting.
What should I do if no roots form after several weeks?
First, check the root zone temperature, then check airflow and humidity balance (too wet and stale is a common bottleneck). Also confirm that the cut end is actually in contact with the medium, and that the cutting still looks alive. If it has yellowed severely or the cut end is soft, take a new cutting and adjust one variable at a time.
Can I put rooting hormone on every plant cutting?
You can use rooting hormone on many cuttings, but it is not equally helpful for all categories. For softwood cuttings like many herbs and common houseplants, hormone is optional. For woody semi-hardwood and hardwood cuttings, it is more likely to make a meaningful difference, and the benefit is strongest when you use a fresh, correctly-sized cut end.
Do I need to scrape or wound the cutting to grow roots?
Sometimes it helps, but it is easy to overdo. A light scrape on the underside of the stem near the cut end can expose rooting tissue, but do not peel deep or damage more than necessary. If you already have a clean, healthy cut and good conditions, wounding is usually not required.
How deep should I place the cutting in water or medium?
Aim for just enough depth to cover the bottom nodes or cut end zone where roots should form, typically a couple inches for many cuttings. Too deep can suffocate tissue or keep stems waterlogged, increasing rot risk, while too shallow may leave no contact with the medium and slow root initiation.
Why do my water-rooted cuttings get brown or slimy at the bottom?
This usually indicates rot or bacterial buildup. Remove the cutting from the water, trim back to healthy tissue (if there is any), and restart with fresh water. Also reduce factors that keep the area wet and stagnant, such as dirty containers, low airflow, and letting the cut end sit in a thick layer of slime.
Should I use a bag or dome the whole time while rooting?
Not continuously. Use it to boost humidity early, then transition to venting daily. Sealed, high-humidity conditions for too long without air exchange are a leading cause of gray mold and rot, especially in warm, poorly ventilated rooms.
When transplanting from water or medium, do I need to rinse the roots?
Usually no. If you are moving from water, avoid aggressive rinsing. Plant the roots as gently as possible, and settle the potting mix around them. Disturbing tender new roots can delay growth and increase wilting.
How long should I keep new cuttings in bright indirect light after transplanting?
Plan on at least two weeks in bright indirect light. Direct sun right away is a common reason transplanted cuttings fail, because the roots are still re-establishing their ability to take up water, while leaves may be expecting the protected humidity of rooting.
Why do transplanted cuttings wilt even though they were rooted?
Most often it is shock from going from a humid environment to dry air, or from overwatering dense mix. Follow gradual acclimation, water based on the top inch of soil drying, and use a well-draining blend so roots can breathe rather than sit in saturated media.
Can I grow roots on a plant in winter or in a cold room?
Yes, but you must control root-zone temperature and light. In cooler months, use bottom heat to keep the rooting medium in the recommended range, and rely on a grow light if windows are dim. Without root-zone warmth, cuttings may sit for weeks without initiating roots.
What is the biggest mistake people make when trying to grow roots?
Overwatering and keeping the cutting too wet for too long. Even if you use the right medium, constant heavy moisture with poor airflow encourages mold and rotting at the cut end. If in doubt, err on slightly drier and ventilate more.