Growing a plant successfully comes down to understanding a handful of non-negotiable needs, matching the right plant to your actual conditions, and then staying consistent. Whether you're starting from a seed, a plug, or a small starter pot, the process is the same at its core: give the plant what it needs, watch how it responds, and adjust. This guide walks you through exactly that, from the biology basics all the way to growing Thuja in your yard.
Plant How to Grow: Soil, Indoor, Hydroponics, Thuja Care

Marcus Holloway
2 Apr 2026
How plants grow: the basics you must get right
Plants make their own food through photosynthesis, and they need three things for that to happen: light, water, and carbon dioxide. If any one of those is missing or inadequate, photosynthesis slows or stops entirely, and your plant stops growing. That's not a metaphor, it's a hard biological limit. This is why a plant sitting in a dark corner looks sad after a few weeks even if you're watering it perfectly.
Water does more than just keep leaves from drooping. Through a process called transpiration, water moves through the plant continuously, pulling mineral nutrients up from the roots, keeping cells firm (which is what 'turgor' means), helping the plant cool itself, and opening tiny pores called stomata to let in carbon dioxide. When transpiration is disrupted, because of drought, root damage, or overwatering, all of those functions suffer at once. So watering correctly is one of the highest-leverage things you can do as a grower.
Temperature matters too. Most common plants, especially indoor ones, grow well between 60 and 75°F. Below that range, growth slows. Above it, plants can get heat-stressed. Humidity plays a similar role. Indoors, aim to keep relative humidity between 30% and 60%, which conveniently aligns with what's comfortable for people too. A cheap hygrometer from a hardware store tells you exactly where you stand.
The other big variable is nutrients, primarily nitrogen, phosphorus, and potassium, with a supporting cast of trace minerals. Healthy soil or a balanced fertilizer takes care of most of this. When something is off, the plant tells you through its leaves: yellowing, pale color, or stunted growth are usually the first signals.
Choosing the right plant and matching it to your conditions
The most common reason beginners struggle is not a lack of skill, it's a mismatch between the plant and the environment. A sun-loving plant in a north-facing apartment will fight you no matter what. Start by being honest about what you actually have: how much light, what temperatures, how much time you can give it.
If you're growing outdoors, your USDA Plant Hardiness Zone is one of the most practical tools you have. The map divides the country into zones based on average annual extreme minimum winter temperatures, split into 10°F bands from zone 1 (coldest) up to zone 13 (warmest). A plant labeled 'hardy to zone 6' means it can survive typical winters there. Just keep in mind that the map reflects averages, and actual low temperatures can still dip below those averages in unusually harsh years, so for sensitive plants, it's worth giving yourself a one-zone buffer.
For indoor growers, the equivalent question is: which window do you have? South-facing windows get the most light, especially in winter. East and west windows get moderate light. North windows get the least. Pair low-light plants like pothos, snake plants, or ZZ plants with darker spots. Keep high-light plants like succulents and herbs near your best window. Getting this one thing right eliminates a huge number of problems before they start.
If you want to go beyond the basics, reading up on how to plant and grow specific varieties can save you a lot of trial and error, since different species have genuinely different requirements for soil pH, spacing, pruning, and feeding.
How to grow plants in soil (simple starter process)
Soil growing is the most forgiving method for beginners, and the process is straightforward when you follow it in order. Here's how to go from nothing to a healthy, established plant.
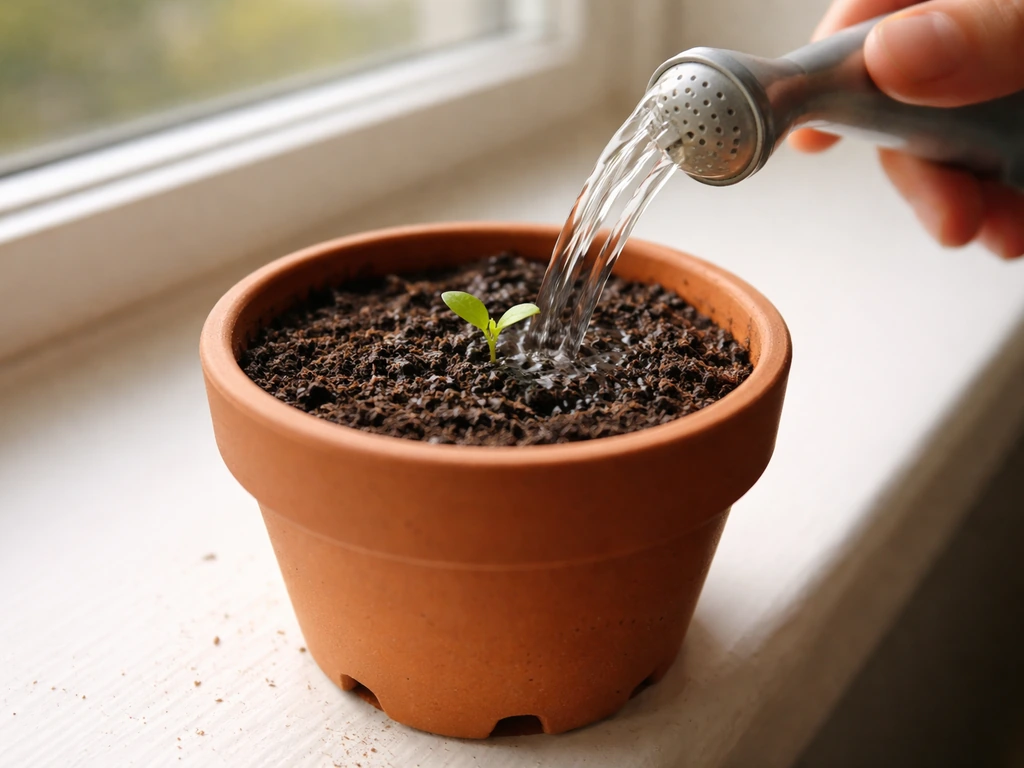
- Choose a pot with drainage holes. Without drainage, water pools at the bottom and suffocates roots. For most starters, a 4- to 6-inch pot is plenty.
- Use a quality potting mix, not garden soil. Garden mineral soil compacts badly in containers, cuts off air to the roots, and tends to waterlog. A good all-purpose potting mix that contains perlite or vermiculite drains properly and keeps air pockets around the roots.
- Fill the pot about two-thirds full, set your seedling or starter plant so the top of the root ball sits about an inch below the rim, then fill in around it. Press gently but don't pack it hard.
- Water thoroughly right after planting until water drains from the bottom, then let it drain completely before setting it in its final spot.
- Place in appropriate light for that plant. Check the tag or look it up, then position accordingly.
- Water again only when the top inch of soil feels dry. Frequency depends on light, humidity, pot size, and the mix you used, so check the plant regularly instead of watering on a fixed schedule.
- Feed with a balanced liquid fertilizer every 2 to 4 weeks during active growing season (spring through early fall). Skip feeding in winter when most plants slow down.
If you're growing from seed, add one step at the start: sow seeds at the depth the packet recommends (usually 2 to 3 times the seed's diameter), keep the soil consistently moist but not wet, and cover with plastic wrap or a humidity dome until germination. Once seedlings emerge, remove the cover and treat them like small starters. If you're working with plug plants, the good news is they already have an established root system, so you skip the germination phase entirely and transplant directly into your prepared pot or garden bed.
Growing plants indoors: light, watering, and setup
Indoor growing adds one challenge that outdoor growing doesn't have: light is almost always the limiting factor. Natural light decreases dramatically with distance from a window, so a plant sitting 6 feet from a window might be getting less than 10% of the light available right at the glass. If your plant is reaching toward the window, producing small pale leaves, or barely growing, move it closer.
South-facing windows are your best asset indoors, particularly in winter when the sun angle is lower. If your apartment doesn't have great natural light, grow lights are a genuinely practical solution. For leafy plants and herbs, a simple LED grow light on a 12 to 14-hour timer works well. For blooming plants, look for incandescent or purpose-built grow light bulbs that include the red spectrum plants need to trigger flowering.
Watering indoors requires reading your plant, not following a schedule. Factors like how much light the plant is getting, the humidity in your home, the size of the pot, and how fast the mix dries out all affect how often a plant actually needs water. OSU Extension notes that sandy or container potting mixes tend to drain and dry faster than heavier soils, which can make watering needs change more quickly potting mixes can dry out faster than heavier soils. A simple test: push your finger about an inch into the soil. If it's dry, water. If it still feels moist, wait. Wilting is a sign of drought stress, meaning roots can't supply moisture fast enough, but overwatering is actually more common indoors and leads to root rot, which produces similar symptoms. When in doubt, err on the dry side.
Keep indoor plants away from cold drafts, heating vents, and air conditioning units. Temperature swings stress plants quickly. Grouping plants together raises local humidity slightly, which most houseplants appreciate. If your home is very dry in winter (common with forced-air heating), a small humidifier or a pebble tray filled with water under the pot can help nudge humidity into that 30 to 60% sweet spot.
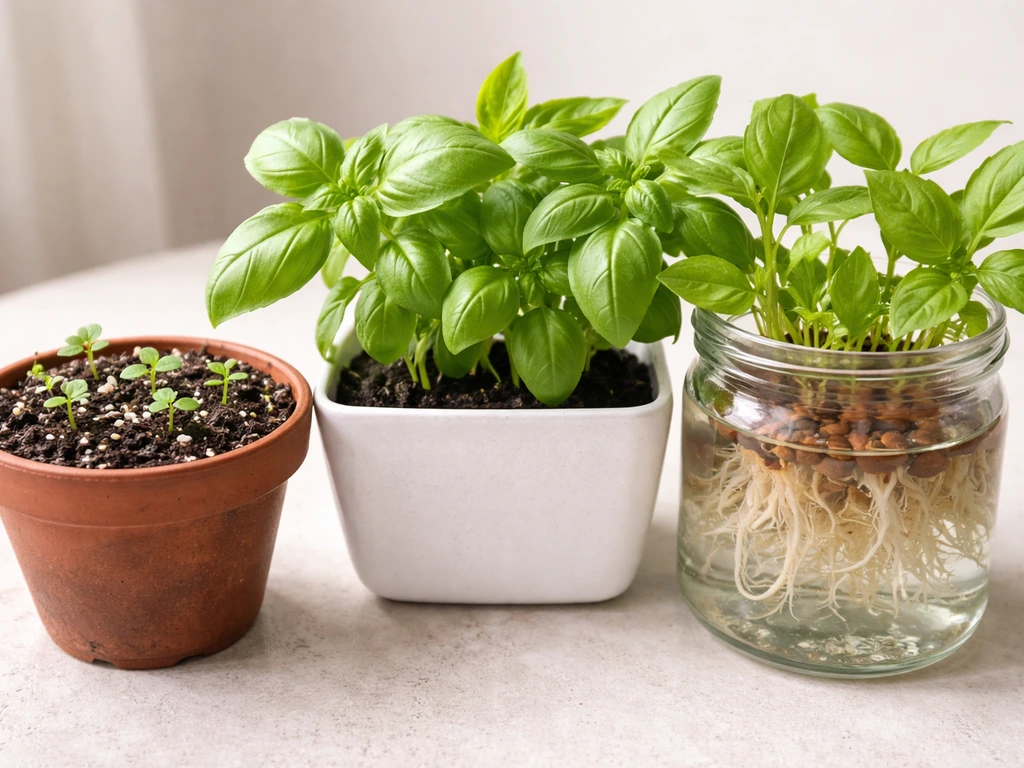
Soilless options: growing in water, hydroponics, and terrariums
Soil isn't the only way to grow plants, and for certain situations, soilless methods actually work better. Here's when each one makes sense.
Hydroponics at home
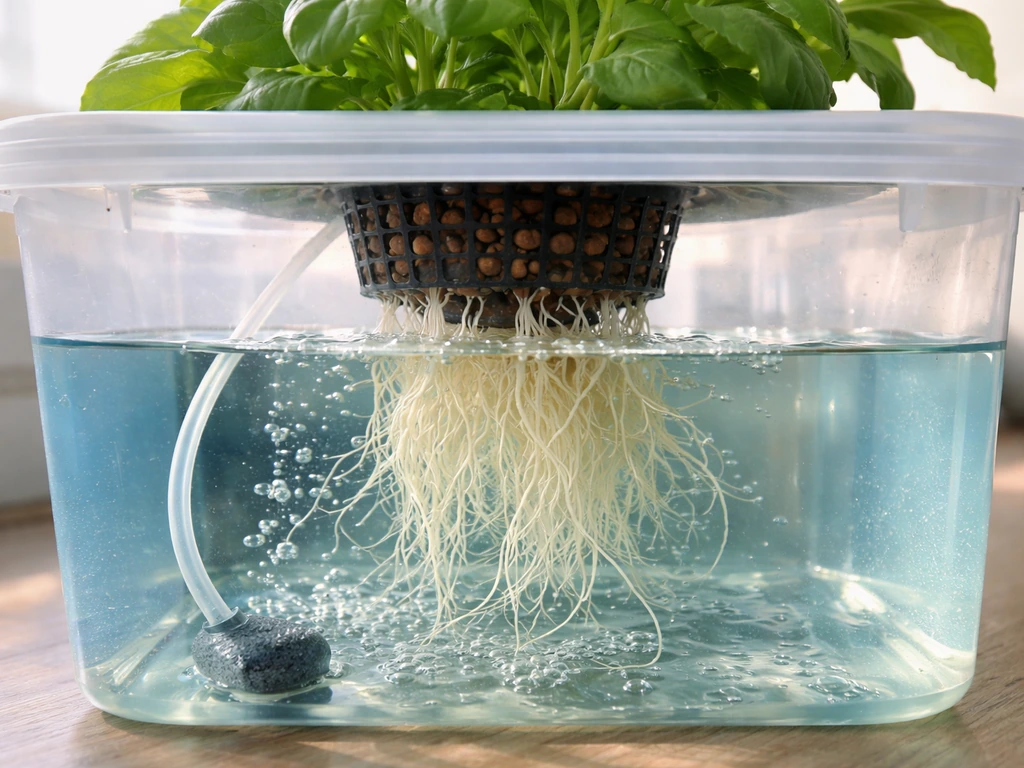
Hydroponics grows plants directly in a nutrient solution instead of soil. The main thing it requires, besides the nutrients, is oxygen at the root zone. Without it, roots drown. The most beginner-friendly setup is deep water culture (DWC), where plant roots hang directly into a nutrient solution held in a reservoir. Net pots hold the plants in place while the roots reach down into the water. Because there's minimal water movement in a DWC system, you need an air pump and air stone to continuously dissolve oxygen into the solution, much like a fish tank aerator. This is non-negotiable: skip the aeration and the roots will rot within days.
Hydroponics works well for fast-growing leafy plants like lettuce, basil, and spinach. It lets you control nutrients precisely and eliminates soil-borne pests. The tradeoff is that it requires more upfront setup and monitoring. If you're curious about going beyond simple water propagation, exploring how to grow plant x in a controlled system is a logical next step once you have the basics down.
Terrariums
A terrarium is a closed or semi-open clear glass or plastic container filled with small plants, and it essentially creates its own miniature water cycle. Moisture evaporates, condenses on the glass, and drips back down to the roots. If you stop seeing condensation on the inside of a closed terrarium, that's your signal to add a little water. Terrariums are great for moisture-loving plants like mosses, ferns, and small tropical species.
The one firm rule for terrariums: no direct sunlight. Direct sun through glass creates a greenhouse effect that can cook your plants quickly. Bright indirect light is ideal. Open terrariums work similarly but lose moisture faster, so they suit plants that prefer slightly drier conditions, like succulents and air plants.
Neither hydroponics nor terrariums are better than soil in an absolute sense. They're tools for specific situations. If you have very little space, want to grow indoors year-round, or just want a visually interesting project, they're worth trying.
How to help plants grow upward: support, pruning, training, and light
Some plants need help growing in the right direction. Vines, tall perennials, and climbing plants in particular benefit from physical support and intentional training. Getting this right makes the difference between a plant that grows into a beautiful vertical feature and one that flops over and breaks its own stems.
Stakes and cages are the simplest supports. Insert a bamboo stake close to the main stem without damaging the roots, and use soft ties or velcro plant tape to loosely attach the stem. The tie should be snug enough to guide growth but loose enough that it doesn't cut into the stem as it thickens. For sprawling plants like tomatoes, a cage works better than a single stake because it supports branches from multiple directions.
Pruning shapes the plant and redirects energy. When you remove a growing tip, the plant responds by pushing growth to side branches, which creates a fuller, bushier shape. Pinching the top of a leggy basil plant or cutting back a sprawling pothos stem are both examples of this principle in action. Always cut just above a leaf node (the point where a leaf meets the stem) using clean, sharp scissors or pruning shears.
Light positioning drives direction of growth more than anything else. Plants grow toward their light source. Rotate your indoor pots a quarter turn every week or two to encourage even, upright growth rather than a plant leaning dramatically to one side. For outdoor plants, placing taller species on the north side of a bed ensures they don't shade shorter ones and that all plants get adequate sun exposure. Understanding when to plant, throw, and grow specific varieties also affects how well you can position plants for optimal light from the start of the season.
When your plant stops thriving: diagnosing common problems
Plants communicate through their leaves, stems, and roots. Once you know the signals, you can usually diagnose the problem quickly and fix it before it becomes fatal.
| Symptom | Likely Cause | What to Do |
|---|---|---|
| Yellowing leaves | Nutrient deficiency, root rot, too much or too little light, or sap-sucking insects/mites | Check roots for rot, adjust light, inspect for pests, resume balanced feeding |
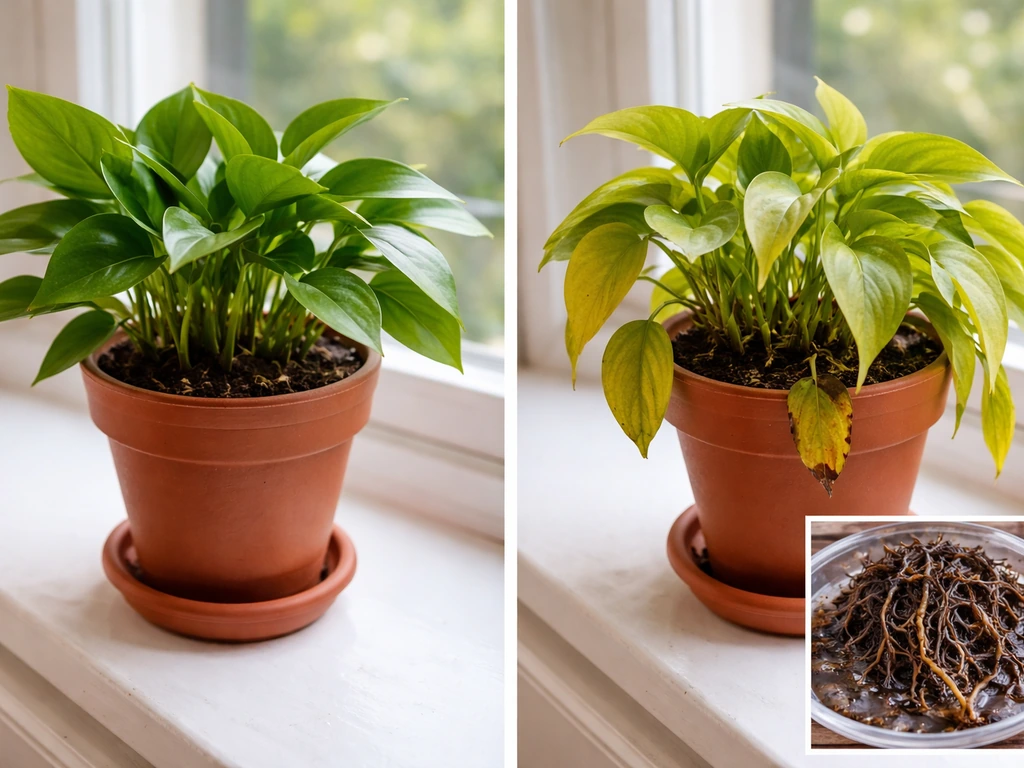
| Wilting despite wet soil | Root rot from overwatering (roots can't deliver moisture) | Unpot and inspect roots; trim black/mushy ones, repot in fresh dry mix |
| Wilting with dry soil | Drought stress: roots don't have access to water | Water thoroughly, then address whether you need to water more frequently |
| Leaf drop or drooping | Poor culture, pest damage, or disease | Inspect roots and undersides of leaves; isolate from other plants if pests are found |
| Pale, small, or leggy growth | Insufficient light | Move closer to window or add a grow light |
| Slow or no growth | Wrong temperature, low light, nutrient deficiency, or root-bound pot | Check all four variables; repot if roots are circling the drainage holes |
Root rot is worth emphasizing because it's so common indoors and gets misread as underwatering. The plant wilts, so the instinct is to water more, which makes it worse. If a plant is wilting in moist soil, take it out of the pot and look at the roots. Healthy roots are white or tan and firm. Rotted roots are brown to black, mushy, and may smell. Trim off anything damaged, let the roots air out for a few hours, and repot in fresh, well-draining mix.
For pests, the most common indoor culprits are fungus gnats (which live in wet soil), spider mites (fine webbing on undersides of leaves), and mealybugs (white cottony clusters). Isolate affected plants immediately to stop spread, then treat with neem oil, insecticidal soap, or appropriate systemic treatments depending on severity. Managing stock plants for propagation requires extra vigilance here, since any pest you miss can spread to every cutting you take.
Thuja care: how to grow thuja plant step by step
Thuja is one of the most popular evergreen shrubs and trees for hedges, privacy screens, and landscape structure. The two most commonly planted types are Thuja Green Giant (a fast-growing hybrid that can reach 40 to 60 feet at maturity) and Emerald Green Arborvitae (Thuja occidentalis 'Smaragd'), which stays compact at 10 to 15 feet and is slower-growing. The care principles are similar for both, with a few differences in spacing and sun tolerance.
Site selection and light
Thuja does best in a location that gets around six hours of sun per day. Emerald Green is slightly more flexible and tolerates part shade, ideally with 4 to 6 hours of sun, but both varieties perform best in full sun. Avoid shaded spots, especially if you're planting as a privacy hedge, because poor light leads to thin, sparse growth that defeats the purpose.
Soil requirements
Plant Thuja in well-drained soil. Waterlogged soil is one of the fastest ways to kill established Thuja. Emerald Green specifically prefers moist, neutral-pH soil and does not require acidic conditions, which means you don't need to amend your soil with sulfur the way you would for blueberries or azaleas. If your soil drains poorly, mound the planting area slightly or work in coarse sand and organic matter before planting.
Spacing
Spacing depends on what you're trying to achieve. For a dense privacy hedge using Green Giant, plant 5 to 6 feet apart. For a more open screen or specimen planting, 8 to 10 feet gives each tree room to develop its natural form. Emerald Green, being narrower at maturity (about 3 to 4 feet wide), can be planted 3 to 4 feet apart for a tight hedge. Crowding plants too close speeds up initial coverage but causes long-term crowding, poor airflow, and increased disease risk.
Planting steps
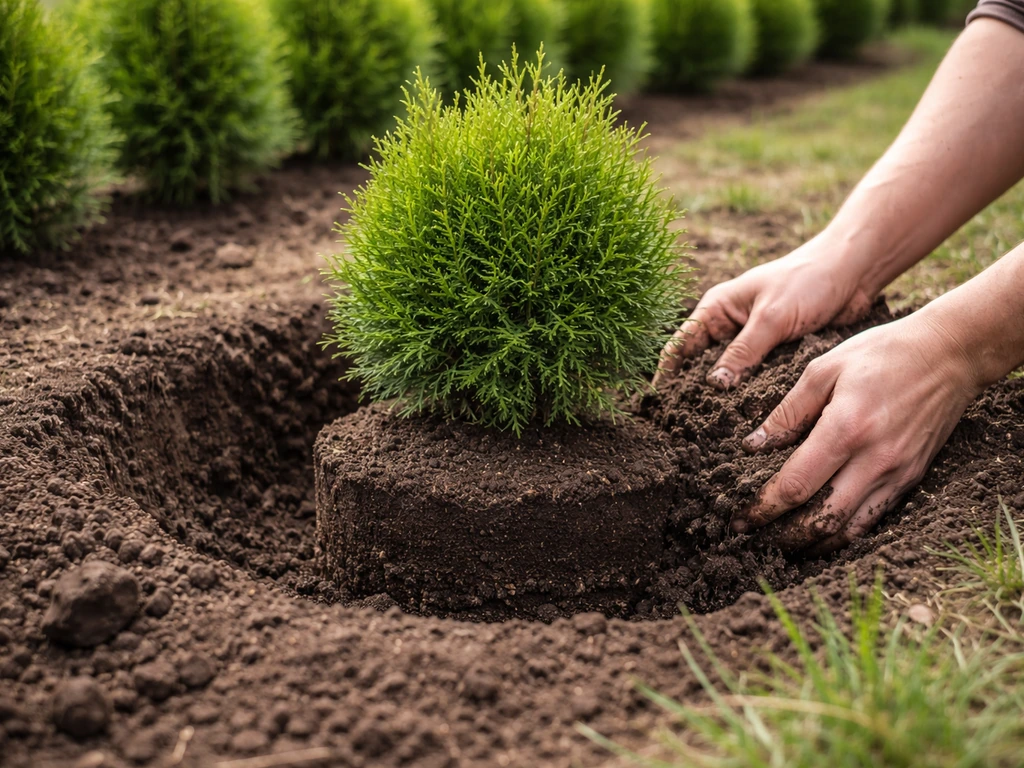
- Dig a hole that is 2 to 3 times wider than the root ball but no deeper. The top of the root ball should sit at or just slightly above ground level.
- Loosen the sides of the hole with a fork to help roots spread outward easily.
- Remove the container or burlap wrapping. If burlap is natural, you can leave it folded back around the bottom, but remove all synthetic wrapping and wire cages.
- Set the tree in the hole and check that it stands straight. Backfill with the native soil you removed, tamping it down in layers to eliminate air pockets.
- Water thoroughly after planting to settle the soil around the roots.
- Mulch a 2- to 3-inch layer around the base, keeping mulch a few inches away from the trunk to prevent rot. Mulch conserves moisture and moderates soil temperature.
Watering after planting
For the first two weeks after planting, water on any day that hasn't had significant rainfall. This establishment phase is when Thuja is most vulnerable. After that, gradually reduce watering frequency as the plant sets new roots. Once fully established, which typically takes about six months of active growth, Thuja is relatively drought-tolerant and only needs supplemental water during extended dry periods. Don't let this toughness trick you into neglecting newly planted trees, though. Dry root balls in the first season are the number one cause of Thuja failure.
Ongoing maintenance
Thuja generally needs very little pruning if you've spaced it correctly and chosen the right variety for the space. Light shearing in late spring after new growth flushes keeps a hedge tidy without stressing the plant. Avoid cutting back into old wood with no green foliage, because Thuja does not regenerate well from bare wood. Fertilize in early spring with a slow-release balanced fertilizer to support vigorous new growth. Watch for bagworms, which are the most common pest on Thuja, and remove egg masses by hand in winter or treat with Bt (Bacillus thuringiensis) in late spring when larvae are small.
Putting it all together
Every plant, whether it's a seedling in a 4-inch pot, a hydroponic lettuce raft, or a row of Thuja along a property line, needs the same core inputs: light, water, nutrients, and a root environment that lets it breathe. The specific amounts differ by species and setting, but the principles stay constant. Start by matching your plant to your actual conditions rather than forcing a mismatch, keep a close eye on what the leaves are telling you, and adjust based on what you observe. If you've killed plants before, that experience isn't wasted. It's data.
If you're growing plants in a game environment rather than your actual home or yard, the mechanics are surprisingly instructive. For example, looking at how to grow and harvest a plant on Sims Freeplay or even exploring ark plant species x and how to grow them can actually reinforce the same core concepts of light, water, and timing in a low-stakes environment before you apply them in real life. And for anyone curious about unusual container setups, there's even a guide on how to grow plants in a teapot in Genshin that explores creative growing vessels, which mirrors the real-world principle that almost any container works as long as drainage and root space are addressed.
FAQ
My plant is not growing, should I water more or add fertilizer?
Start by checking light hours and intensity first. If you cannot place the plant in a brighter spot, choose a lower-light species instead of increasing water or fertilizer, since weak light makes plants use less water and nutrients and raises the risk of rot.
What is the right way to water a potted plant without overwatering?
If the soil is dry 1 inch down, water thoroughly until it drains from the bottom, then empty the saucer. Frequent small sips keep roots near the surface, so the plant stays stressed even though the top looks moist.
How can I tell if wilting means underwatering or root rot?
Not always. Wilting can come from dry soil or from root damage where roots cannot take up water. If the soil feels moist and the plant wilts, inspect roots for rot instead of watering again.
Can I use garden soil for indoor pots or hydroponics?
Use a potting mix that matches the method. For soil, choose a mix with drainage, and do not reuse old potting soil that has compacted. For hydroponics, never add soil to the reservoir, and keep nutrient solution depth and reservoir cleanliness consistent to prevent oxygen and nutrient swings.
When should I fertilize after repotting or buying a new plant?
You generally want to fertilize during active growth, not after big stress events. If a plant is just repotted, wait a couple of weeks, then use a diluted balanced fertilizer, because strong feeding during recovery can burn roots.
Why does my indoor humidity reading not match how plants look?
A low-cost hygrometer tells you humidity, but placement matters. Keep it away from the humidifier stream, radiators, or direct sun. If humidity is low, raising it too fast can encourage fungus, aim for gradual changes into the target range.
How do I acclimate a plant when moving it from low light to a brighter window?
Move slowly and watch for leaf scorch or sudden droop. For most plants, increase light over 7 to 14 days, and rotate the pot gradually so the plant adapts evenly instead of leaning then stretching.
Can I grow faster with stronger light in a hydroponic system?
Yes, but do it with timing. For hydroponics like DWC, check oxygenation and nutrient concentration before adding light and growth boosters, and keep the system clean, because algae grows fast in bright, stagnant reservoirs.
My terrarium stopped condensing, what should I do?
In a closed terrarium, condensation is normal, but absence of condensation usually means low moisture in the system. If it is dry inside, add water in small amounts and re-cover to restore the cycle, then avoid moving it into direct sun.
Is bright sun okay for a terrarium if it is behind glass?
If a plant is in a terrarium and the container is exposed to sun through glass, temperatures can spike quickly even on mild days. Ensure the terrarium sits in bright indirect light and that leaves are not touching the hottest glass wall.
How often should I adjust plant ties or stakes?
Replace an inconsistent support plan. Tying too tightly can cut into stems as they thicken, so re-check ties every 2 to 4 weeks and loosen as needed. Also, avoid staking after major root disturbance if possible.
What are common pruning mistakes that stunt growth?
Yes, and it is easier to fix than people think. Prune above a leaf node for branching, remove only a small fraction at a time for delicate plants, and disinfect tools because pruning wounds can spread disease between plants.
How do I prevent Thuja from dying from drainage problems?
For Thuja, recheck the root zone after heavy rain or when heat waves hit. If your area stays wet, improve drainage with mounding or amended mix, because Thuja failure often happens from persistently waterlogged soil, even if watering seems “reasonable.”
Does the USDA hardiness zone guarantee Thuja survival?
If you live near a zone boundary, use a buffer and choose the hardiest variety that matches your worst winter lows. For hedges, also plan spacing for airflow, because dense Thuja in poor circulation increases fungal issues.
My Thuja hedge looks sparse, should I fertilize more?
Yes. Thuja hedges often look “thin” because of insufficient hours of sun, not lack of fertilizer. First correct light exposure, then fertilize in early spring, because feeding a shaded hedge usually does not thicken it.
What should I check first when Thuja starts yellowing?
If you see yellowing, first check drainage and watering patterns, then inspect for pests like bagworms. For indoor or container Thuja-like evergreens, also confirm they are not sitting in cold drafts or near vents that cause rapid temperature swings.
What is the biggest mistake people make when switching from soil to hydroponics?
Use different root-zone rules. In DWC you must prioritize aeration and clean water, while in soil you prioritize drainage and not keeping the mix constantly wet. Mixing expectations causes failures, so treat each method’s “non-negotiable” as its main rule.