Growing show plants at home means one thing: raising houseplants that look genuinely impressive, not just alive. We're talking lush, healthy foliage, compact and vigorous growth, clean leaves, and a polished presence that makes someone walk into your space and immediately ask, "What is that?" The good news is you don't need a greenhouse, a grow tent, or a horticulture degree. You need the right plant for your conditions, a consistent routine, and a few finishing habits that separate a thriving specimen from a sad houseplant that's just surviving.
How to Grow Show Plants at Home: A Step-by-Step Guide

Marcus Holloway
17 Apr 2026
What "show plant" actually means and how to pick yours
A show plant is simply a plant you're growing to its full visual potential, whether that's massive, glossy leaves, a perfectly trained climbing vine, or a tight rosette of striking variegated foliage. It doesn't have to be rare or expensive. The goal is display quality: healthy, compact, polished, and grown to look its best rather than just kept alive in a corner.
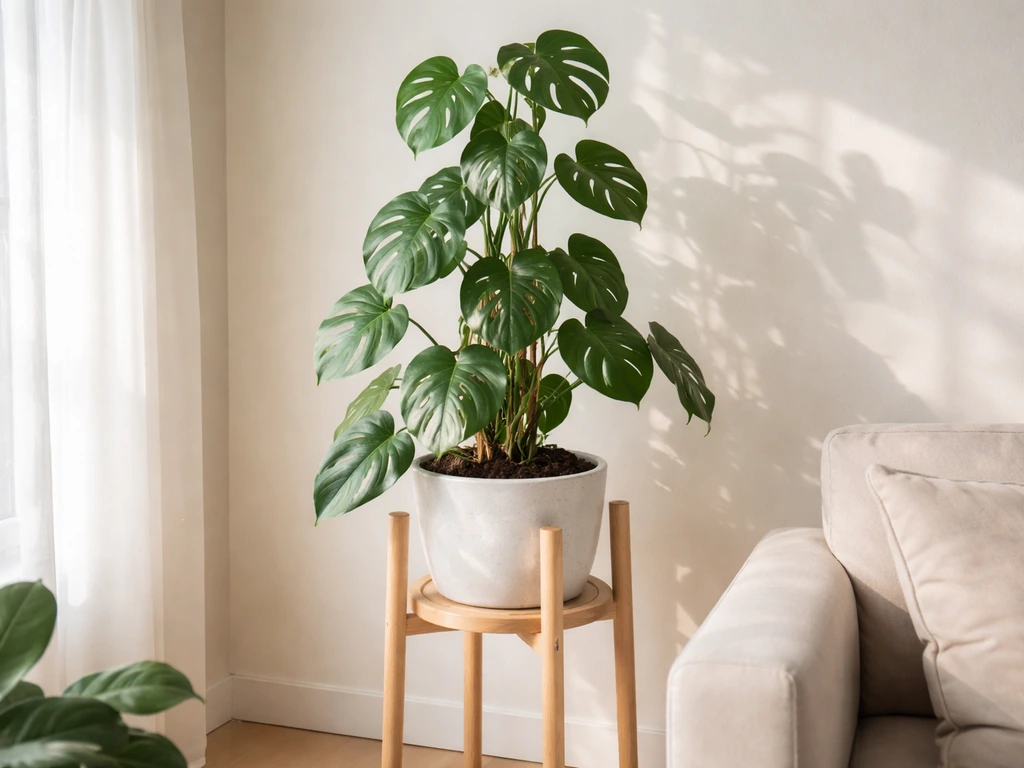
The single most important decision you'll make is matching the plant to your actual conditions. Most popular houseplants grown for show are foliage plants, which is a good thing. Many houseplants that would need greenhouse conditions to flower can still produce genuinely stunning leaves all year round indoors. Monstera deliciosa, for example, is one of the most visually impressive plants you can grow at home, with its dramatic split leaves, and it trains beautifully as a specimen.
Rubber plants (Ficus elastica) bring large, shiny, leathery leaves and tolerate lower light and less frequent watering than most, which helps them hold their display look without constant fussing. For north-facing rooms or genuinely dim spots, pothos and philodendrons are your workhorses. They're listed repeatedly by extension programs as reliable choices for lower-light conditions, and in the right spot they can still look spectacular.
When picking your show plant, think about the "glow-up" goal first. Do you want a large floor specimen with architectural presence? A trailing plant on a high shelf? A compact, dense foliage plant on a windowsill? Your answer narrows your plant list immediately. Then look honestly at your light. That's the one constraint you can't fake your way around, and we'll cover it in detail next. If you want a broader starting framework for choosing and caring for houseplants, the guide on how to grow plant in home covers the foundational decisions well.
Light, location, and timing: the biggest driver of display quality
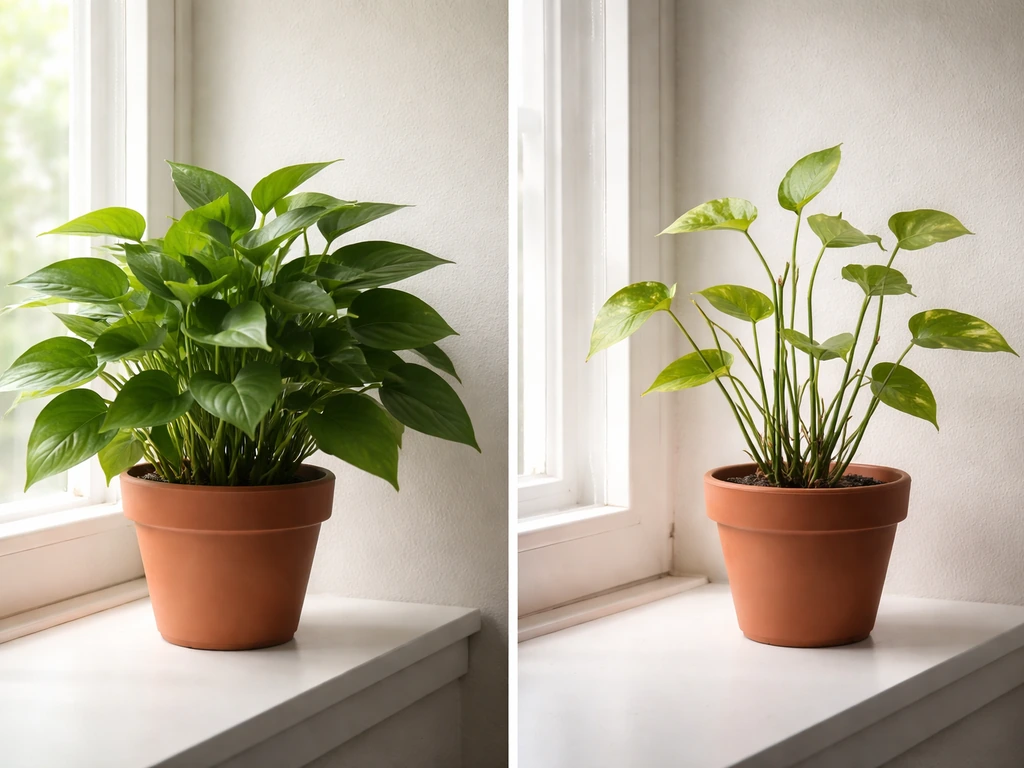
Light is where most show-plant ambitions succeed or fail. Plants in continuously poor light become spindly with yellow foliage and produce little or no new growth. That's not a watering problem or a fertilizer problem. It's a light problem. And no amount of feeding will fix it.
For foliage houseplants, you're generally aiming for medium to high light, with most tropical foliage plants doing best at roughly 100–200 µmol/m²/s (PPFD) as a practical target. For a light science guideline focused on foliage, Ariumology suggests a common target PPFD range of roughly 100, 250 µmol/m²/s for tropical foliage houseplants a practical target.. Flowering or more demanding plants push that higher, toward 500–1,000 foot-candles or more. If you're measuring in lux at typical indoor distances and only getting 3,000–5,000 lux, that's often not enough for fast, compact, show-quality growth. The visual cues are reliable: stretched stems reaching toward the light source, fading variegation, and smaller new leaves than the old ones all signal insufficient light.
Window placement matters a lot. South- and east-facing windows are almost always your best options for a wide range of show plants. North-facing windows don't receive enough direct sunlight to support bright-light-loving plants, so if that's what you're working with, stick to proven lower-light performers like pothos or philodendron rather than fighting your conditions. West-facing windows work well but can deliver intense afternoon heat that stresses some tropical foliage plants, so watch for leaf scorch.
If your natural light is genuinely limited, grow lights are a legitimate and increasingly affordable solution. Many growers run their lights around 12 hours per day as a practical baseline, keeping a consistent schedule rather than leaving lights on whenever they remember. A simple outlet timer costs very little and removes the guesswork entirely. Full-spectrum LED grow lights placed at the appropriate distance for your chosen PPFD target will produce noticeably more vigorous, compact growth compared to relying on a dim window alone.
Setting up your home growing space: soil, pots, and water-based options
Most show plants are happiest in a well-draining potting mix in a container with drainage holes. This isn't negotiable for soil growing. Without drainage, you will overwater eventually, and overwatered roots cannot support the lush, vigorous foliage you're after. For tropical foliage plants like monsteras, pothos, or rubber plants, a standard quality potting mix with added perlite (roughly 70% mix, 30% perlite) improves drainage and aeration without much cost or effort.
Pot size matters more than most beginners expect. A pot-bound plant may need watering so frequently that moisture management becomes a daily scramble, and growth slows down noticeably. On the other hand, oversized pots hold excess moisture that roots haven't accessed yet, which invites root rot. The rule of thumb: repot when roots start filling the container and circling the bottom, typically moving up one pot size at a time (about 1–2 inches larger in diameter).
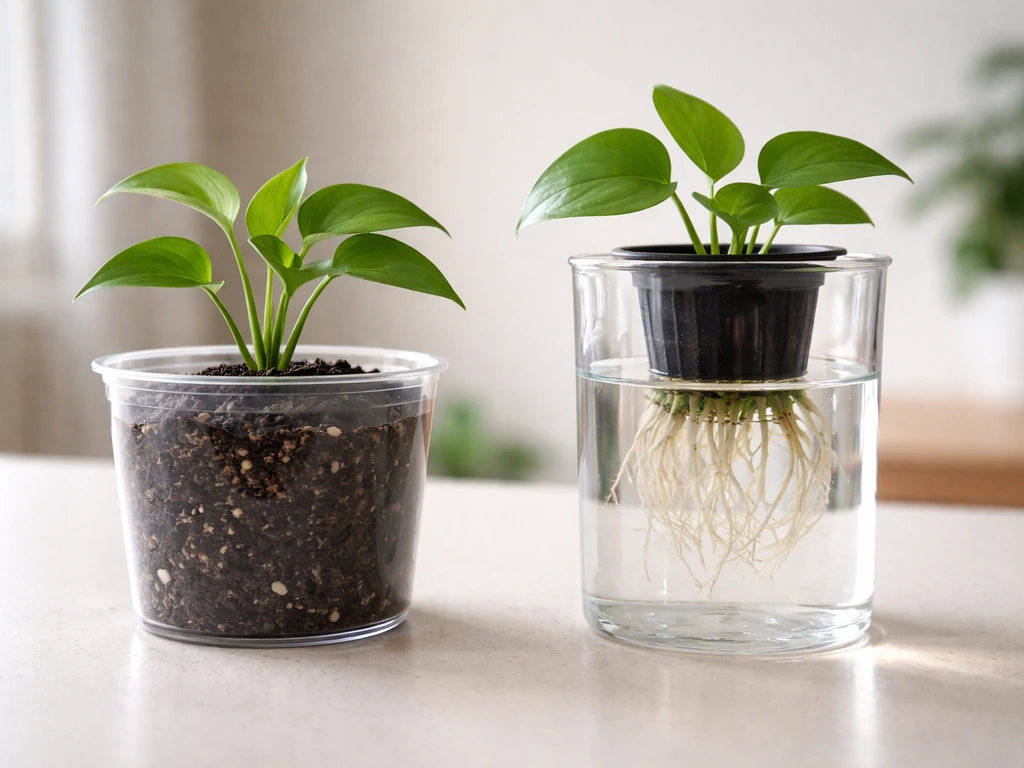
If you're interested in water-based or alternative growing methods, many show-quality foliage plants adapt well. Pothos and philodendrons root and grow happily in water, and monsteras can be kept in hydroponic setups. The same principle applies in any medium: roots need oxygen as much as water, so if you're growing in water, use a container that allows light in (to support beneficial microbes) and change or aerate the water regularly.
For closed terrarium setups, the stable humidity and temperature environment actually suits some tropical plants beautifully, though airflow management becomes your main concern. If you're curious about exploring different growing approaches, you'll find a lot of useful overlap with the techniques covered in how to grow your own plants at home.
A quick comparison: soil vs. water growing for show plants
| Factor | Soil (Container) | Water / Hydroponic |
|---|---|---|
| Setup cost | Low – standard pots and potting mix | Low to moderate – clean containers, nutrients needed |
| Watering effort | Moderate – check soil moisture regularly | Regular water changes or top-offs required |
| Root visibility | Hidden | Visible, which can be a display feature |
| Risk of overwatering | Moderate if drainage is poor | Lower if aerated properly |
| Best plant types | Most houseplants | Pothos, philodendron, monstera, peace lily |
| Display flexibility | Wide range of pots and styles | Glass vessels look elegant but limit pot choice |
| Recommendation | Best all-around choice for beginners | Great for specific plants and modern minimalist displays |
Watering, feeding, and managing growth for real results
Improper watering is the single biggest cause of houseplant injury and death. Full stop. It's not pests, it's not fertilizer, it's water. The two mistakes beginners make are watering on a fixed schedule ("every Sunday") without checking the soil, and blank" rel="noopener noreferrer">letting plants stand in water for extended periods. Neither works. Instead, check the soil by feel and color: push your finger an inch into the soil, and if it feels dry and the soil color is lighter, it's time to water. If it still feels moist and looks dark, wait. Plants should not wilt, but they also must not sit in water for long stretches.
Feeding is simpler than most people make it. For show-quality growth, a balanced liquid fertilizer diluted to half strength, applied during the active growing season (roughly spring through early autumn), is the reliable default. The frequency depends on your season, light levels, temperature, and potting medium, so there's no single fixed schedule that works for every plant in every room.
A practical approach: fertilize after the plant has had a normal watering and the soil has partially dried, not when the plant is stressed or the soil is bone dry. Avoid the temptation to fertilize heavily thinking it will push faster growth. Overdoing fertilizer causes leaf damage and salt buildup in the soil, which is the opposite of the polished look you're going for. When in doubt, do less and observe the response.
Temperature and humidity round out the growth environment. Most tropical foliage show plants prefer 60–80°F (15–27°C) and humidity above 40–50%. Grouping plants together raises ambient humidity naturally. A pebble tray with water under the pot adds modest moisture to the microclimate around the plant. If your home is very dry (common in winter with central heating), a small humidifier near your plants will produce a visible improvement in leaf quality, especially for monsteras and other large-leafed tropicals. Good airflow is also worth thinking about. Stagnant air encourages fungal issues and pest problems, so gentle circulation from a fan a few feet away benefits both plant health and display quality.
These care fundamentals apply whether you're just starting out or refining an established collection. For a broader look at making all your houseplants perform well, the tips to grow plants at home resource covers many of these same principles from a different angle.
Pruning, training, grooming, and keeping pests away
This is where "just alive" becomes "show quality." Pruning, training, and grooming are the finishing work that makes the difference, and most of it takes only a few minutes at a time.
Pruning and training
Pruning removes leggy, damaged, or crowded growth and encourages the plant to redirect energy into strong new shoots. For most foliage plants, cut just above a leaf node (the point where a leaf meets the stem) using clean, sharp scissors. When you take cuttings for propagation, make sure each cutting has at least one healthy node, which is the key to rooting success.
Regular pruning not only improves the plant's shape but gives you free propagation material to grow additional specimens or share with others. Training climbing plants like monsteras onto a moss pole or trellis as they grow produces a more structured, impressive specimen than letting them sprawl, and it mimics their natural growth habit well enough that they reward you with larger, better-formed leaves over time.
Grooming and leaf care
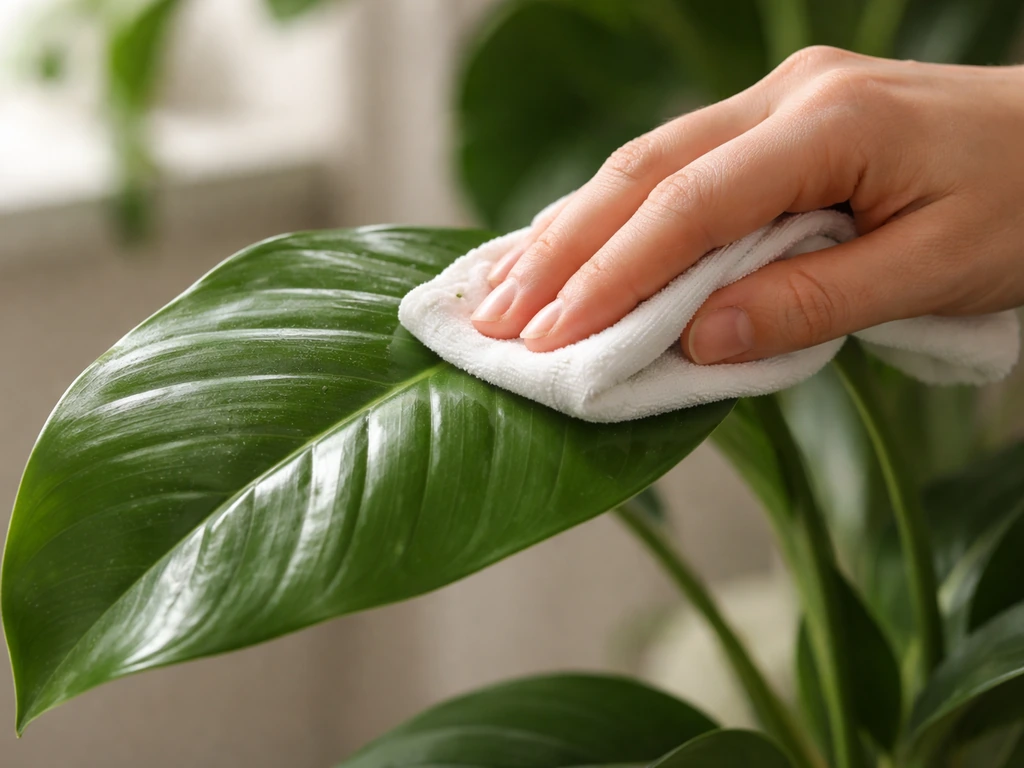
Dust on leaves isn't just cosmetic. It reduces the amount of light the leaf can absorb and makes an otherwise healthy plant look dull and neglected. For non-hairy leaves, a damp cloth is the gentlest and most effective cleaning method. Support the leaf from underneath with one hand while you wipe with the other to avoid stressing the stem. Do this every few weeks and the difference in how plants look under any light source is immediate. One thing to avoid: commercial leaf-shine products. These can leave residue and interfere with the leaf's natural functions, and honestly, a clean leaf doesn't need any product to look good.
Pest and disease management
Pests will find your plants eventually. The key is catching them early, before they damage enough foliage to set back a plant's appearance significantly. The most common culprits are spider mites (look for fine webbing on leaf undersides), mealybugs (white cottony clusters in leaf joints), scale insects (brown bumps on stems), and fungus gnats (tiny flies around the soil surface).
For spider mites and mealybugs at early infestation, wipe affected areas with cotton swabs dipped in rubbing alcohol or apply insecticidal soap, making sure to cover undersides of leaves thoroughly. For scale, horticultural oil is generally the most effective treatment. For fungus gnats, the larvae live in the soil and damage roots, so a soil drench containing Bacillus thuringiensis israelensis (Bti) breaks the larval cycle effectively.
Prevention is much easier than treatment. Quarantine every new plant for two to four weeks before placing it near your existing collection. This one habit alone prevents most pest introductions. Periodically washing leaf surfaces with water removes early-stage pest populations before they establish, and it keeps foliage looking clean. If you spot a problem, remove infested plant parts while the issue is still localized rather than waiting to see how it develops. The approach to how to grow green plants with consistently healthy foliage really does come down to this kind of early, consistent intervention.
Fixing the most common home growing problems
Even with a solid setup, things go wrong. Here's how to diagnose and fix the issues beginners hit most often, quickly.
| Problem | Most likely cause | Quick fix |
|---|---|---|
| Yellowing leaves | Overwatering or too little light | Check soil moisture first (reduce watering if wet), then assess light levels and move plant closer to a window or grow light |
| Leggy, stretched growth | Insufficient light | Move to a brighter spot or add a grow light; prune leggy stems to encourage bushier regrowth |
| Leaf drop | Temperature shock, drafts, or sudden light change | Keep plant away from cold drafts and heating vents; avoid moving plants abruptly from low to high light |
| Slow or no new growth | Low light, pot-bound roots, or underfeeding | Check root mass and repot if root-bound; increase light; resume feeding schedule during growing season |
| Brown leaf tips | Low humidity, fluoride in tap water, or salt buildup from fertilizer | Increase humidity, switch to filtered water, and flush soil occasionally to reduce salt accumulation |
| Fading variegation | Insufficient light | Move to a brighter location; variegated plants need more light than solid-green versions of the same species |
| Wilting despite wet soil | Root rot from overwatering | Remove plant from pot, trim black or mushy roots, repot in fresh dry mix, and reduce watering frequency |
A note on recovery: plants take time to bounce back. If you fix the underlying cause, give the plant a few weeks before expecting visible improvement. New leaves emerging healthy is the confirmation that your fix worked. Don't panic-water, panic-fertilize, or panic-move a recovering plant. Stability helps more than constant adjustments.
If you're also growing foliage plants specifically for their rich green color and want to understand what drives that intense, healthy coloration, the detailed breakdown in how to grow green plants at home is worth reading alongside this guide.
Simple routines and a growth plan to keep everything on track
Consistency beats intensity every time with plants. A brief, regular routine produces far better results than occasional intensive care sessions. Here's what a practical weekly and monthly rhythm looks like for home show plants.
Weekly habits
- Check soil moisture on all plants by feel, not by schedule. Water only what needs it.
- Look over leaves top and bottom for early pest signs: webbing, sticky residue, or unusual spots.
- Wipe down one or two plants per week so leaf cleaning stays on rotation rather than becoming a big project.
- Rotate pots a quarter turn so all sides of the plant receive even light and growth stays balanced.
Monthly habits
- Feed plants with diluted liquid fertilizer during spring and summer. Skip or reduce feeding in autumn and winter when growth naturally slows.
- Check root health: if roots are circling the bottom or pushing through drainage holes, plan a repot into the next size up.
- Prune any leggy, damaged, or crowded growth. Use healthy cuttings for propagation.
- Assess your light setup. As seasons change, window angles shift, and a plant that had great light in summer may need to move or get supplemental lighting in winter.
A 30-day starter growth plan
- Week 1: Choose your show plant based on your actual light conditions (not your wishlist). Set up the container with well-draining mix, position it in your best light spot, and quarantine any new plant away from existing ones for at least two weeks.
- Week 2: Establish your watering rhythm by checking the soil every two to three days and recording when it needs water. This builds your feel for that specific plant in that specific pot.
- Week 3: Do a full pest inspection and clean all leaves. If using a grow light, confirm your timer is set and running at a consistent schedule each day.
- Week 4: Feed for the first time if the plant has settled in and shows healthy new growth. Assess overall light response: is new growth compact and similar in size to existing leaves? If yes, you're on track. If new leaves are smaller and stems are stretching, increase the light.
From week four onward, you're just maintaining and refining. Most show plants look noticeably better within six to eight weeks of a consistent, well-matched routine. The biggest shift most beginners report is learning to slow down: fewer adjustments, more observation, and trusting that the right conditions produce the results on their own timeline. If you want to expand your collection or experiment with different plant types as your confidence grows, the how to grow hanging plants at home guide is a natural next step for adding vertical and trailing show elements to your space.
FAQ
Should I rotate my show plants to keep them looking symmetrical?
Yes, but only if the plant gets enough usable light. Rotate the pot every 1 to 2 weeks so leaves grow evenly toward the light, and avoid frequent repositioning within the same day, which can trigger temporary leaf droop. If you are using a grow light, rotation is usually optional, but it still helps for highly phototropic plants.
How do I tell if my plant is being overwatered versus just needing more light?
Overwatering is the most common reason “show plants” never look polished. Use drainage holes, empty saucers after watering, and make watering decisions from soil moisture (not a calendar). If you consistently see damp soil for several days after watering, either repot into a better-draining mix (with more perlite) or reduce watering frequency, but do not increase fertilizer to compensate.
Can I fertilize to speed up show-quality growth?
Feed less often than you think, and never “rescue” a weak plant with heavy fertilizer. For most foliage show plants, half-strength balanced fertilizer during active growth is the default, and you should fertilize only after a normal watering when the top portion of the mix has partially dried. If you see browning leaf tips or a crusty buildup on the soil surface, flush with plain water and pause feeding for a few weeks.
Do I need to repot my show plants every year for best appearance?
For many foliage plants, a small amount of root crowding is fine, and sometimes beneficial for maintaining dense growth. The repot signal to watch is roots circling and filling the pot bottom, not just slow growth. When you do repot, increase pot size gradually (around 1 to 2 inches in diameter) to avoid excess wet soil.
Should I prune to fix leggy growth, or is it always a light problem?
Not always. If your plant is losing showy variegation, shrinking leaves, or stretching stems, the fix is usually light, not pruning. You can remove the least attractive growth, but if the underlying light is too low, new leaves will repeat the problem. Use pruning as a shaping tool once light and watering are already stable.
What’s the safest way to take cuttings from a plant I’m growing for display?
Gently, and at the right time. For cuttings of show plants, include at least one healthy node and keep the cutting bright and warm, but not in harsh direct sun until it roots. If you root in water, change or aerate the water regularly to prevent oxygen-poor conditions, and once roots are established, transition gradually to potting mix rather than moving instantly.
How often should I clean the leaves for a “show plant” look, and what should I avoid?
Wiping leaves improves appearance, but don’t over-clean. A damp cloth is best for non-hairy leaves, and you should avoid doing it under bright sun that could cause temporary spotting. If the plant has a lot of dust, clean over multiple sessions rather than scrubbing aggressively, and steer clear of leaf-shine products that can leave residue.
Are pebble trays enough, or should I use a humidifier for indoor show plants?
If humidity is low, a humidifier often helps more consistently than pebble trays because it raises ambient moisture rather than only the microclimate at the pot surface. Aim for at least 40 to 50% humidity for most tropical foliage plants, and place the humidifier near your plants but ensure airflow so you do not create stagnant, overly wet conditions that invite fungal issues.
What’s the best way to stop fungus gnats without harming my plant?
Fungus gnats are a strong hint of a moisture issue in the top layer of the mix, plus often a lack of drying between waterings. Let the top portion of the soil dry more between waterings, and use a targeted soil treatment for larvae when needed. Yellowing shoots plus visible pests may indicate another problem, so check the plant and the soil surface rather than only treating the adults.
How long should I run grow lights for show-quality foliage?
Yes, but keep the schedule consistent and avoid “always on” if your plants are reacting badly. A common baseline is about 12 hours per day, then adjust based on response, such as tighter growth and stable leaf color. If leaves bleach or develop scorch-like patches, reduce light intensity or increase distance, and if growth stays leggy, increase exposure or brightness.
Why does my plant look worse after I “fix” one problem?
If leaves are dropping quickly, don’t change everything at once. First stabilize light, watering, and temperature, then wait a few weeks for new growth to confirm recovery. Constantly switching windows, watering habits, and fertilizer during recovery can delay stabilization, because plants respond to changes on a longer timeline than we expect.
How strict should I be about quarantining new plants?
Quarantine is crucial, especially when you are building a show-worthy collection. Keep new plants separate for 2 to 4 weeks, inspect leaf undersides and joints, and only then move them near your established specimens. If you see early pests, remove affected parts while the issue is localized, since treating after an infestation spreads usually takes longer.