Growing plants successfully comes down to matching the right plant to your conditions, then building a simple routine around light, water, and nutrients. You don't need a greenhouse, a big yard, or years of experience. You need a few reliable principles and the willingness to observe your plants and adjust. This guide walks you through everything from picking your first plant to troubleshooting leaves that are turning yellow, and it covers soil, water growing, hydroponics, and terrariums so you can grow in whatever space you actually have.
Tips on How to Grow Plants: Soil, Water, Hydroponics, Terrariums

Marcus Holloway
18 Apr 2026
Start with the right plant for your space and experience level
The single biggest mistake beginners make is choosing a plant that doesn't fit their environment, then blaming themselves when it dies. Start by honestly assessing your light. A north-facing apartment window or a dim office isn't a death sentence for plants, but it does narrow your options significantly. If you're working with a low-light spot, reach for proven survivors: pothos, snake plant, ZZ plant, spider plant, and philodendron are all genuinely tolerant of lower light conditions and inconsistent watering. These aren't consolation prizes. They're legitimately beautiful, fast-growing plants that will build your confidence.
If you want flowering plants, know that most need more light than foliage plants. A snake plant might adapt to a shaded corner, but it typically needs medium light to actually bloom. Flowering potted plants also prefer more stable temperatures, doing best at around 65 to 75 degrees Fahrenheit during the day and 55 to 60 degrees at night. If your space fluctuates a lot (near a drafty window or an air vent), stick to foliage plants until you dial in the conditions.
For a structured look at what comes next after you've picked your plant, the steps to grow plants breaks down the full sequence in a clean, easy-to-follow format. But let's get into the specifics right here.
Plant basics: light, water, soil, temperature, and nutrients
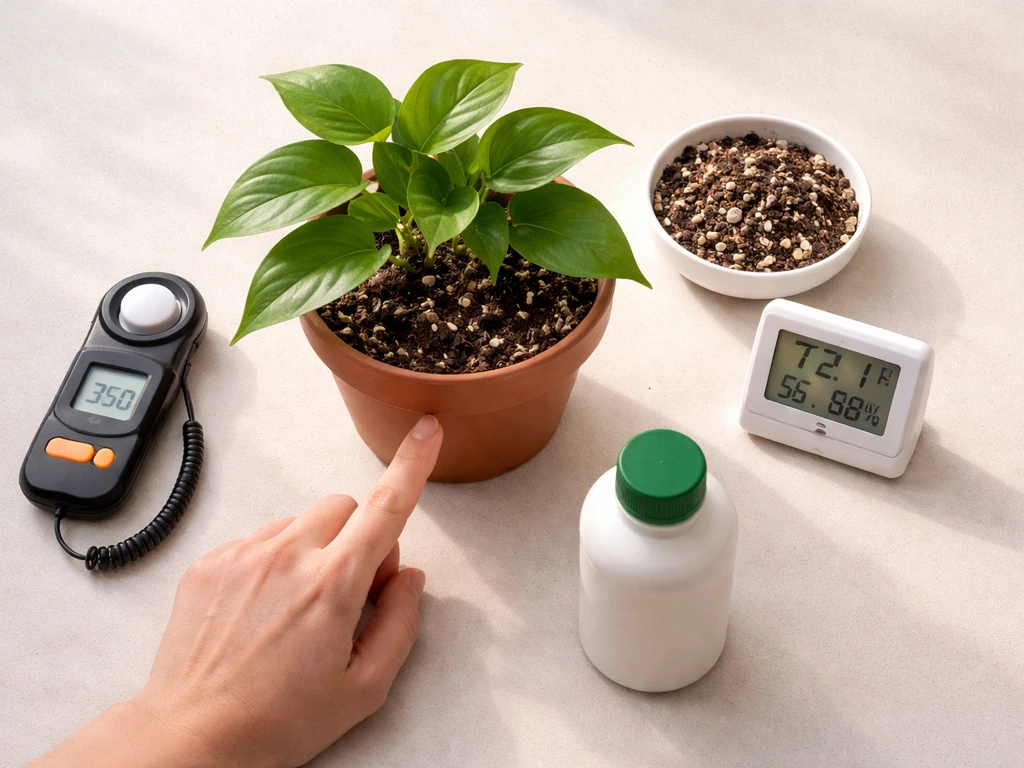
Think of these five factors as the dials on a mixing board. Every plant has a sweet spot for each one, and your job is to get them all into a range where the plant can thrive. You don't need perfection. You need to be in the right zone.
Light
Light is measured in foot-candles (fc). Low light is roughly 25 to 75 fc, which is what you'd find well away from a window in a typical room. University of Maryland Extension notes that low light for indoor plants is roughly 25, 100 foot-candles and lists common low-light houseplants such as ZZ plants and snake plants [Low light is roughly 25 to 75 fc](https://www. extension.
umd. edu/resource/lighting-indoor-plants). Medium light is 75 to 200 fc, usually within a few feet of a bright window with indirect sun. High light is 200 fc and above, typically in a south-facing window or under a grow light.
If a plant is getting too little light, it will tell you: new leaves come in small and pale, stems stretch toward the nearest light source, and overall growth slows to almost nothing. More on that in the troubleshooting section.
Water
Water when the top few centimeters of soil feel dry to the touch. That simple check beats any fixed schedule because it accounts for seasonal changes, humidity shifts, and the fact that different pots dry out at different rates. Don't water on a calendar. Water based on what the soil is actually doing.
Soil and growing medium
Most houseplants do fine in a good-quality all-purpose potting mix. The key thing the soil needs to do is drain well while retaining enough moisture to keep roots hydrated between waterings. Dense, compacted soil that stays soggy is a fast track to root rot. If your mix feels heavy and doesn't drain, add perlite to open it up.
Temperature and humidity
Most common houseplants are comfortable in the same temperature range as people: 60 to 80 degrees Fahrenheit. Where things go wrong is with cold drafts from windows in winter, heat blasting from vents, or sudden drops when plants get moved outside unprepared. Humidity matters more for tropical plants. If you have ferns or calatheas dropping leaves, a small humidifier or a pebble tray with water near the plant can make a real difference.
Nutrients
Fertilizer is fuel, not medicine. It supports healthy, active growth but won't rescue a plant that has a root or light problem. For most houseplants, a balanced liquid fertilizer diluted to half strength is a safe, effective approach. You can apply a very dilute dose at every watering, or fertilize once every third or fourth watering at a slightly stronger (but still label-diluted) rate. Either method works. The half-strength habit just removes the risk of over-fertilizing, which can burn roots. Stop or reduce fertilizing in fall and winter when most plants slow their growth naturally.
Step-by-step setup: containers, drainage, and planting
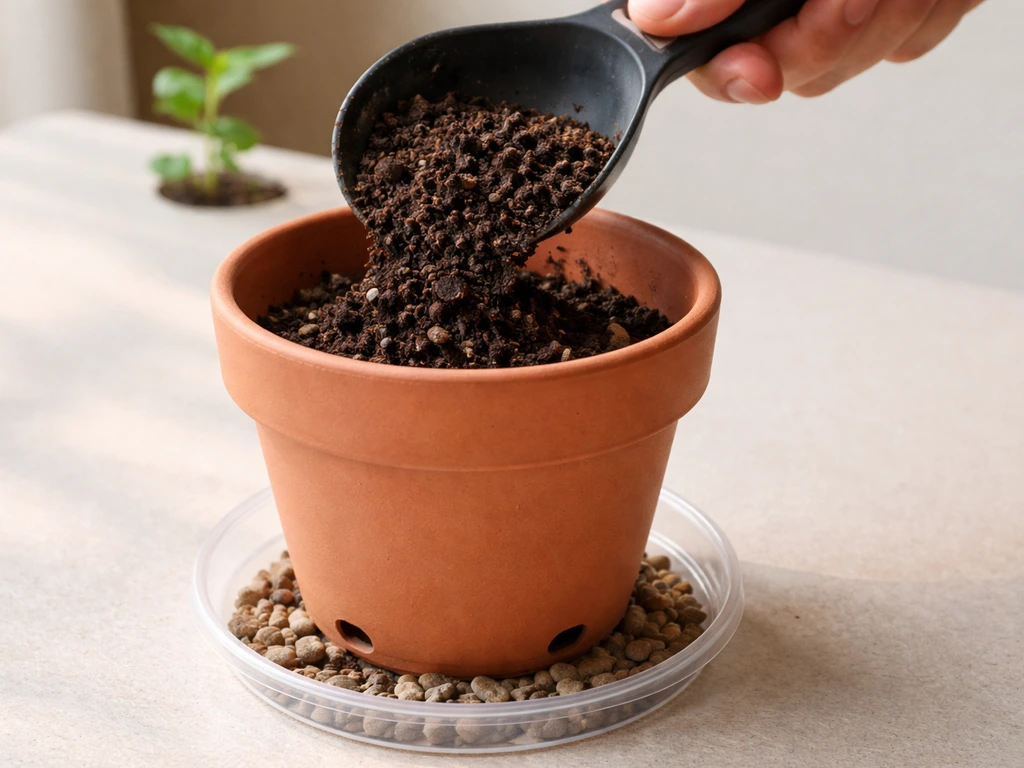
Getting the setup right from the start saves you a lot of headaches. Here's how to do it properly.
- Choose a container with drainage holes. This is non-negotiable for most plants. Containers without holes trap excess water at the bottom, which rots roots. Decorative pots without holes can be used as cache pots (drop a plain nursery pot inside), but make sure to empty any water that collects in the bottom after watering.
- Pick the right size. Bigger is not always better. A pot that's too large holds more soil than the roots can absorb water from, which means the outer soil stays wet for too long. Go up by about 2 inches in diameter when potting up from a smaller container.
- Add a layer of potting mix to the bottom of the pot, then set your plant in and check the height. The top of the root ball should sit about an inch below the rim of the pot so water doesn't just run off the sides when you pour.
- Fill in around the sides with fresh potting mix, pressing gently to remove large air pockets. Don't compact it too hard or roots will struggle to push through.
- Water thoroughly after planting until water runs from the drainage holes, then let the soil dry slightly before the next watering. This helps settle the mix and encourages roots to spread.
- For outdoor container gardening, remember that pots dry out significantly faster than in-ground beds, especially in warm weather, so check soil moisture more frequently than you think you need to.
If you want a more condensed version of this process, the 4 steps to grow a plant distills setup into a quick reference you can come back to.
Watering and feeding schedules that prevent over- and under-watering
Over-watering is the number one way people kill houseplants, and it almost never looks like drowning. It looks like yellowing leaves, wilting despite wet soil, and a smell of rot coming from the pot. The plant looks sad, so you water more, and things get worse. Under-watering, by contrast, usually shows up as dry, crispy leaf edges and soil that's pulling away from the sides of the pot.
The most reliable watering method is the feel-and-appearance approach: stick your finger an inch or two into the soil. If it feels damp, wait. If it feels dry and the soil looks lighter in color, water. You can also lift the pot. A light pot means dry soil. A heavy pot means there's still moisture in there. These physical checks tell you much more than a fixed schedule ever will.
When you do water, water slowly and thoroughly, making sure the water reaches the bottom of the pot and drains out the holes. Shallow watering only wets the top inch of soil, which trains roots to stay near the surface instead of growing deep. That makes plants more vulnerable to drying out quickly.
For fertilizing, build it into your watering routine rather than treating it as a separate task. If you water twice a week, add a half-strength liquid fertilizer to one of those waterings during the growing season (roughly spring through early fall). In winter, most houseplants slow down and don't need as much feeding. Giving heavy fertilizer to a plant that isn't actively growing can actually damage it.
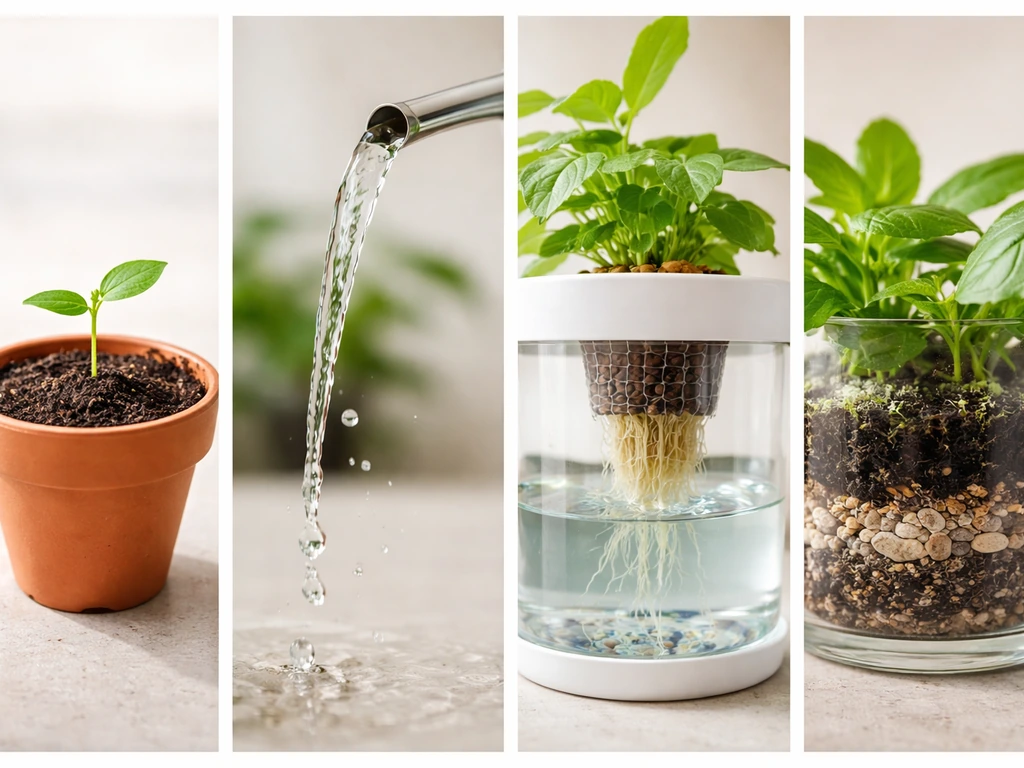
Growing by environment: soil vs. water vs. hydroponics vs. terrariums
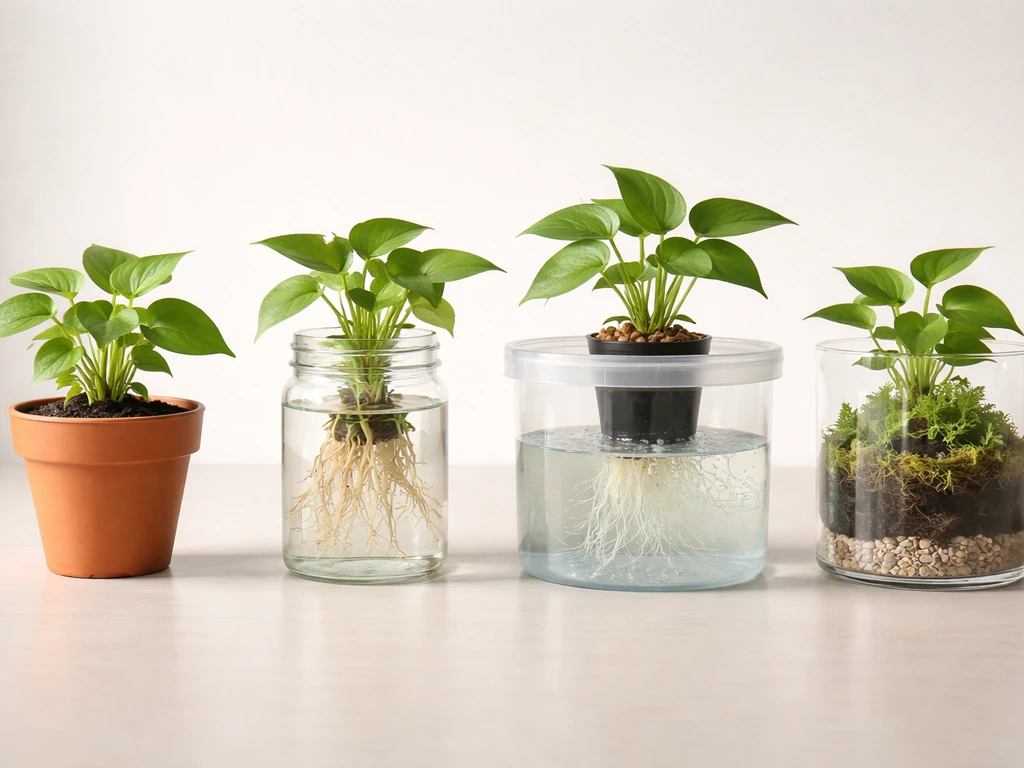
The growing medium you choose changes how you manage water, nutrients, and oxygen at the roots. Here's what's different in each method and what to watch for.
Soil growing
Soil is the most forgiving medium and the best starting point for most people. It buffers moisture, holds nutrients, and supports beneficial microbial life that helps roots absorb what they need. The main risks are compaction over time and salt buildup from fertilizers, both of which you can manage by refreshing the top inch of soil annually and repotting every year or two.
Water growing (passive hydroculture)
Some plants, like pothos and philodendron, can grow long-term in just water. Take a cutting, strip the lower leaves, place the stem in a jar of water with the nodes submerged, and put it in indirect light. Change the water every one to two weeks to prevent stagnation and algae buildup. Add a few drops of liquid fertilizer diluted very heavily once a month once roots are established. This is a low-commitment way to try growing without soil.
Hydroponics

In a hydroponic system, roots are surrounded by a nutrient solution instead of soil. In a deep water culture (DWC) setup, plants sit in net pots above a reservoir of nutrient solution, with their roots hanging directly into it. Because the roots are submerged with minimal water movement, aeration is critical. An air pump connected to an air stone bubbles oxygen through the solution and keeps roots from suffocating.
Without adequate aeration, roots rot even in clean water. Hydroponics can produce faster growth than soil because nutrients are delivered directly to roots, but it requires more monitoring of pH and nutrient levels. If you're curious about a more detailed breakdown, guidance on how to grow plants step by step covers these systems in more depth.
Terrariums
A closed terrarium creates a self-contained humid microclimate that works beautifully for tropical plants, mosses, and ferns. The layering matters: start with a drainage layer of pebbles or gravel at the bottom, then add a layer of activated charcoal mixed into the growing medium to prevent odors and microbial buildup. Add a thin layer of sphagnum moss over the drainage zone to keep the growing medium from filtering down into it, then top with your planting mix. One important note: research suggests that using rocks, sand, or charcoal alone as the drainage layer isn't as effective as once believed, so the charcoal works best mixed into the medium rather than as a standalone drainage solution.
Closed terrariums retain moisture well, but they can also get too humid. If you see heavy condensation on the glass that doesn't clear, partially open or briefly remove the lid to vent it, then re-cover once condensation subsides. The enclosed environment is also a risk for pests and pathogens, so inspect any plants or materials carefully before they go in. For more on building a beautiful terrarium from scratch, the gardening documentation for growing plants resource includes terrarium-specific planning guidance.
| Method | Best for | Main advantage | Main challenge | Skill level |
|---|---|---|---|---|
| Soil | Most houseplants, beginners | Forgiving, buffers moisture and nutrients | Overwatering, compaction over time | Beginner |
| Water growing | Pothos, philodendron, cuttings | No soil mess, easy to see root development | Algae, needs regular water changes | Beginner |
| Hydroponics (DWC) | Fast growth, leafy plants | Rapid growth, no soil-borne pests | Requires aeration, pH monitoring | Intermediate |
| Terrariums | Ferns, mosses, tropical plants | Self-regulating humidity | Pest/pathogen risk, humidity management | Beginner to intermediate |
Troubleshooting common problems
Most plant problems trace back to one of the five basics: light, water, soil, temperature, or nutrients. When something looks wrong, work through that list before reaching for a spray bottle of pesticide.
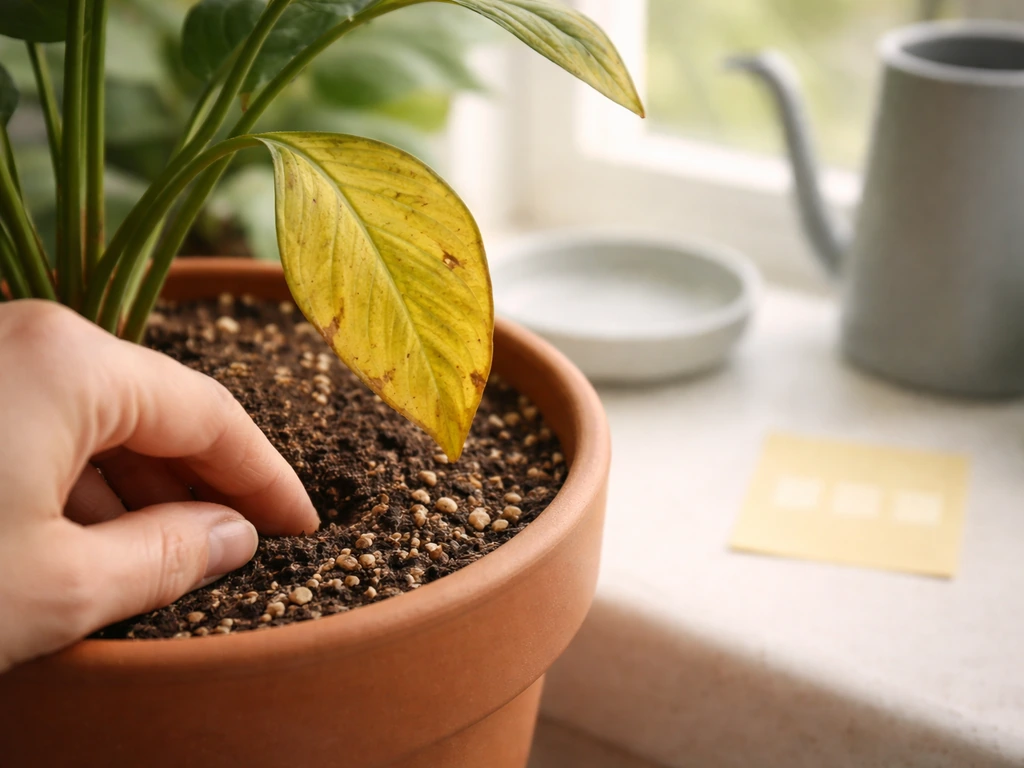
Yellow leaves
Yellowing is one of the most common symptoms and one of the most frustrating because it has multiple causes. Lower leaves yellowing and dropping gradually can point to overwatering (root damage), underwatering, insufficient light, or low nutrient levels. Check the soil first. If it's soggy, ease off watering and check the roots for rot (they'll be brown, mushy, and smell bad). If the soil is bone dry, water thoroughly and the plant may perk up within hours. If watering is fine, evaluate the light. A plant that's not getting enough light will slowly shed its lower leaves as it abandons them to redirect energy upward.
Wilting
Wilting can happen from too little water or too much. The difference: if the soil is dry and the plant is wilting, water it. If the soil is wet and the plant is wilting, you likely have root rot. In that case, stop watering immediately, unpot the plant, trim any rotted roots (brown, mushy tissue), let them air-dry briefly, and repot into fresh, well-draining mix. Cold exposure can also cause sudden wilting, so check whether the plant has been near a drafty window or exterior door.
Leggy growth
If your plant is producing long, stretched stems with wide gaps between leaves, it's reaching for more light. This is called etiolation. Move the plant closer to a brighter window, or add a grow light. You can trim the leggy stems to encourage bushier growth. The trimmed pieces can often be used as cuttings to propagate new plants.
Pests
Fungus gnats are common, especially on newly purchased houseplants or plants that stay too wet. The larvae live in moist soil and feed on roots. The fix is straightforward: let the top inch or two of soil dry out between waterings. The larvae need moisture to survive, and consistent drying interrupts their life cycle. For scale and mealybugs, which look like white cottony masses or brown bumps on stems, dab them with a cotton swab soaked in rubbing alcohol. The alcohol dissolves the waxy coating that protects them, killing them on contact. Check the undersides of leaves and stem joints where they hide.
Fungal issues
Powdery mildew shows up as a white, dusty coating on leaf surfaces. It thrives in warm, humid conditions with poor air circulation. Remove affected leaves, improve airflow around the plant (a small fan helps), and avoid getting water on the foliage when watering. In more stubborn cases, registered fungicides formulated for home use are an option, but fixing the environment usually does more good long-term than spraying alone.
Nutrient deficiencies
Pale or yellowing new leaves often point to a nitrogen deficiency. Yellowing between leaf veins while veins stay green suggests iron or magnesium deficiency. Before adding more fertilizer, check whether the soil pH is off (in soil growing, most nutrients become unavailable if pH drifts far from 6.0 to 7.0). For most houseplant situations, switching to a complete balanced fertilizer and applying it at half strength resolves the issue within a few weeks.
For a comprehensive look at common visual symptoms and what causes them, tips to grow flowering plants includes specific guidance on diagnosing nutrient and light problems in plants that are trying to bloom.
Propagation and repotting: when and how to grow more plants
When to repot
Repot when roots are circling the bottom of the pot, growing out of the drainage holes, or when the plant dries out much faster than it used to (a sign the roots have consumed most of the usable soil space). Spring is the ideal time because plants are entering their active growth phase and can recover quickly from the disruption.
Go up by about 2 inches in diameter, not more. When you remove the plant, untangle or trim any circling roots so they don't continue to spiral and eventually strangle the plant. If you see white crusty deposits on the soil surface or the inside of the pot, that's salt buildup from fertilizers. Scrape away the top inch of old soil before repotting, and rinse the pot thoroughly. Place fresh mix in the bottom, set the plant at the right height, fill in the sides, and water well.
How to propagate
Propagating from seed is rarely the most practical route for indoor houseplants. The faster, more reliable methods are stem cuttings, leaf cuttings, division, offsets (plantlets), and layering. The method depends on the plant.
- Stem cuttings: Cut a 4 to 6 inch section just below a node (the point where leaves attach). Remove lower leaves, let the cut end callous for an hour or two, then place in water or moist potting mix. Works well for pothos, philodendron, basil, and many more.
- Leaf cuttings: Works for succulents, snake plants, and African violets. Remove a healthy leaf, let it dry briefly, then lay it on or insert it into moist mix. New plantlets emerge from the base.
- Division: For clumping plants like spider plants, peace lilies, or ZZ plants. Remove the plant from its pot, gently separate the root mass into sections, and pot each section individually.
- Offsets and plantlets: Spider plants produce hanging babies (spiderettes) that can be pinned to soil in a nearby pot while still attached to the mother plant, or cut off and rooted in water.
- Layering: A stem is partially wounded and pinned to soil or wrapped with moist sphagnum moss until roots form, then cut from the parent plant. Useful for larger plants like rubber trees or monstera.
Keep cuttings in bright indirect light while they root, and don't fertilize until you see new growth, which signals that roots have established. Fertilizing before that point stresses a plant that isn't yet equipped to absorb nutrients effectively.
If you want to walk through the full propagation-to-establishment process in order, these 5 steps on how to grow plants maps it out from first cut to thriving plant. And if you're building a documented care plan for multiple plants, the step-by-step guide to growing plants can help you structure that routine from the beginning.
Build your routine and keep adjusting
The best plant care routine is one you'll actually do consistently. Start simple: check your plants once or twice a week, feel the soil, look at the leaves, note anything that seems off. Over time, you'll build an intuition for what each plant needs. You'll notice when a plant is thirsty before it wilts, or when new growth looks pale and feed it before it becomes a problem.
Plants fail for everyone, including experienced growers. A plant that didn't survive isn't a personal failure. It's data. It tells you something about light, water, or medium that you can adjust next time. The growers who end up with thriving, full spaces are the ones who kept showing up, kept adjusting, and didn't let a few losses stop them from trying again. If you want a practical framework for building that routine from scratch, a detailed how-to for growing plants gives you a clear path forward, regardless of where you're starting from.
FAQ
How do I figure out if my plants need more light or just better watering?
Do a 3 to 5 day check using the soil first. If the soil is staying wet, increase light or reduce watering, since extra water in low light is a common cause of root problems. If the soil dries quickly and leaves look pale or growth slows, light is often the limiting factor. When in doubt, adjust light gradually (a few inches or a slight move toward the window) and keep the watering method the same so you can see which change actually helps.
Should I rotate my plants to prevent leaning or uneven growth?
Yes, rotate about a quarter turn every 1 to 2 weeks. This reduces one-sided stretching because plants naturally grow toward the brightest side. Avoid rotating right after repotting or during rapid recovery from stress, since roots and leaves can be sensitive to sudden changes.
What’s the best way to tell if my pot has drainage problems?
Look for consistently damp soil and water pooling in the saucer 15 to 30 minutes after watering. If the pot feels heavy long after watering or the soil smells sour, drainage is likely poor. Make sure holes are clear, use a potting mix that drains well, and never let the plant sit in a standing-water tray for long periods.
Is misting or using a spray bottle a good substitute for watering?
Not for most houseplants. Misting raises humidity only briefly and often leaves the root zone dry, which can lead to weak, shallow root growth. Use misting for humidity-loving plants only as a short-term supplement, and prioritize watering based on the actual dryness of the soil.
How often should I fertilize, and what should I do if I’m not sure about the plant’s growth season?
When growth is active (typically spring through early fall), feed lightly at half strength using one watering in every few. If you see slow growth or new growth has stopped, back off because many plants naturally downshift. A practical rule is to adjust based on the plant’s behavior, not the calendar, and to skip fertilizer when the soil is bone dry or the plant is stressed.
My leaves are yellowing but the soil isn’t soggy, what else could it be?
If soil moisture checks out but yellowing persists, suspect low light, nutrient imbalance, or a buildup issue. Yellowing that starts on older leaves first can be normal in low light. If you also see white crust on the pot or the water runs straight through too fast, flush the soil with water to remove excess salts and consider refreshing the top inch before adding more fertilizer.
What should I do if I accidentally overwater and catch it quickly?
Stop watering immediately, then improve airflow and light so the soil can dry at a safer pace. If you see persistent wilting with wet soil, check roots sooner rather than later. For fast action, unpot and inspect for mushy, brown roots, trim rot, and repot into fresh well-draining mix.
How do I prevent fungus gnats besides just letting the top dry?
Use a multi-step approach: allow the top inch or two to dry between waterings, remove any decaying plant material, and consider a sticky trap to monitor adults. Letting the soil dry more thoroughly than you think you should is often the real breakthrough. If infestations are recurring, repot into fresh mix, since eggs and larvae can live in the old medium.
Are terrariums always self-sustaining once they’re set up?
They’re self-contained, but they still require monitoring. If condensation never clears, vent briefly and re-cover once it stabilizes, because constant high humidity can invite rot and mold. Also, trim plants early when they start crowding, since a dense canopy traps moisture and reduces airflow inside the sealed environment.
Can I use regular potting soil in a terrarium or hydro setup?
Usually not. Terrariums and hydro systems need a medium that supports the right balance of moisture and oxygen. Regular soil can compact and hold too much water in enclosed conditions. For hydroponics, the medium and nutrient solution are specific to the system and must be matched to the plant and aeration level.
What pH range should I aim for in hydroponics?
Aim for the range recommended for your specific plant and nutrient formula, since “good pH” depends on the system and product. If growth slows despite correct nutrients and light, test pH and adjust gradually, since sudden shifts can stress roots. Always measure pH with a calibrated meter, because small reading errors can lead to over-corrections.
How do I know whether to repot or just adjust my care routine?
Repot when the plant shows root crowding (roots circling the pot, growing from drainage holes) or when watering behavior changes significantly (drying much faster than before). If the plant is struggling right after repotting, wait and reassess. If it’s declining without root crowding, start with light and watering checks first, since repotting can add stress.
Is propagating in water always the best method for cuttings?
No. Water propagation works well for many stems, but some plants root better in perlite or propagation media with higher aeration. Also, don’t fertilize until you see new growth, and change water regularly to reduce stagnation. If roots stall, increase light slightly (bright indirect) and keep cuttings warm, since temperature affects root formation.