Growing nursery plants at home means following the same core workflow professional nurseries use: start young plants from seeds, cuttings, or divisions; keep them in controlled conditions until they are strong and rooted; pot them up as they grow; then transition them safely to their final home. You do not need a greenhouse or special equipment to pull this off. What you need is a clear process, the right starting mix, consistent light and water, and a bit of patience. This guide walks you through every step, from choosing how to start your plants all the way through hardening off and long-term care.
How to Grow Nursery Plants: A Step-by-Step Guide

Marcus Holloway
13 Apr 2026
What nursery-style growing actually means
When people say they want to "grow nursery plants," they usually mean one of two things: either they want to produce young plants the way a commercial nursery does, or they want to buy nursery starts and grow them on successfully. This guide covers both, because the skills overlap almost completely. How do nurseries grow plants at a commercial scale? They control three things obsessively: propagation environment, potting media, and the transition to outdoor or retail conditions. You can mirror all three at home.
Nursery-style growing has three distinct phases. First, propagation: starting a new plant from a seed, cutting, or division in a sterile, well-draining medium with high humidity and consistent warmth. Second, establishment: moving the rooted plant into a slightly larger pot, feeding it gently, and growing it on under good light until it is sturdy enough to handle real-world conditions. Third, hardening off: gradually exposing the plant to outdoor temperature swings, wind, and full sun so it does not go into shock when it hits its final spot. Skip any of these phases and you will run into the classic problems, leggy seedlings, damping off, or transplant shock.
Choosing your plants and how to start them
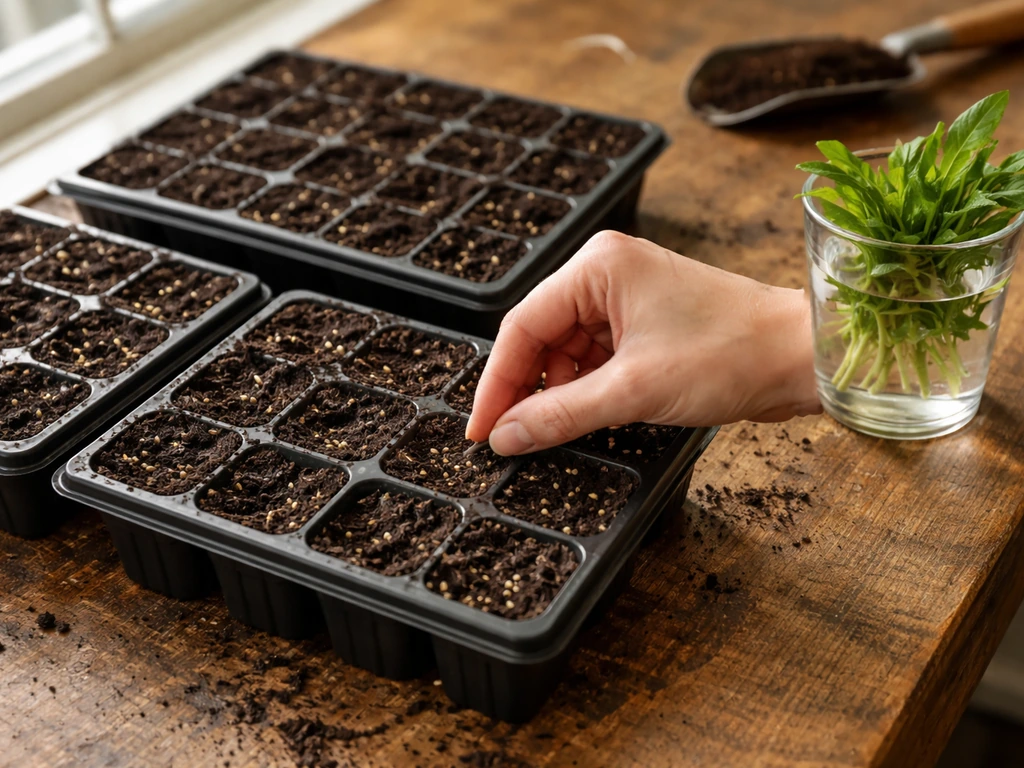
The starting method you choose depends on what you are growing and how much time you have. Seeds are the cheapest and most flexible option, great for annuals, vegetables, and many herbs. Cuttings are faster for woody or semi-woody plants like basil, coleus, pothos, or rosemary, and you get a genetically identical copy of the parent plant. Divisions work best for clumping perennials like hostas, ornamental grasses, or liriope, where you simply split an established root ball into sections. Understanding how do new plants grow from each of these starting points helps you pick the right method for your situation and set realistic expectations for timing.
| Starting Method | Best For | Time to Transplant-Ready | Key Risk |
|---|---|---|---|
| Seeds | Annuals, vegetables, herbs | 4–12 weeks | Damping off, legginess |
| Stem Cuttings | Woody/semi-woody plants, tropicals | 2–6 weeks to root | Rot if too wet, wilting if too dry |
| Leaf Cuttings | Succulents, begonias, snake plants | 3–8 weeks | Slow; needs patience |
| Divisions | Clumping perennials, grasses | 1–3 weeks to settle | Transplant shock if roots torn |
For cuttings, the nursery trick is intermittent misting: keeping the foliage hydrated while the cutting develops roots, without waterlogging the medium. Professional operations use automated mist systems, but at home you can replicate this with a simple humidity chamber, basically a clear plastic bag or dome over the cutting tray. Mist the inside of the dome once or twice a day and leave a small gap for airflow to reduce rot risk. Once you see new growth or feel resistance when you gently tug the cutting, roots have formed and you can remove the dome.
Picking the right growing medium and containers
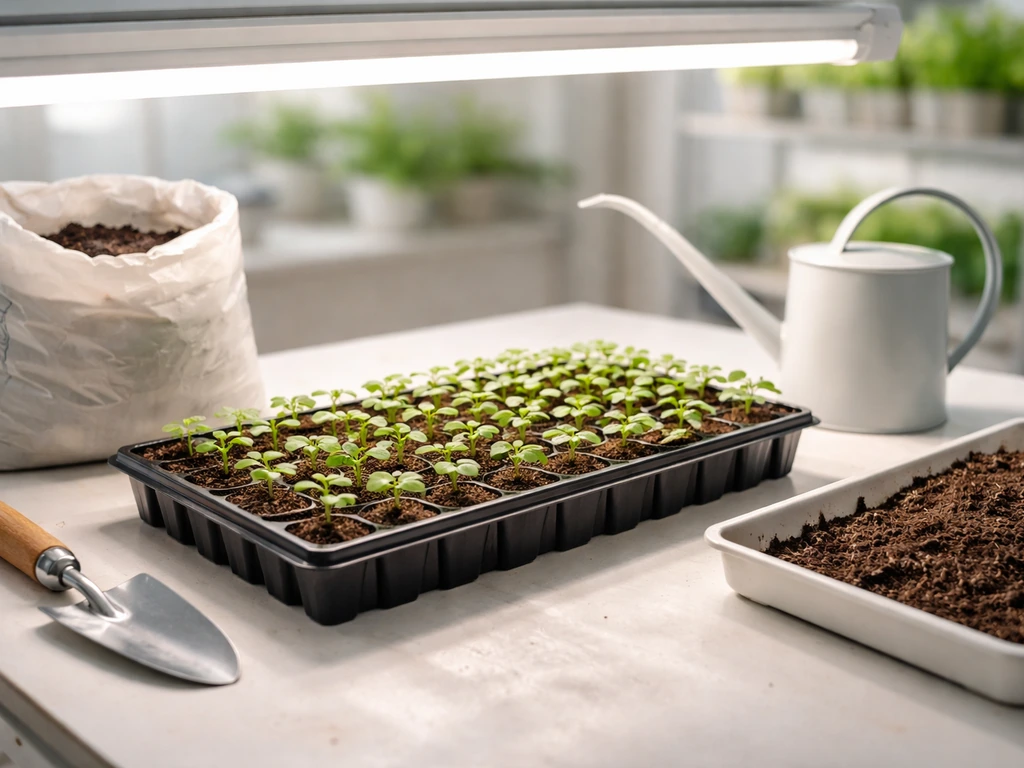
This is where a lot of beginners go wrong. Garden soil from your backyard is not suitable for starting seeds or rooting cuttings indoors. It compacts in small containers, drains poorly, and can introduce the soilborne pathogens that cause damping off. A quality soilless seed-starting mix, typically made from peat or coco coir, perlite, and vermiculite, gives you a sterile, lightweight medium that holds just enough moisture without suffocating roots. Penn State Extension puts it plainly: most commercial potting mixes are soilless specifically to avoid soilborne diseases and to promote drainage. For seeds and cuttings, buy a dedicated seed-starting mix rather than a standard potting mix, which is often too chunky for fine roots.
Container choice matters more than most people think. Small cells or plug trays (72-cell or 128-cell trays) are ideal for seeds because they limit overwatering and make potting-on easy. For cuttings, 2-inch or 3-inch pots work well. Drainage holes are non-negotiable. As plants grow, you will pot them up into progressively larger containers, matching the pot size to the root ball rather than jumping straight to a large pot, which holds excess moisture and invites root rot.
Alternative growing setups: hydroponics, water propagation, and terrariums
Not every plant needs soil. Tropicals, herbs, and many houseplants root readily in water, and some, like pothos, philodendron, and mint, can live in water long-term or be transitioned to a hydroponic setup once rooted. If you go the hydroponic route, oxygenation is the critical factor.
Oxygen-starved root zones are the primary driver of root rot in hydroponic systems, so whether you are using a simple Kratky-style container or a full nutrient-film setup, make sure roots are not sitting in stagnant, airless water. Terrariums are a genuinely useful option for small humidity-loving plants like ferns, mosses, and certain orchids, where the enclosed environment mimics the high-humidity propagation chambers nurseries use. They are less practical for large batches but perfect for a few specimen plants.
Light, temperature, and watering: matching nursery conditions
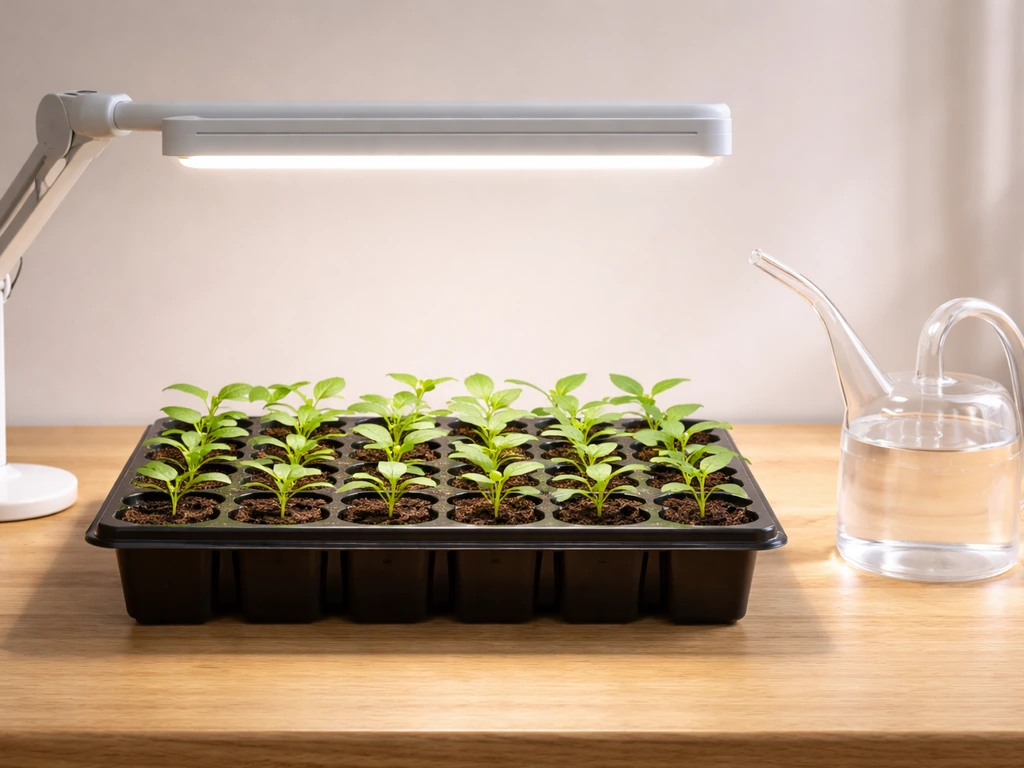
Light is the single biggest reason home-grown seedlings turn out leggy and weak. Most windowsills, even south-facing ones, do not deliver enough photosynthetically active light in late winter or early spring when you are starting seeds indoors. A dedicated LED grow light positioned 8 to 12 inches above the seedling tray for 14 to 16 hours a day is the most reliable solution.
If you mount the light higher, say 20 inches, you need more hours to deliver the same daily light integral (DLI). The principle is simple: more distance means more hours needed. A 16-hour photoperiod is a common nursery standard for vegetative growth, and you can achieve it with a basic outlet timer. Knowing how do plants and flowers grow in response to light duration helps explain why short winter days stall seedlings even when temperatures seem fine.
Temperature is the other lever. Most vegetable and annual seedlings germinate best between 65°F and 75°F (18–24°C). A heat mat under the tray speeds germination significantly for warm-season crops like tomatoes and peppers. Once germinated, drop the temperature slightly (60–70°F) to keep growth compact and stocky rather than stretchy. Avoid placing trays near cold windows at night, where temperatures can dip and slow growth unevenly.
Watering is where most seedling problems start. The goal is consistently moist but never waterlogged. Bottom-watering, placing the tray in a shallow dish of water and letting the mix absorb moisture from below, is one of the best habits you can build. It keeps the surface of the mix drier, which directly reduces damping-off risk. Water when the top quarter-inch of the mix starts to feel barely dry, not on a rigid daily schedule. The schedule that works on a warm, sunny day will overwater on a cool, cloudy one.
Fertilizing, rooting care, and the potting-up workflow
Seed-starting mixes have little to no fertilizer in them by design. For the first two to three weeks after germination, your seedlings are living off the nutrients packed inside the seed itself. Once the first true leaves appear (the second set of leaves, which look like the plant's adult foliage rather than the rounded seed leaves), it is time to start a gentle liquid feed.
A dilute balanced fertilizer at around 100 to 200 ppm nitrogen every watering is a good starting point. UMass Amherst's guidance for bedding plants suggests 200 ppm N at every watering or 300 to 400 ppm N once every 7 to 10 days once plants are established. Start at the lower end and watch the plants, not a rigid schedule.
Starter fertilizers, which are high in phosphorus, are particularly useful at transplant time because phosphorus supports root development and young roots have a limited zone to pull nutrients from. Penn State Extension describes starter fertilizers as placing readily available nutrients near the limited root zone early in seedling growth. A simple approach is to water transplants in with a dilute starter solution: roughly two teaspoons of a balanced liquid fertilizer per gallon of water works as a practical rule of thumb. Hold off on heavy feeding for the first week after transplanting to let roots settle.
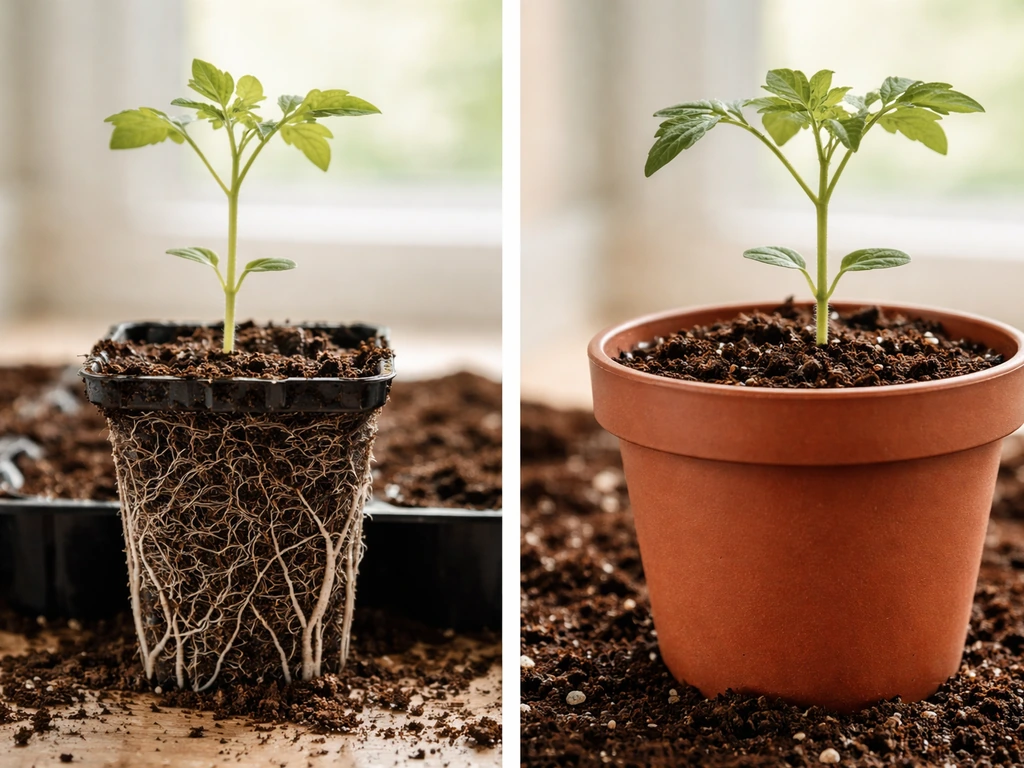
When and how to pot up
Pot up when you see roots circling the bottom of the cell or growing out of drainage holes, or when the plant looks clearly top-heavy for its container. Do not wait until the plant is completely rootbound, but do not rush either. Move up only one or two container sizes at a time. A 72-cell seedling goes to a 3-inch pot, then a 4-inch or 6-inch pot, then to its final location. Each time you pot up, use fresh soilless mix, water the plant in well, and return it to its normal light and temperature conditions. Plants grow step by step, and respecting that progression by not over-potting is one of the most underrated nursery habits you can adopt.
Common problems and quick fixes
Leggy seedlings
Leggy seedlings, those tall, floppy, pale ones that look like they are reaching for a light source they cannot find, are almost always a light problem. Not enough light intensity, too few hours per day, or a light source that is too far away.
The fix is to move the light closer (8 to 12 inches for most LED panels), extend the photoperiod to at least 14 hours, and if the seedlings are already stretching, bury them deeper when you pot up (this works especially well for tomatoes and similar plants that can root along buried stems). Temperature imbalance and overcrowding can also contribute, so thin seedlings early and make sure air can circulate around them.
If you want to build genuinely dense, compact foliage once plants are established, understanding how to grow more leaves on plants through light and pinching techniques is worth reading alongside this guide.
Damping off
Damping off is the sudden collapse of seedlings at the soil line, caused by soilborne fungal pathogens. The stem looks brown and water-soaked at the base, then the seedling just falls over. It spreads fast: once one seedling goes, neighbors are often already infected. The prevention strategy is straightforward: use sterile soilless mix (never garden soil in trays), bottom-water to keep the surface drier, avoid overcrowding, and run a small fan near the seedling area to improve air circulation.
Penn State Extension also recommends using bottom heat to keep the container medium warm, around 70, 75°F (22, 24°C), as part of damping-off prevention bottom heat to keep container medium warm (70–75°F / 22–24°C). If you see damping off, remove the affected seedlings along with the mix they were growing in immediately.
Monitor neighboring plants closely, because the pathogens spread through shared water and contact.
Fungus gnats
Fungus gnats are the tiny flies you see hovering around seedling trays. The adults are mostly just annoying, but the larvae live in moist soil and chew roots, which can stall or kill young seedlings. The control approach is two-pronged: hang yellow sticky traps near the trays to catch adults and monitor population levels, and drench the growing medium with a Bacillus thuringiensis israelensis (Bti) solution to kill larvae.
Bti is a naturally occurring bacterium that specifically targets gnat and mosquito larvae and is safe for seedlings. Apply it every 5 to 7 days in cycles until the population drops. The best long-term fix is letting the top inch of the medium dry out between waterings, since fungus gnats need consistently moist conditions to breed.
Nutrient problems
Pale yellow-green seedlings are usually nitrogen-deficient, especially if you have been growing them in a plain seed-starting mix for more than three weeks without feeding. Start a dilute balanced liquid fertilizer and you will see improvement within a week or two. Dark green, almost blue-green leaves with purpling on the undersides often indicate phosphorus deficiency, which is common when roots are cold (cold soil limits phosphorus uptake even if it is present in the mix). Warm the root zone and add a phosphorus-containing starter fertilizer. Burnt, crispy leaf tips usually mean fertilizer concentration is too high, so flush the medium with plain water and dial back the feeding rate.
Other pests
Spider mites, aphids, and whiteflies occasionally show up on seedlings kept indoors, especially in warm, dry conditions. The nursery approach to pest management is integrated pest management (IPM): start with the least-toxic option and escalate only if populations get out of hand. For most soft-bodied insects on seedlings, a dilute neem oil or insecticidal soap spray applied in the evening (to avoid light-magnification burn) handles the problem without harming beneficial insects or the plants. Neem's active compound, azadirachtin, interferes with insect molting and works well as a preventive measure in enclosed growing spaces. Keep tools and containers clean between uses and avoid bringing outdoor soil or unchecked plants into your propagation area.
Hardening off and what comes after

Hardening off is the process of slowly introducing your indoor-grown plants to outdoor conditions: fluctuating temperatures, wind, direct sun, and lower humidity. Plants grown indoors under artificial light or in a protected environment have thin cell walls and are not equipped to handle the intensity of direct outdoor sun right away. Skip this step and you will see bleached, scorched leaves within days, or worse, complete collapse.
Start hardening off about 7 to 10 days before your planned outdoor planting date or final pot placement. Begin with one to two hours of outdoor time in a sheltered, shaded spot on mild days. Gradually increase outdoor exposure by an hour or two each day, moving plants into more sun as the week progresses. Bring plants back inside if temperatures drop below 45°F (7°C) or if wind is strong. Once night temperatures stay consistently above 50°F, plants can stay outside overnight. Kentucky Extension guidelines suggest beginning this process 7 to 10 days before your area's frost-free date, which gives you a concrete calendar anchor to work from.
When you are ready to transplant into the final pot or garden bed, do it on a cloudy day or in the early morning or late evening to minimize heat stress. Water the plant thoroughly before you move it, handle the root ball gently to avoid tearing roots, and plant at the same depth it was growing (not deeper, which can rot the stem). Water in with a dilute starter fertilizer solution.
For the first week or two after transplanting, let the plant approach the point of almost wilting before watering again: this encourages roots to grow outward in search of moisture rather than sitting in a small wet zone. Hold off on heavy nitrogen feeding until you see new growth, which signals that the plant has recovered from transplant stress.
Transplant shock is real but usually temporary. The most common signs are wilting, leaf drop, and a temporary pause in growth. Plants under transplant stress are also more vulnerable to disease and pest pressure, so keep an eye on them for the first two weeks. Avoid making things worse by overwatering, fertilizing heavily too soon, or moving the plant around repeatedly. Stable conditions, consistent light, and restrained watering are the fastest route through the adjustment period.
Long-term care once your plants are established
Once your plants are through the hardening-off and initial transplant phase, the nursery workflow is essentially complete. Now you shift into standard growing care, but with a few nursery habits worth keeping. Continue potting up as plants outgrow their containers rather than letting them become severely rootbound. Match your fertilizer program to the plant's growth stage: higher nitrogen during active vegetative growth, less nitrogen and more phosphorus and potassium as plants approach flowering or fruiting. For foliage-focused plants specifically, a consistent nitrogen program is what drives dense, rich leaf growth, and reading up on how to grow foliage plants will give you more targeted advice for that category.
Monitor plants weekly for early signs of pests or nutrient issues, which are much easier to address when caught early. Keep growing areas clean, remove dead leaves promptly, and rotate plants under lights periodically so all sides receive even exposure. If you want to go deeper on the underlying biology of what is happening at every stage, how does a plant start its life and grow is a useful companion read that explains the science behind germination, root development, and vegetative growth in plain terms.
The honest truth about growing nursery-style plants at home is that the process is not complicated, but it does require consistency. Small, regular attention beats occasional heroic interventions every time. Get the starting medium right, give plants enough light, water thoughtfully, and harden them off properly before the move outdoors, and you will be producing plants that look like they came from a professional nursery, because they did, yours.
FAQ
Can I root nursery plants in water and skip potting-on
Yes, but only for specific plants and only after they are well-rooted. Many cuttings root in water, but you need to treat the transition carefully because the roots adapt to different oxygen and nutrient conditions. Start in water, then move to a soilless mix once you see strong roots and continued growth, keeping the new pot in bright light (not scorching direct sun) for the first week to reduce stress.
Do seedlings and rooted cuttings both need hardening off
If you are growing from seed, harden off is not optional because indoor light and humidity conditions create soft, thin growth. For cuttings, even rooted ones can be shocked by outdoor wind and sun. A practical test is to start hardening off once new growth has stabilized (not just new root formation), then continue the outdoor exposure ramp until they can tolerate a full afternoon of shade outdoors without wilting.
Should I reuse seed-starting mix when I pot up
Use fresh mix when you up-pot, because old seed-starting or cutting mix breaks down, compacts, and can carry pests or disease forward. You can often salvage containers by sterilizing them, but the medium should be replaced. Also, do not reuse mix that had damping off symptoms, fungus gnats, or persistent mold on the surface.
Will a heat mat help once seeds have sprouted too
Not directly. A heat mat improves germination speed for warm-season crops by warming the seed-starting zone. It can also increase drying, algae, and uneven growth, so you still need a consistent watering routine and a thermometer to confirm root-zone temps stay in the target range.
How do I know when it is time to water seedling trays
Let the top of the mix guide you, not the calendar. Overwatering usually shows up as slow growth, persistent soggy mix, and increased damping-off risk, even if seedlings look alive. Bottom-water, and only water again when the top quarter-inch is barely dry to the touch (deeper than that for larger containers).
My seedlings look pale, how can I tell nitrogen deficiency from other problems
If you see pale yellow-green leaves after the first true leaves, start with a mild feeding rather than immediately adding more fertilizer. If leaves are pale and plants look otherwise weak, nitrogen is often the issue. If leaves show purpling or roots seem cold, prioritize warming the root zone and using a phosphorus-containing starter. Flush with plain water if you suspect burning from too-strong fertilizer.
Can I plant seeds directly into large pots instead of cell trays
Yes, but you need to avoid over-potting and watch fertilizer strength. Larger pots hold more moisture, so seedlings in a big container can stay wet too long. If you must start in larger containers, choose ones with excellent drainage, use the same bottom-watering approach, and reduce watering frequency. For most people, smaller cell trays prevent early mistakes.
When is the right time to pot up from cells
A practical marker is root visibility and readiness, not just height. Pot up when roots are circling the bottom, poking out of drainage holes, or the plant becomes top-heavy and begins to lean. Waiting until it is severely rootbound increases transplant shock and can delay growth for weeks.
What should I do if my plants wilt after transplanting
Try to keep the transition week calm and consistent: transplant on a cloudy or low-stress day, keep light bright but not extreme, water in properly, then avoid frequent moving. If the plant wilts after transplanting, hold off on heavy fertilizing and only water when it is near the “almost wilt” stage, which encourages outward root growth.
Which propagation method works best for my plant, seeds, cuttings, or divisions
Start by matching the plant type to the propagation method, then plan for time. Use seeds for annuals and many vegetables, cuttings for true-to-type traits like some herbs and houseplants, and divisions for clumping perennials. A common mistake is using cuttings or divisions on plants that do not naturally root that way, which leads to wasted effort and inconsistent results.
Do sticky traps alone control fungus gnats
For indoor seedlings, yellow sticky traps help with adult fungus gnats, but they do not solve the larval problem. Combine traps with Bti drenches on a consistent cycle, and reduce breeding by letting the top layer dry between waterings. Also remove standing water under trays and keep airflow around the plants.
What is the biggest mistake people make with hydroponic-style plant rooting
Do not aim for “just a little” root-stagnant water in hydro setups. Oxygenation is the key, so use enough air exchange or flow for the system type and avoid topping off with warm, stagnant water. If roots turn brown and smell sour, treat it as an oxygen and sanitation issue immediately.
How do I prevent leggy seedlings if my light timer is already on
Rotation and airflow help, but the bigger factor is total light exposure. If plants are leaning, the light is usually too far, too short a photoperiod, or weak for the season. Ensure the light runs 14 to 16 hours and is positioned at the correct height, then rotate trays daily so all sides get similar intensity.
When is the best time to apply neem or insecticidal soap to seedlings
No, avoid spraying neem or insecticidal soap on plants directly under strong light. Apply in the evening or when lights are off to reduce leaf burn risk from residues plus heat and light interaction. Also test a small area first if your seedlings are very young or stressed.